That post was designed to be a little bit of a primer into all kinds of output devices, to get you thinking about the kind of output that you want to put on your projects.
Now I'm going to start looking at those output devices in a little more detail.
I'll skip over light bulbs for the moment, other than small signal lamps, (torch bulbs) there aren't a lot of light bulbs that are particularly practical to drive from beginner projects, they don't solder directly to boards (requiring bulb holders), and lots require either mains voltage, or the type of current that's really going to burn you if it goes wrong. -I'll come back to light bulbs as output devices later in the series mostly because it'll be necessary to explain a project that I've written up and am waiting to publish.)
LEDs
LEDs are light emitting diodes.
When you buy an LED you'll normally find that appears in a round shape with a dome top.
the round shape has a small ledge of skirt at the bottom of it and one of the sides of this next to a leg is flat.
You'll also find that when you buy the component that one leg is slightly shorter than the other.
The reason that a diode has these characteristics is:
The round body: this is a nice easy package type to make, however, LEDs to come in all different shapes and sizes.
A look here: http://www.rapidonline.com/Electronic-Components/Optoelectronics will help to show just how many different shapes and sizes!
The reason that LEDs generally have a dome shaped top is so that they can be seen from a variety of different angles. if you look at surface mount LEDs these will generally have flat tops, this is so that light guides, that will carry the light from your board to your front panel can fit on top. (a light guide is like a fibre optic cable, except that it's generally made of clear plastic (not glass) and is quite thick (measured in millimetres not microns), and is rigid.
The reason that there is one leg shorter than the other, and the reason for the flat spot on the case is that these show which leg is negative.
The component is a diode and will only conduct one way (when used within specification). and when the diode is conducting it will let you know by giving out light.
Circuit symbol
The LED is a diode, therefore is shares the same basic symbol as the diodes, (arrow with a flat bar on it) however, as this device emits light there are also two arrows the come out of the diode.
I've only drawn the basic, and now standard symbol for the LED.
however, you may find that there is a circle around the diode symbol, you may find that the arrows have a zig-zag in the middle, the arrow heads may or may not be filled.
Some experiments to try
There are some experiments that you may wish to try.
The first experiment that you should do is either using a power supply with a variable voltage. or using batteries, the examples that I'll use will involve batteries.
For this experiment you're going to need 3AA batteries, (1.5 Volts).
and a 1K resistor (note this is not the same colour bands as shown in the pictures, that's just a picture).
and a 100Ohm resistor
First connect all the batteries end to end inside a battery holder.
Connect the 1k resistor to the battery packs' negative terminal.
Now connect the other leg of the resistor to the negative leg of the LED
Connect the positive leg of the LED to the first battery in the battery pack.
You'll see that the LED doesn't come on at all.
That's because in order to make the LED light up around 2volts is used up. since you don't even have 2 volts this thing won't light up.
so now connect the positive leg of the LED to the second batteries positive terminal.
Now you've got 3v as a supply voltage, so you've got enough to make the LED light up.
but it'll be very dim.
That's there isn't much current flowing through the device, and the amount of current going through the device is proportional to how bright it looks.
To figure out how much current goes through the device,
start with your supply voltage (3v)
take away the forward voltage of the LED (2v) you're left with 1v
Now use Ohms law to determine how much power is flowing through the circuit
1/1000 = 1miliamp (barely enough to even make it work!)
Now swap your 1k resistor for the 100Ohm, resistor.
the LED should appear to be brighter. the reason is that more current is flowing
1v / 100 Ohms = 10milliamps of current flowing.
Now repeat the same steps on the positive voltage of the last battery.
This time the LED should be reasonably bright with the 1k resistor and much brighter with the 100Ohm resistor
this is due to the fact that there is now 4.5v supply. (subtract 2 for the LED) leaves 2.5v being dissipated in the resistor.
2.5/1000 = 2.5milliamps.
Before you substitute the 1k resistor for the 100Ohm resistor be sure to take a look at the resistor from the top (birds eye view looking down on the dome,) and from the side.
Notice how it looks brighter at the top. and as you come down to look at the side view, the light almost disappears completely?
Now put that 100 Ohm resistor in the circuit.
When you put the 100ohm resistor into the circuit
2.5/100 = 25milliamps.
You may now find that either the LED is lit very brightly, or that it sort of lit brightly for a bit, but now doesn't work.
It's not going to have exploded! but it might have failed inside. (if you pump enough power through an LED it will explode though!)
Looking at data sheets
To find out why your LED doesn't work any more we'll have a look at the data sheet.
The data sheet that I'm using for reference is:
http://datasheet.octopart.com/L-53GD-5V-Kingbright-datasheet-578943.pdf
Data sheets give you all kinds of useful information, some are better than others, this one just happens to give a lot of information.
So... lets look at the data sheet and find out why the things that were happening above happened.
why varying the resistor made a difference to the brightness, why varying the voltage made a difference, and why the viewing angle made a difference.
We'll start with the viewing angle:
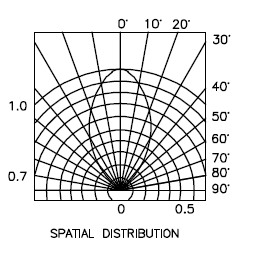
At the end of the data sheet is a diagram called spatial distribution. this diagram is a little confusing at first, but here is now to read it.
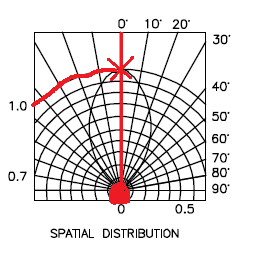
firstly there is a circle at the bottom, you need to imagine that the dome of the LED is inside this circle, now you notice that there is a straight line going up to the marking 0 degrees.
This means that you're looking straight down on the LED.
you can see on the blob shape in the middle touches this 0degree line at the top.
moving along this reaches 1 on the brightness scale.
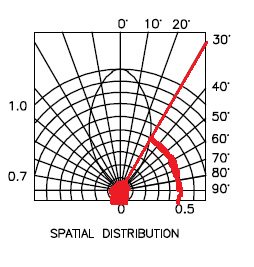
Now if you change your viewing angle to 30degrees, you find that the blob touches a different brightness line, this line is 0.5
This means that at 30degrees that LED is half as bright as when looking at it from the top.
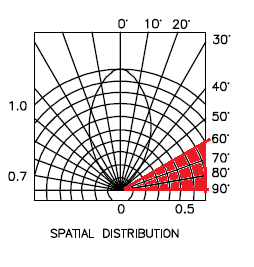
Now if you move anywhere in the 60 - 90degree region, you'll see that the blob doesn't even touch the line, basically, you'd be lucky to see any light at all.
Clearly this is important if you're using the light to indicate anything.
For a start, lets say that your device sits flat at one end of a room, sitting down at the other end of the room your viewing angle will be so shallow that you won't see it at all, OK so this might mean that you just don't know if your cat is inside of outside, no big deal.
Now consider that you're using these LED as brake lights? you're braking in one lane, people behind you can see, but what about people who are only slightly behind and alongside. they can't see that you're braking. what if you try to use these as direction indicators/turn signals? now it's really dangerous as people who need to know your intentions are now given no warning of your intentions.
You might think those LED bulbs are super bright and look cool (and they do) But what if they aren't bright enough? what of the viewing angle? what if they are too bright? this is why (in Europe at least) all car parts have to be E marked, to say that they are tested and approved.
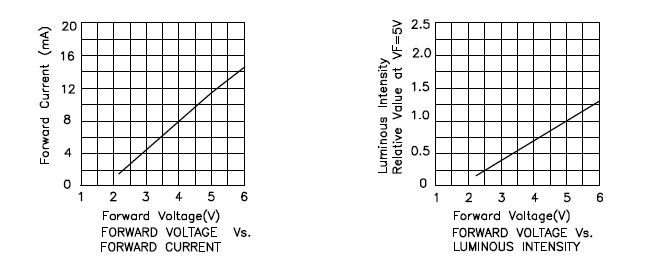
Next let's look at the voltage characteristics:
What these charts are telling us is that as more voltage is applied, the device will get brighter.
And that as more voltage is applied, more current is passed through the device.
This is exactly what we saw in the experiment, as voltage increased, the device got brighter.
As the current limiting resistor was decreased, more current flowed through the device, which was proportional to the voltage "used" in the device, and so the device got brighter.
Next lets look at the maximum ratings:
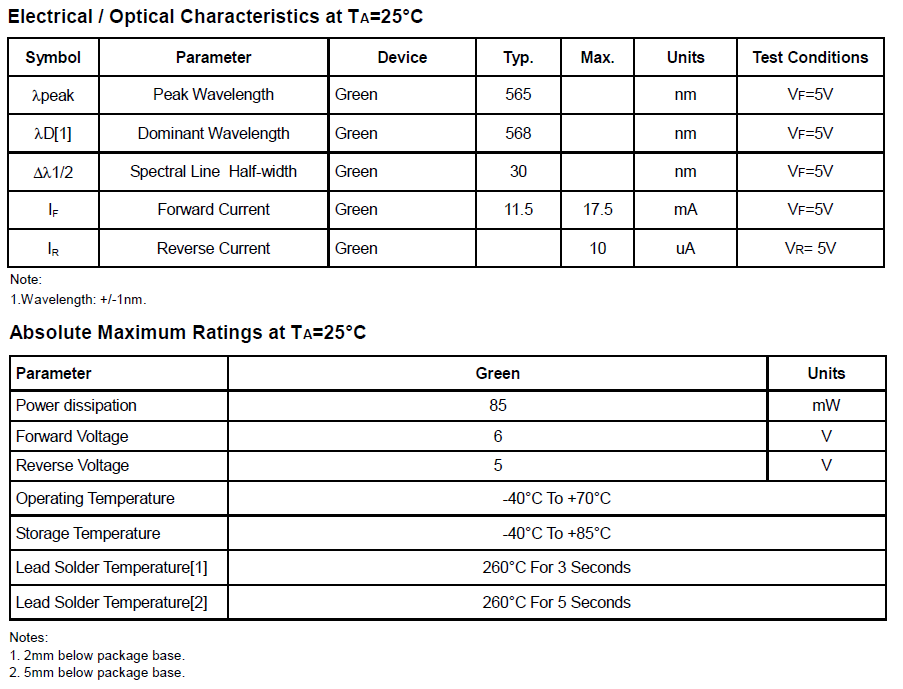
The maximum ratings are there to tell us what conditions we can place on the device, this this case the maximum rating tell us a few things.
Firstly: forward current (max) the maximum current permitted to flow through this device is 17.5mA (when the voltage is 5v)
This means, select your current limiting resistor such that only this much current can flow.
Then we have absolute maximum ratings:
maximum power: 85mW this means select your input voltage, and current limiting resistor such that less power than this is able to flow, (for lower voltages you can use lower value resistors.)
The absolute maximum voltage rating is 6v, putting more voltage than this through the device will make it stop work, (possibly in a spectacular way.)
Last, but not least we have temperature ratings.
now these are important if you're planning on making a project that'll go in a particular place.
With temperatures of -40 - 60 degrees Celsius, these devices aren't going to be suitable for making stuff that you plan to use in the Antarctic, nor will they be suitable for devices that are left in the baking hot equatorial sunshine.
But lastly, they tell you how long you can hold a soldering iron on the leads before the heat will damage the component. this goes back to the Electronics workbench shopping list of equipment.
If you buy a low power soldering iron, you will have to wait longer for things to heat up. That's because it take the heating element longer to heat up, in the same way that a 2000w kettle boils faster than a 1000w, a 40W soldering iron heats up the components quicker than a 15 or 20Watt one, meaning that you don't have to hold it on the work as long. meaning that you're less likely to damage the components.


No comments:
Post a Comment