This was a little bit of fun to give my nephew something nice for Christmas. I thought that it might be nice if he got a nice sign for his bedroom door with his name on it.
Rather than go out to the garage and get busy with the jigsaw/sandpaper and paint like I once would have I decided that I'd have a go at printing some letters that could be stuck to a door.
So this is a step by step guide on how to create letters and a door sign, from design to creation.
Modeling
First you're going to need 3d modelling software, this blog post will explain how to use the Creo elements software since that's pretty good and free.
Open the package, as before you see your work plane and nothing else,
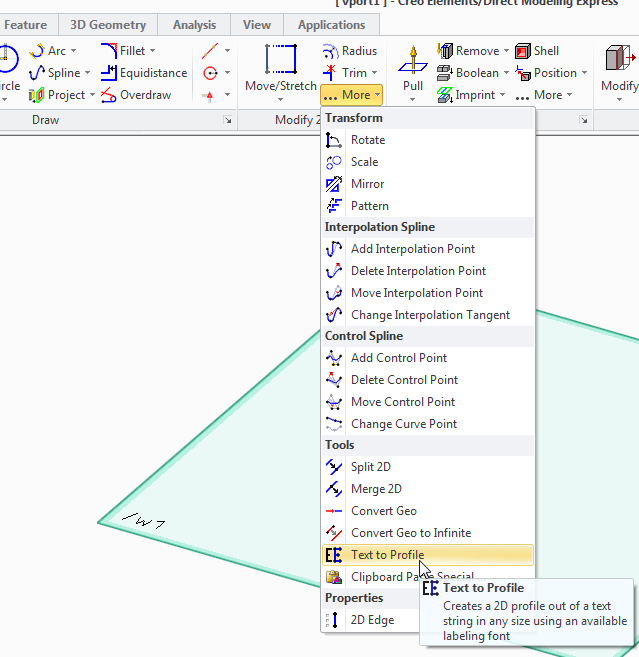
in the 2d toolbox click on the more button, and then select "text to profile" tool.
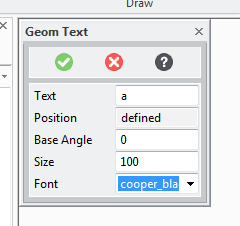
A box will now appear where you can enter the letters that you want to print.
As an example I've put the letter a
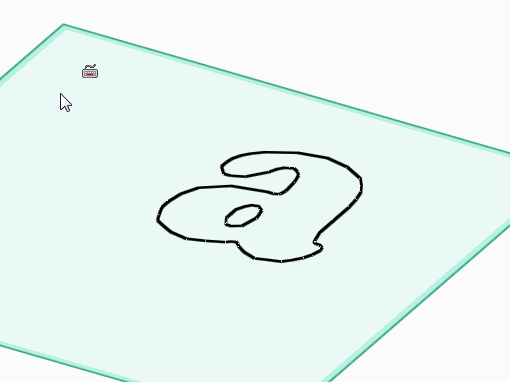
Now you press the position button and select where in the work plane you want the letters to appear.
(click somewhere in the middle)
Now you need to define the angle that the letters will be at (zero is probably fine!) the size, -I want them large for sign so I choose 100, and the font.
I've chosen cooper black as the font. it's not the worlds fanciest font, but it is pretty good for printing, there are no weird angles etc no parts that will end up impossibly thin or unprintable.
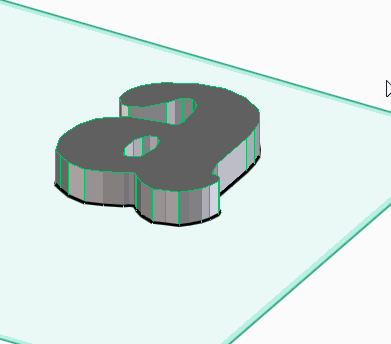
Once the letter is on the page we're going to need to give it some depth.
So use the pull tool:
And select the pull width to decide how fat you want the letters to be:
Now delete the work plane ans select save.
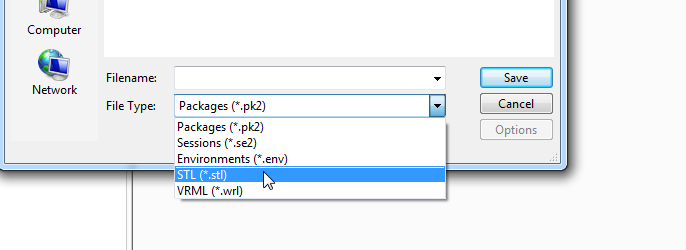
change the file type to STL
Now select to save All Objects using the button at the top, (that's only part 1)
type a file name and press save.
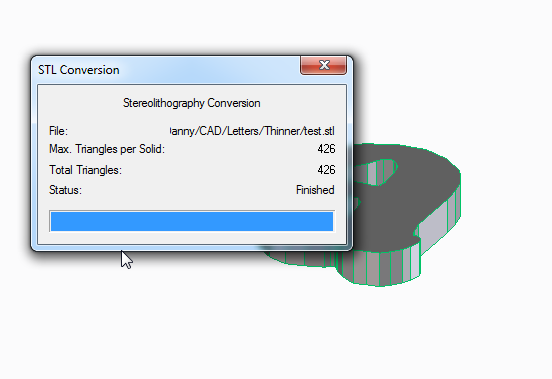
You can close the STL conversion box that appears.
Slicing
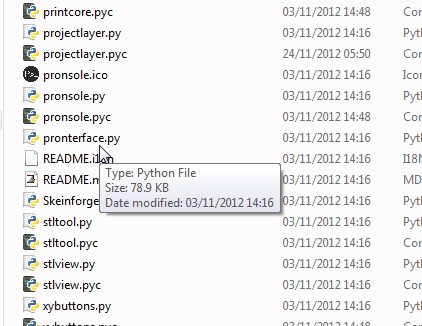
Now launch pronterface by running the pronterface.py file
you now need to access the model slicer.
select settings, slicing settings
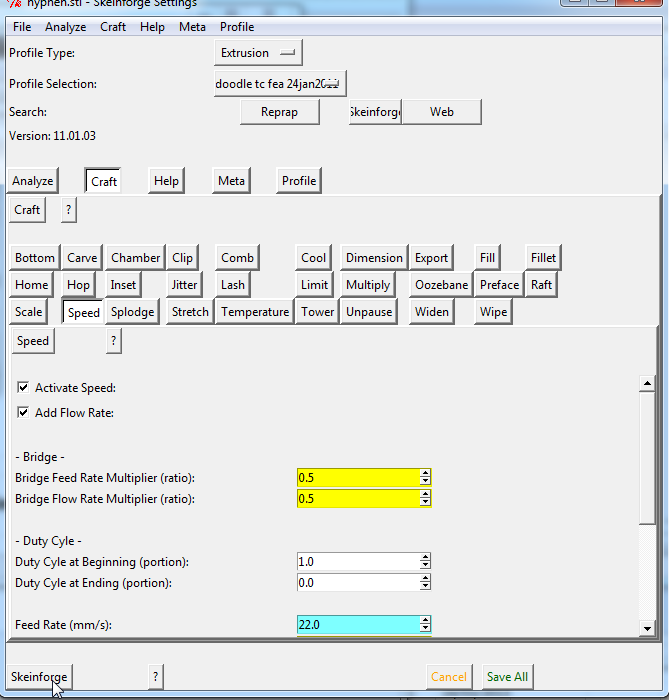
This opens a new window called skeinforge,
click on the skeinforge button at the bottom to open your model
Select your STL file and press open.
Now Wait...
...
...
Two new windows will appear, these describe in a colourful way how the models will be built. you can close these windows now.
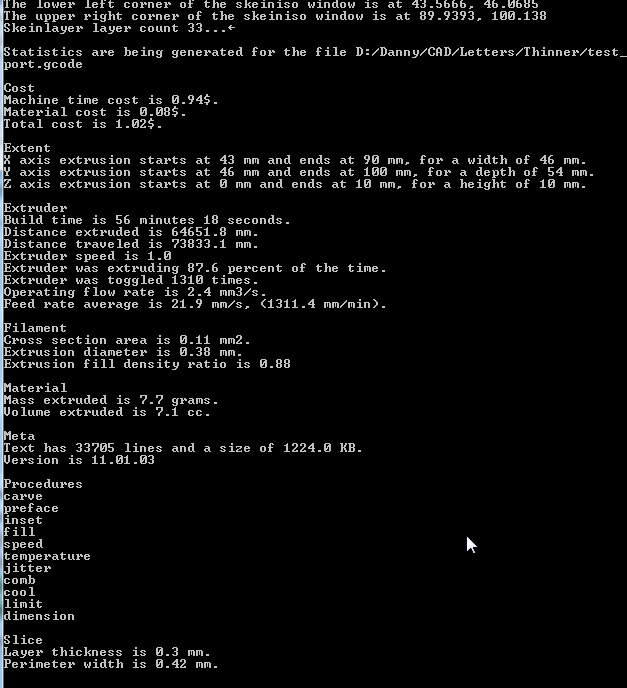
Now if you look at the python command line window that is open you can find some interesting things about your print that's going to happen, (like how much material will be used, how long it might take to print etc.
Printing
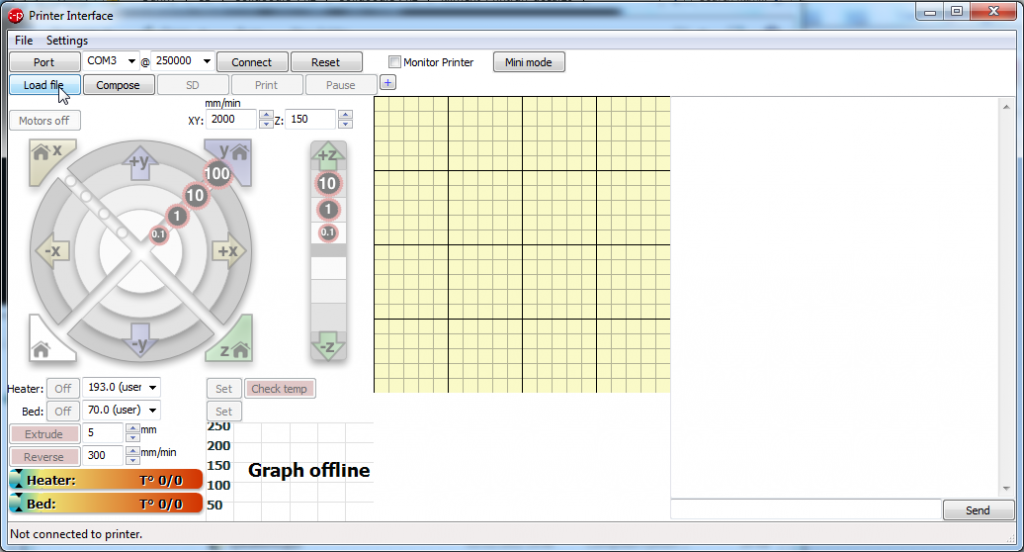
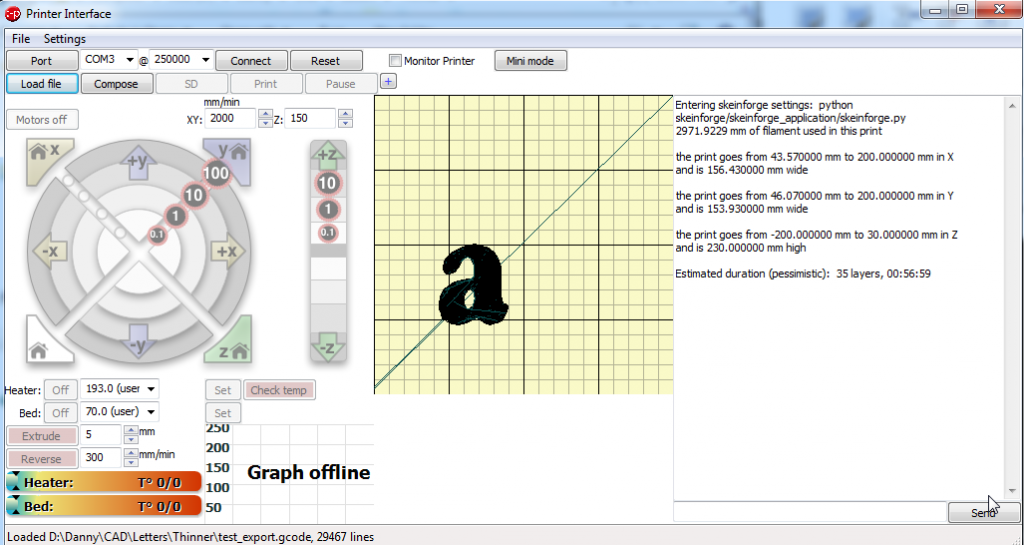
Now you should be looking at the pronterface screen again, select load file and open your file:
You now get a picture showing you how your file will look and where it will be printed on the bed.
Make sure that you have the correct com port set, and press connect.
Check the box that says monitor printer (in-between reset and mini mode)
now press set on the bed temperature.
watch as the actual temperature line ramps up to meet the target line.
When the bed has heated up, click set on the heater button, watch as the nozzle comes up to temperature.
When both the bed and the nozzle are at printing temperature then press the print button, then watch your printer make the letters for the door sign.
Monday, December 31, 2012
Monday, December 24, 2012
Coding lessons: Network client software
So, in the last coding lesson post I covered how to make a simple message server.
The message that it sent only said Hello, but it doesn't take too much imagination to realise that you could make this read data from a text file, or make it get some system parameters, or any number of things. perhaps the weather from a weather station.
For now we'll stick with the simple hello message.
We tested the server program by running telnet and connecting to the server that was running on port 66.
Now we're going to create some client software to connect to the server and get our message.
Again this is pretty simple proof of concept type software so don't get too excited about the code samples that I'm creating, on the other hand do imagine the possibilities of what you can create with these building blocks, and do get excited about that!
so as last time I'm going to step through the code roughly explaining what each line does.
#include <stdio.h>
#include <stdlib.h>
#include <unistd.h>
#include <string.h>
#include <sys/types.h>
#include <sys/socket.h>
#include <netinet/in.h>
#include <netdb.h>
void error(const char *msg)
{
perror(msg);
exit(0);
}
First as before we set-up our required header files, and that place to go to in the case of a terminal error.
then we start our program.
int main(int argc, char *argv[])
{
The first thing that you should notice is that something is different, what is argc and argv?
They are simple command line arguments.
The idea here is that we don't know where our software will run, it's all very well saying that the server is always going to be called "my_home_server", but what abuot when it's not. what about when it's out on the internet and you need to contact it by name, or what about when you change the host that the server software runs on. you don't want to have to compile a new binary for every host that you want to connect to.
so we're going to accept arguments about what host to connect to from the command line when this program is run.
Argc is argument count, Argv is the argument values it's an array of values, I.e. what we write after the program name
int sockfd, portno, n;
struct sockaddr_in serv_addr;
struct hostent *server;
char buffer[256];
next (as before) we set up all the little bits of data variables we'll use in the program.
Now as we are specifying the host name to connect to as a command line argument, we need to check if there are command line arguments.
if (argc < 2) {
fprintf(stderr,"You Must specify a hostname: usage %s hostname\n", argv[0]);
exit(0);
}
if the program runs on it's own with no arguments then argc = 1 -just the program name,
we're running the software in the format "program_name hostname" so there are two arguments.
We also can see what the value of that first argument is, as it's argv[0], it's the program name, in this way even if we rename the executable, this help message is going to be correct.
portno = 66;
Once again we specify the ports that we're going to use, (if you changed from port 66 in the server software part, remember to change this again!)
sockfd = socket(AF_INET, SOCK_STREAM, 0);
if (sockfd < 0)
error("ERROR opening socket");
And we setup our socket the same as we did on the server, a simple TCP/IP stream
server = gethostbyname(argv[1]);
if (server == NULL) {
fprintf(stderr,"ERROR, no such host\n");
exit(0);
}
Next we get the address of the server that we're going to connect to.
this uses a special function called gethostbyname that enables us to have literal addresses (like www.google.com) as the host that we want to connect to. We check to make sure that the address exists, if it doesn't the gethostbyname function returns nothing. and if this happens how are we going to open a socket to nowhere? -we can't so we throw and error message and close the program.
bzero((char *) &serv_addr, sizeof(serv_addr));
serv_addr.sin_family = AF_INET;
bcopy((char *)server->h_addr,
(char *)&serv_addr.sin_addr.s_addr,
server->h_length);
serv_addr.sin_port = htons(portno);
then we setup out port using roughly the same sort of instructions as we used for the server port. specifying our protocols, where it's going to connect to, and the port number that the socket will be bound to.
if (connect(sockfd,(struct sockaddr *) &serv_addr,sizeof(serv_addr)) < 0)
error("ERROR connecting");
In the server example the next thing we did was bind the port, and set it to listen.
this is where client software dramatically differs here. rather than binding the port to listen, we now tell this port to connect.
(and obviously trap an error if this fails)
This software isn't just sitting and waiting this software is activly going out and connectting.
bzero(buffer,256);
So the first thing we do now is zero our buffer, basically get rid of any data in it.
you remember how with files if we opened a file for reading and writing with the pointer at the start of a file.
if the file said
Goodbye
and we wanted to write
Hello
we'd end up with
Helloye
As the second string doesn't completely replace the first.
Same thing here, and we don't want to display garbage to the user, so we clear out the buffer first.
Then we read from the socket, (in just the same way as we read from files, (except using read, not fread.
n = read(sockfd,buffer,255);
if (n < 0)
error("ERROR reading from socket");
and if we can't read from the socket, obviously we give an error!
but if we can read from the socket then we display what we received from that socket by printing the buffer to the screen.
printf("%s\n",buffer);
close(sockfd);
return 0;
}
then we close the socket and exit gracefully.
complete code is here:
#include <stdio.h>
#include <stdlib.h>
#include <unistd.h>
#include <string.h>
#include <sys/types.h>
#include <sys/socket.h>
#include <netinet/in.h>
#include <netdb.h>
void error(const char *msg)
{
perror(msg);
exit(0);
}
int main(int argc, char *argv[])
{
int sockfd, portno, n;
struct sockaddr_in serv_addr;
struct hostent *server;
char buffer[256];
if (argc < 2) {
fprintf(stderr,"You Must specify a hostname: usage %s hostname\n", argv[0]);
exit(0);
}
portno = 66;
sockfd = socket(AF_INET, SOCK_STREAM, 0);
if (sockfd < 0)
error("ERROR opening socket");
server = gethostbyname(argv[1]);
if (server == NULL) {
fprintf(stderr,"ERROR, no such host\n");
exit(0);
}
bzero((char *) &serv_addr, sizeof(serv_addr));
serv_addr.sin_family = AF_INET;
bcopy((char *)server->h_addr,
(char *)&serv_addr.sin_addr.s_addr,
server->h_length);
serv_addr.sin_port = htons(portno);
if (connect(sockfd,(struct sockaddr *) &serv_addr,sizeof(serv_addr)) < 0)
error("ERROR connecting");
bzero(buffer,256);
n = read(sockfd,buffer,255);
if (n < 0)
error("ERROR reading from socket");
printf("%s\n",buffer);
close(sockfd);
return 0;
}
this code is compiled on a linux system with the command.
gcc -o client client.c
then you can run the software with the command
./client localhost
(where the server software is also running on your computer)
Monday, December 17, 2012
Glass bed upgrade for Solidoodle
So I'm beinging to find that I'm habing some issues with my solidoodle, the issues are that the aluminium plate that acts as the bed is warped.
This means thatI have intermittent issues with the first layers sticking to the beds, in some areas of the bed the bed is too close to the extruder and a short fat line of filament is squashed onto the bed.
In other areas the extrusion comes out of the extruder and is almost gently placed on the bed, keeping it's round shape and not sticking very well at all!
Coupled with this I'm finding that the heat distribution of a central power resistor just screwed to the bottom of the bed is meaning that the centre of the bed is very hot, (and causes the first few layers to melt and deform, whilst the outside edges are not at all hot, so the extruded plastic has trouble sticking.
Many people have started putting a sheet of glass on top of their aluminum beds and holding it with binder clips to ensure that it doesn't move.
I've decided that I'm going to replace the warped bed completely, and try to get more even heating by using some nichrome wire to heat the bed all over.
You can get heat proof glass from a glass merchant, sounds silly, but look for one that specialises in glass for home made wood burning stoves.
As a guide to price, I got a piece 7" x 7" 1/4" thick £13 (GBP) that was the price to get this measures and cut
The rest of this post is my new glass bed.
To start remove the glass that you've either clipped or taped to the aluminium bed, (for those wanting to avoid the hot end bumping into binder clips, use 1/4" kapton to stick down the glass:

remove the kapton, (you need to get to the screws:
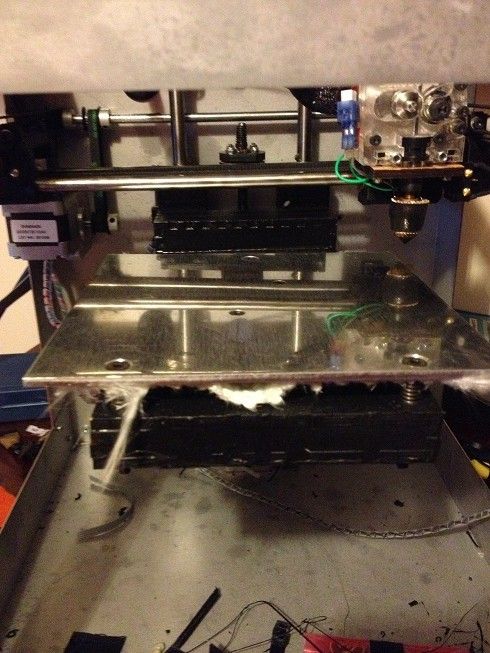
Using a "china marker" go ask someone working on a deli counter to get you one, mark the edges of where the glass can comfortably sit:
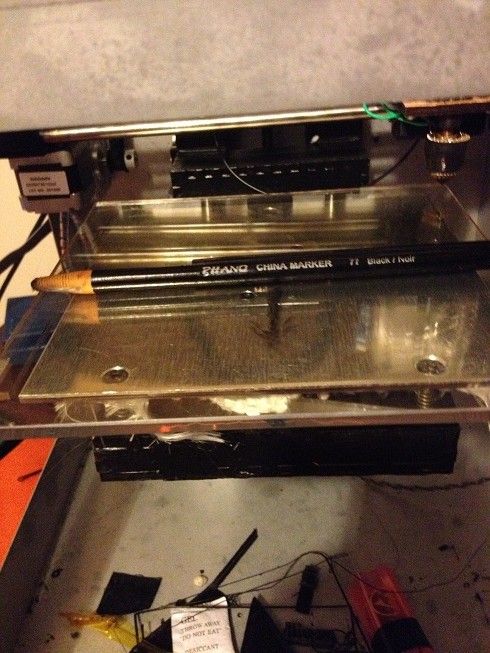
You won't need to do this if you're using a 6x6 piece of glass, but of you want to use all the extents of travel of the hotend, then you'll need to make sure that the steppers are cleared

next unscrew the aluminium. remove the heat shield/insulation from the back.
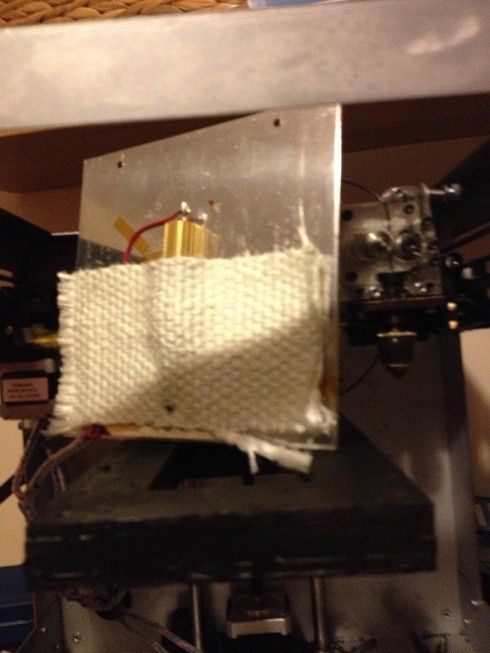
now remove the resistor and thermistor:


now the bed is completely removed
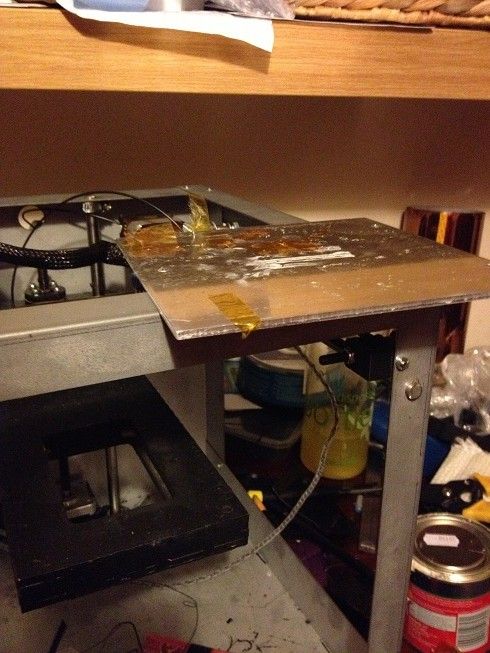
Next using the marks on the glass put the bed under the glass and mark the screw holes.
using a glass bit drill the glass, (either 4mm or 5mm) and countersink the holes.

now take three 9ohm lengths of nichrome wire, and a 1/4" roll of kapton, loop the wire over the underside of the bed using the 1/4" kapton to hold it to the glass

Join the ends together to make a 3ohm resistor evenly spread over the whole bed,
tape the thermistor to the bed in a spot where it's an even distance from any length of nichrome.
join the red wires where the resistor was attached to the ends of the nichrome
and replace the heat shield
Level the bed...
next, because glass isnt all that sticky, you'll need kapton
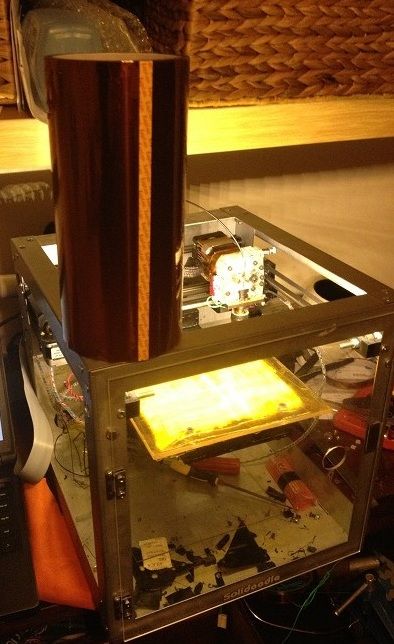
a nice big roll will do!
lay the kapton over the bed, stick one side first, use a plastic squeegee (you can print this!) to push the kapton onto the bed without airbubbles.
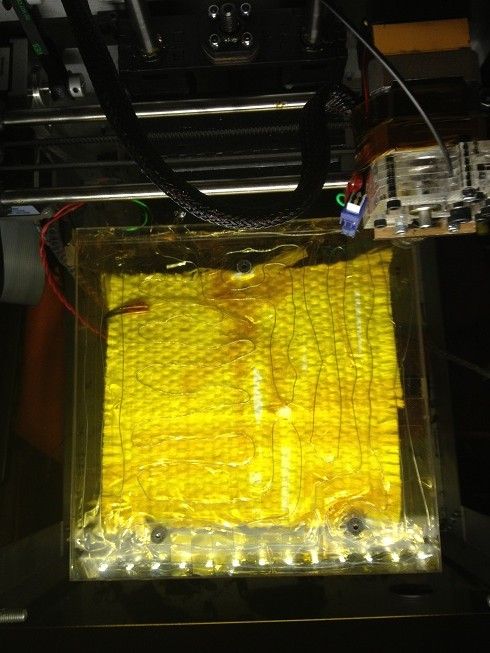
Done

Printing on an all glass bed.

As a bit of a bonus, the bed takes the same time to heat up, but rather than getting a middle of spot of around 90 degrees with cooler edges, (so the middle of a print squidges and the edges lift, I can print with a bed temperature of around 70Degrees (and have confirmed the machine readings with a thermocouple probe)
I've also increased the area that I can print on by almost a full inch in the x and y planes.
This means thatI have intermittent issues with the first layers sticking to the beds, in some areas of the bed the bed is too close to the extruder and a short fat line of filament is squashed onto the bed.
In other areas the extrusion comes out of the extruder and is almost gently placed on the bed, keeping it's round shape and not sticking very well at all!
Coupled with this I'm finding that the heat distribution of a central power resistor just screwed to the bottom of the bed is meaning that the centre of the bed is very hot, (and causes the first few layers to melt and deform, whilst the outside edges are not at all hot, so the extruded plastic has trouble sticking.
Many people have started putting a sheet of glass on top of their aluminum beds and holding it with binder clips to ensure that it doesn't move.
I've decided that I'm going to replace the warped bed completely, and try to get more even heating by using some nichrome wire to heat the bed all over.
You can get heat proof glass from a glass merchant, sounds silly, but look for one that specialises in glass for home made wood burning stoves.
As a guide to price, I got a piece 7" x 7" 1/4" thick £13 (GBP) that was the price to get this measures and cut
The rest of this post is my new glass bed.
To start remove the glass that you've either clipped or taped to the aluminium bed, (for those wanting to avoid the hot end bumping into binder clips, use 1/4" kapton to stick down the glass:

remove the kapton, (you need to get to the screws:

Using a "china marker" go ask someone working on a deli counter to get you one, mark the edges of where the glass can comfortably sit:

You won't need to do this if you're using a 6x6 piece of glass, but of you want to use all the extents of travel of the hotend, then you'll need to make sure that the steppers are cleared

next unscrew the aluminium. remove the heat shield/insulation from the back.

now remove the resistor and thermistor:


now the bed is completely removed

Next using the marks on the glass put the bed under the glass and mark the screw holes.
using a glass bit drill the glass, (either 4mm or 5mm) and countersink the holes.

now take three 9ohm lengths of nichrome wire, and a 1/4" roll of kapton, loop the wire over the underside of the bed using the 1/4" kapton to hold it to the glass

Join the ends together to make a 3ohm resistor evenly spread over the whole bed,
tape the thermistor to the bed in a spot where it's an even distance from any length of nichrome.
join the red wires where the resistor was attached to the ends of the nichrome
and replace the heat shield
Level the bed...
next, because glass isnt all that sticky, you'll need kapton

a nice big roll will do!
lay the kapton over the bed, stick one side first, use a plastic squeegee (you can print this!) to push the kapton onto the bed without airbubbles.

Done

Printing on an all glass bed.

As a bit of a bonus, the bed takes the same time to heat up, but rather than getting a middle of spot of around 90 degrees with cooler edges, (so the middle of a print squidges and the edges lift, I can print with a bed temperature of around 70Degrees (and have confirmed the machine readings with a thermocouple probe)
I've also increased the area that I can print on by almost a full inch in the x and y planes.
Monday, December 10, 2012
Coding lessons: Socket servers
So in the last lesson I looked at socket servers, I touched on a problem with these lessons that will now become very apparent.
Windows Vs. the world,
So, there is a problem here, windows sockets work different to the way that practically everyone else does it. I might come back to winsock later. and certainly if you want to learn how to program network aware programs on windows then those lessons will be useful. the changes are not insurmountable, but the code is not directly portable
The lessons that I'm writing here apply to Linux (every distribution to date) Unix, BSD Unix, Solaris, and I think MacOS.
Right now if you're reading this lesson thinking that you only have access to windows, then I suggest that you download VMware player, it's free and lets you host virtual machines on your PC, or Microsoft's virtual PC, or any other virtualisation software out there.
Then download a free copy of Linux to go with it. I'll leave it to you to decide which copy of Linux.
But I recommend Debian Linux, I wouldn't suggest using it as a desktop OS, (there are much more polished distributions based on Debian,) so I'd recommend it more based on what it forces you to learn more than because it's a really comfortable OS for a beginner to use.
Anyway, go somewhere else to figure out how to use Linux, when you've finished with learning how to do that, come back and learn how to make server software.
Libraries
There is going to be a whole heap of headers included in this program. these are needed because of the types of data that we're dealing with, and the sorts of data that we need, (that these libraries can provide).
Functions
We're going to be using the error function that was created in the last post so that we can provide some helpful errors in case of failure.
Program
So I figure the best way to do this is to go through the program line by line explaining what each line/block is doing then I'll paste the whole code at the end.
#include <stdio.h>
#include <stdlib.h>
#include <string.h>
#include <unistd.h>
#include <sys/types.h>
#include <sys/socket.h>
#include <netinet/in.h>
So first we've included all the libraries that we're going to use, it's a reasonably large list! I won't go through what every library does, it'd be pointless without the context provided by showing the code later.
void error(const char *msg)
{
perror(msg);
exit(1);
}
We setup our error function just as we did in the last lesson.
Then onto our main program.
int main()
{
int n, sockfd, newsockfd, portno;
First we're setting up integers that are going to be used for some error checking, we also set-up an integer to decide what port we want to open the server program on.
socklen_t clilen;
This line is declaring a variable called clien, it's data type is socklen_t.
tis is a bit weird, so far we've only looked at variable that are ints, chars, floats etc, socklen_t is a new variable type it's defined in the socket.h header file that we included.
struct sockaddr_in serv_addr, cli_addr;
now we're setting up a structured data type called sockaddr_in, this struct is defined in the library file #include <netinet/in.h>
sockfd = socket(AF_INET, SOCK_STREAM, 0);
Now we get to the meat of the program, setting up a socket.
to set-up a socket first we use a return variable, (in this case the integer sockfd) then we use the socket function.
the socket function has three arguments.
the first of which is AF.
There are lots of AF types, (these are all defined in the header file socket.h) we're defining the socket as AF_INET this means internet protocol version 4. (notice I didn't say TCP/IP! just IP at this point).
we could also use AF_IPX to setup an IPX/SPX connecttion, or AF_APPLETALK to setup a socket for use with the apple talk protocol AF_INET6 for use with IP6 AF_ROUTE for using the software with the internet routing protocol.
(look in socket.h for an extensive list)
The next argument that socket function needs is instructions as to the type of socket it's going to be, in this case we say it'll be a stream, and we use it just like file streams, but we could have said it'll be raw.
and the final piece of information is the protocol used,
in this case we're setting it to 0, this means use the default type for the family and type of socket, (AF_INET and SCOK_STREAM default protocol is TCP) but we could always specify a different protocol.
Next we need to check if we're able to create a socket at all
if (sockfd < 0)
error("ERROR opening socket");
we check that sockfd (the returned integer from the socket function is greater than zero, (as a 0 or negative number would specify an error, -if there is an error the program is useless so we break off into our error routine.
if there is no error we carry on through the program.
bzero((char *) &serv_addr, sizeof(serv_addr));
Bzero is a function defined in the header string.h, it writes zeros to every location in the char array that makes up a string.
portno = 66;
serv_addr.sin_family = AF_INET;
serv_addr.sin_addr.s_addr = INADDR_ANY;
serv_addr.sin_port = htons(portno);
Now we need to set-up the data that's used in the structs for our socket creation.
again we're setting the socket family at AF_INET
Most machines will have more than one interface, this line :
serv_addr.sin_addr.s_addr = INADDR_ANY;
is telling the struct what address it will bind to, in this case the answer is any address
Then we set-up out port number, we do this using the function htons.
Htons is simply a function that converts the order or numbers.
the reason that it does this is because there are some machines on the internet that use big endian byte order, and some that use little endian byte order
If you consider how to store variables.
lets say we have a 8 bit number 00101101, and we need to store this 8 bit number, in a memory space that's only 2 bits wide.
we'll use 4 memory spaces, we'll number the memory spaces 1 - 4 with big endian number storage
1, - 00
2, - 10
3, - 11
4, - 01
so you see we read the most significant bits from memory location 1, then work through the memory locations until we reach the least significant bit.
little endian system store the least significant bit in the lowest addressed memory location. a map of the memory in this case would look like this.
1, - 01
2, - 10
3, - 11
4, - 01
the internet protocol specifies that big endian is the correct order, that means that anyone using a machine with an intel processor (for example) has to re-order the words that they speak in to devices on the internet.
if (bind(sockfd, (struct sockaddr *) &serv_addr,
sizeof(serv_addr)) < 0)
error("ERROR on binding");
so next we say if (this stuff) <0 br="" error="" function.="" so="" to="">we're binding our socket here if it fails we want to break out to our error function, we could have written:
ec = sockfd, (struct sockaddr *) & serv....... [so on]
if (ec < 0) { error(); }
but it takes a bit less space to combine it all on one line.]
so we're calling the bind function, this opens the socket and binds it to a port. we pass out serv_addr struct that contains all the data about the port and address etc to the bind function.
listen(sockfd,5);
Next we tell the socket to enter listen mode.
Now the socket is sitting patiently waiting for a client to make a connection.
Once a client connects, (as described in an earlier post) the client will have an address and a port for communications.
now we set-up a new socket for communication so that our existing socket can handover and continue to listen for new connections.
clilen = sizeof(cli_addr);
newsockfd = accept(sockfd,
(struct sockaddr *) &cli_addr,
&clilen);
just as we setup our listening socket we set-up our communication socket.
if (newsockfd < 0)
error("ERROR on accept");
and we check that it's opened properly, if not they we'll break out of the main routine to our error function.
n = write(newsockfd,"Hello",5);
Now we'll send the client a message.
again we say n = some function so that we can see what that function returned, zero or less is error.
if (n < 0) error("ERROR writing to socket");
which again means break out to the error routine.
finally we need to close the sockets, just as we close files when we're done reading and writing.
close(newsockfd);
close(sockfd);
return 0;
}
here's the whole code:
#include <stdio.h>
#include <stdlib.h>
#include <string.h>
#include <unistd.h>
#include <sys/types.h>
#include <sys/socket.h>
#include <netinet/in.h>
void error(const char *msg)
{
perror(msg);
exit(1);
}
int main()
{
int n, sockfd, newsockfd, portno;
socklen_t clilen;
struct sockaddr_in serv_addr, cli_addr;
sockfd = socket(AF_INET, SOCK_STREAM, 0);
if (sockfd < 0)
error("ERROR opening socket");
bzero((char *) &serv_addr, sizeof(serv_addr));
portno = 66;
serv_addr.sin_family = AF_INET;
serv_addr.sin_addr.s_addr = INADDR_ANY;
serv_addr.sin_port = htons(portno);
if (bind(sockfd, (struct sockaddr *) &serv_addr,
sizeof(serv_addr)) < 0)
error("ERROR on binding");
listen(sockfd,5);
clilen = sizeof(cli_addr);
newsockfd = accept(sockfd,
(struct sockaddr *) &cli_addr,
&clilen);
if (newsockfd < 0)
error("ERROR on accept");
n = write(newsockfd,"Hello",5);
if (n < 0) error("ERROR writing to socket");
close(newsockfd);
close(sockfd);
return 0;
}
when compiled on a linux system using gcc
(gcc -o server server.c)
a new binary file called server is created.
You should run this with the command ./server
(you may need to use sudo)
then you can connect to the server using telnet
c:\>telnet server 66
Trying 127.0.0.1...
Connected to localhost.
Escape character is '^]'.
HelloConnection closed by foreign host.
you can see that the server is working, it's listening, it's accepting connections, displaying the string, and then closing the socket. (just as it was programmed to do so!)
Monday, December 03, 2012
coding lesson: error codes
So I was expecting to be posting a lesson on how to make a server program that listens for a connection and then responds to a connection by sending a message to the client.
But in order to reduce the amount of code in that program first I'm going to introduce a way or outputting errors.
A program could fail in a few ways, I guess out of memory etc, but it can be difficult to trap those errors in a program, what's more the system knows what the error is, like I can't open a listening port because the port is already in use.
So to trap these errors and report useful information we use a call to a function found in a standard header file:
The standard header is stdlib.h that is included in the same way as stdio.h
then we are able to call a function called perror, tell it how we want to message to start, then the function will add what the system knows the error as, and print that to the screen.
#include <stdio.h>
#include <stdlib.h>
int main()
{
perror("error_one");
printf(\r\n"program running");
return 0;
}
when this program runs it prints the error message (no error) then prints a message to say that the program is still running.
Some errors are going to mean that we just can't go on. For example in the
creation of a server program that's going to listen on a network socket, if you can't create a socket, then the program is pretty useless and should terminate.
#include <stdio.h>
#include <stdlib.h>
void error(const char *msg)
{
perror(msg);
exit(1);
}
int main()
{
perror("error_one");
printf(\r\n"program running");
error("error_two");
printf(\r\n"program running");
return 0;
}
When this is run you can see that the message program running is only displayed once.
That's because when we call error there is a function called exit.
This does exactly what it says on the tin...
we can now call perror for non fatal errors saying hey you might want to fix this, any fatal errors now we can let the user know what's wrong and exist the program in a good way
Subscribe to:
Posts (Atom)
