Monday, June 25, 2012

Electronics Lessons: The 555

The 555 is a generic name given to a series of 8 pin chip packages, since 555 is the main code, (which may be NE555 SE555, SE555T which are suitable for different applications -read the data sheet to find out why)

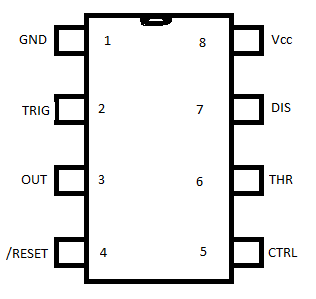
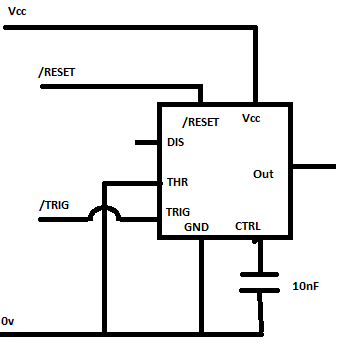
The 555 chip is a timer, it comes in a little black chip form and has 8 legs, the pin outs of the 555 chip are as such:


The functions of the pins are:
1: GND: this is the ground pin and should be connected to the zero volts rail in the circuit.
2: TRIG: the output pin will switch to high when the voltage on this pin goes below 0.5 x Vctrl (the voltage applied to a different pin), If the CTRL pin isn't connected then the output switches high when this TRIG pin goes below above 0.3 x Vcc
3: OUT : this is the out put pin, it's either high or low, there is no middle ground on this one.
4: /RESET: you reset the timing interval with this pin, that slash before the name is not a mistake, it signifies a logical NOT operator, you don't reset this device by adding a voltage to this pin, you reset this device by attaching this pin to zero volts.
5: CTRL: this pin controls the internal voltage divider in the package.
6: THR: this pin controls the output turn off, the output voltage will fall then the voltage applied to the THR pin is greater that the voltage applied to the CTRL pin.
7: DIS: this is called the "open collector output" it can be used to discharge a capacity between the intervals, and is in phase with the output
8: Vcc: the positive supply power pin.


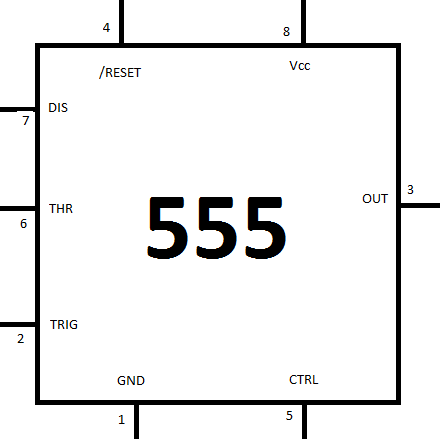
The circuit symbol is a box, with 555 written in the box, there is no set place for wires to come out of that box, and no particular set order that the wires should come out. just draw a box, make a connection to it, and label that connection.
In most circuit diagrams you will find that the RESET and Vcc pin are next to each other (at the top), GND and CTRL are next to each other (at the bottom) DIS, THR and TRIG appear stacked on the left hand side, and the OUT pin appears on the right hand sice of the package on it's own.


So the 555 is a primarily a timer, in that it can produce timed pulses predictable and repeatable.

lets start looking.

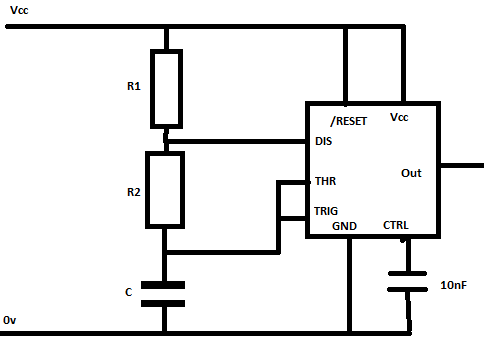
Astable
As a way to remember the states it might be easier to this of astable as unstable! it's not really unstable, (that would conjure up ideas that you didn't know what it would do next) but that the output can't decide exactly where it wants to be.
it puts out a continuous series of pulses with a frequency that is set buy a resistor/capacity network.

The formula for calculating the frequency is

F = 1/(0.693 x C x (R1 + (2 x R2)))


in addition the formula for calculating the "on" time where the output is high is given by the equation:
Ton= 0.693 x (R1 + R2) xC

and the off time is configured as
Toff = 0.693 x R2 x C

So T is Ton + Toff, (that's the total amount of time that the wave form last in a cycle)
and the frequency is defined as F = 1/T (and T = 1/F).

0.693 might look a little weird, but it's the natural log of 2

Ordinarily we actually want to approach this the other way around, we don't generally look at a circuit and say, I see a 555, I see it's connected for astable operation, I see the RC network, now I wonder what the frequency is.

No, ordinarily we are designing a circuit and we say.
I want a specific output wave, and we work from there.

So lets start to show how the design process works:

Our design parameters:
I want a wave form where:
I want a 1000Hz (1KHz) frequency
This means that T = 1/f so T = 0.001 Seconds

I want the wave form to have roughly equal Ton and Toff times, (though since Ton includes R1 and Toff does not, Ton will always be 0.693 x R1 x C seconds longer that Toff

Since we can't have Ton and Toff the same, let's make them pretty close

Ton = 0.0005s (or as close as we can get) Ton = 0.0005001s
Toff = 0.0005s (or as close as we can get) Toff = 0.0004999s (they are within 1000 microseconds)
T = 1ms (that's 0.001 seconds)

So we know that as we want Ton and Toff to be as close to symmetrical as possible, we want R1 to be as small as we can feasibly make the value, without going so small as to upset the overall balance of the circuit. (setting this too low would lead to too much current being drawn) and far from ensuring 50% duty cycle actually makes the duty cycle much less than 50% due to some very weird
We also have equations involving R1 R2 and C for getting values of frequency, we can spend an eternity working on these equations as we alter very slightly one parameter the other two parameters can change. Therefore we should settle on one parameter as soon as we possibly can

The parameter that we need to decide on is what capacitor we'll be using. it makes sense to chose the capacitor, whilst you can for networks of capacitors to get approximate values, it is not convenient, it is far better to chose a capacitor value, and if you then require some weird resistance make a network of resistors to get there!

The value that we'll use for C can be based on what you have.

To get some ball park figures for what C will need to end up at.
so for values of Toff
0.5 seconds (1Hz) C would be in the region of 1uF
0.005 seconds (1Khz) C will be in the region of 1nF
0.000005 seconds (1Mhz) C will be in the region of 1pF

So to recap the equations:
F = 1/(0.693 x C x (R1 + (2 x R2))) = 1/T = 1/Ton + Toff

Ton= 0.693 x (R1 + R2) xC
Toff = 0.693 x R2 x C

Ton = 0.0005001s
Toff = 0.0004999s (ther are within 1000 microseconds)
T = 0.001s
C = 0.000000001F

Toff = 0.0005001 = 0.693 x R2 x 0.000000001
Toff = 0.0005001 = 0.000000000693 x R2
R2 = 0.0005001 / 0.000000000693 = 721000 Ohms (closest standar value is 680,000 Ohms.)

Toff = 0.693 x 680,000 x 0.000000001 = 0.00047124s


Ton = T - Toff = 0.001 - 0.00047124 = 0.00052786s

Ton = 0.00052786 = 0.693 x (R1 + 680,000) x 0.000000001
Ton = 0.00052786 = 0.000000000693 x (R1 + 680,000)
rearranging this we are left with
R1 + 680000 = 761702
so R1 = 81702 (roughly 81K) the closest value is 82K


Ton= 0.693 x (82,000 + 680,000) x 0.000000001
This ends up giving us a Ton time of 0.000528066

This would make Ton + Toff (0.00047124s + 0.00528066) = 0.000999306s
this makes a frequency of 1.006Khz (which is close enough!!)


Once we turn our circuit on it's a Astable circuit, it will switch between the on and off state at the rate set by the Rc network.

Monostable
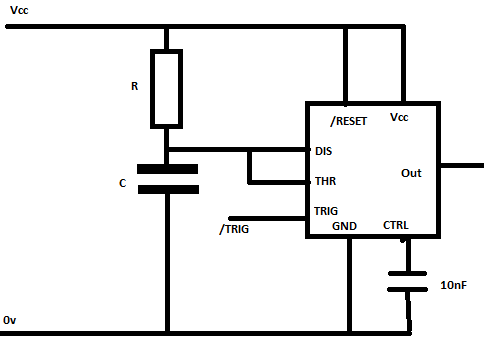
Another mode of operation for the 555 timer is monostable.


You can imagine this as though it is one of those sprung toy things with the little suckers, you push them down onto a table, and after a while the spring tension is too great for the sucker to keep attached and it springs up.

Just like that toy a monostable 555 timer circuit has a stable state, and an unstable state.
you can put the out put of the timer into it's unstable state position, but after an amount of time (set by an RC network) it will flip right back to it's stable state.

in this configuration there is only 1 resistor and 1 capacitor, the DIS and THR pins on the device are both connected to the junction between the Resistor and capacitor

The trigger pin is either held, or floats high,

at this time the output is off,

when the trigger pin is connected to ground the output switches high, however, this is not it's stable state, so after a short period the output switches back to it's stable state (off) the length of the period is determined by the resistor/capacitor network .

T = 1.1 x R x C

so a 1uF capacitor and a 1Mohm resistor will provide an one time pulse of 1.1 second.

one perhaps shortcoming of this circuit is that once you've pressed trigger, if you press it again during the time that the output is high, nothing will happen.


BiStable
The final mode of operation is the bistable the bistable mode means that it has two states where it is stable and can sit indefinitely in either one.
the mode of operation is set with the trigger and reset pins.
both these pins are pulled high, this means that they are connected to the positive power rail with a resistor.
when the trigger pin is pulled to ground the output is set high, it stays this way until such a time as the reset pin is connected to ground then it does off.

This is also called a set/reset flip flop.


Monday, June 18, 2012

Carputer

Once upon a time I had a particularly rubbish car. actually the car was great fun to drive, and never really broke down it was as basic as you could get.

the stereo was also basic, but it had an audio jack socket on the front. and I had something called an Mstation, this is a large hard disk MPs player, with an LCD screen that shows the tracks playing etc.

Then I got a new car, there was no where to mount my Mstation, but I had a cd changer (rather than just a player)

And then that wasn't enough.
so I got a PureDAB digital radio, but the reception was rubbish.

But what it did have was a audio input jack socket.

I decided that rather than re-use my Mstation (which I'd still have to mount and find a way to get to the controls cleanly, I wanted something invisible.

That is when I decided that my car should have a computer in it.


Now this isn't the standard car-puter build, I've already made it reasonably clear that I don't want to cut holes in my dashboard (else I'd just use the Mstation).

and I want this to be as hidden as possible.

and that's when it hit me.

I'd use a computer and use my phone as the control unit.

I also knew I would never want to take the computer or hard disk out of the car, I'd want to be able to pull up to my house and access the computer via my standard home network


Computer
The computer had to be something that would not loose power.
I had an old laptop that was not being put to use so I decided that I would use this.
being a laptop it came with it's own power supply that could keep it running even when the car was off, (when I parked up outside my house)

Software
For simplicity, because it offers an "out the box" solution I decided that I would use Itunes, with the itunes remote application on my phone being used to alter the volume and to skip tracks, where the phone could sit in a regular phone holder as I drove.

Storage
The computer had a relatively small hard drive, so storage will be a small USB powered external hard drive

Connectivity
The iphone does not like non-infrastructure networks, and besides, I want the laptop to connect to my home network, so it can't be trying to be an infrastructure network
To accomplish this, the wireless network of the latptop would be set to autheticate on my home network. now whenever I drive near to my house the computer will recognise the network and connect to it.

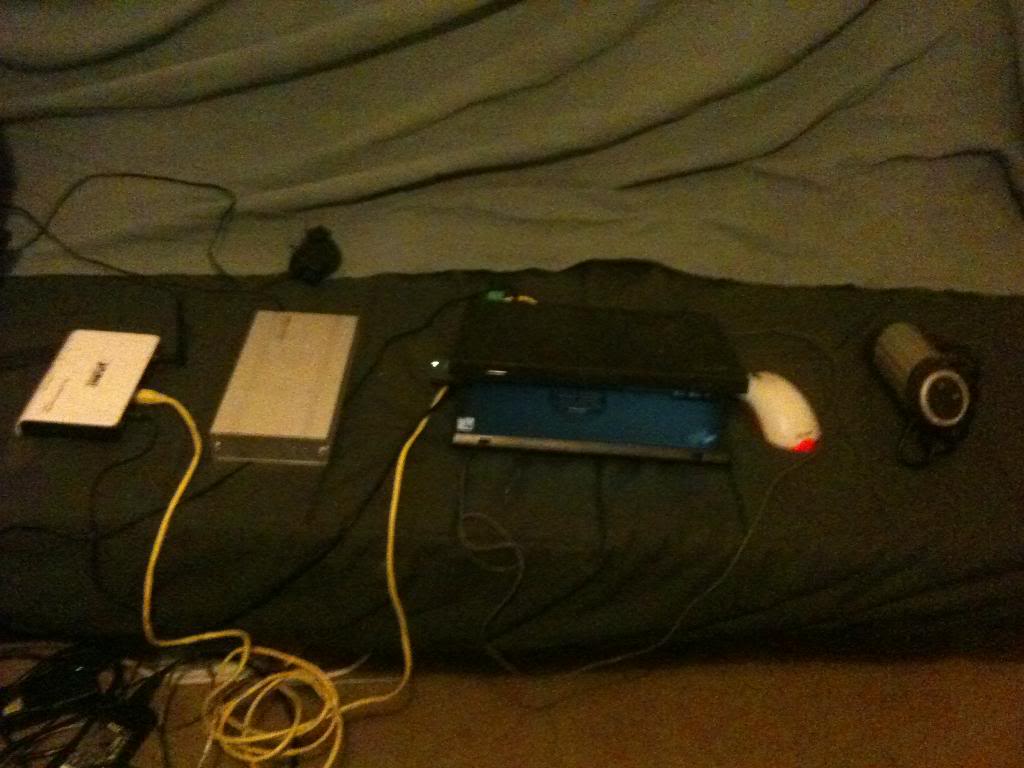
The wired connection on the computer will connect to a wireless access point which will server a localised network (called pugnet as my car is a peugeot) this is the network that my iphone will connect to, allowing itunes remote to connect to the itunes software for control.

Power
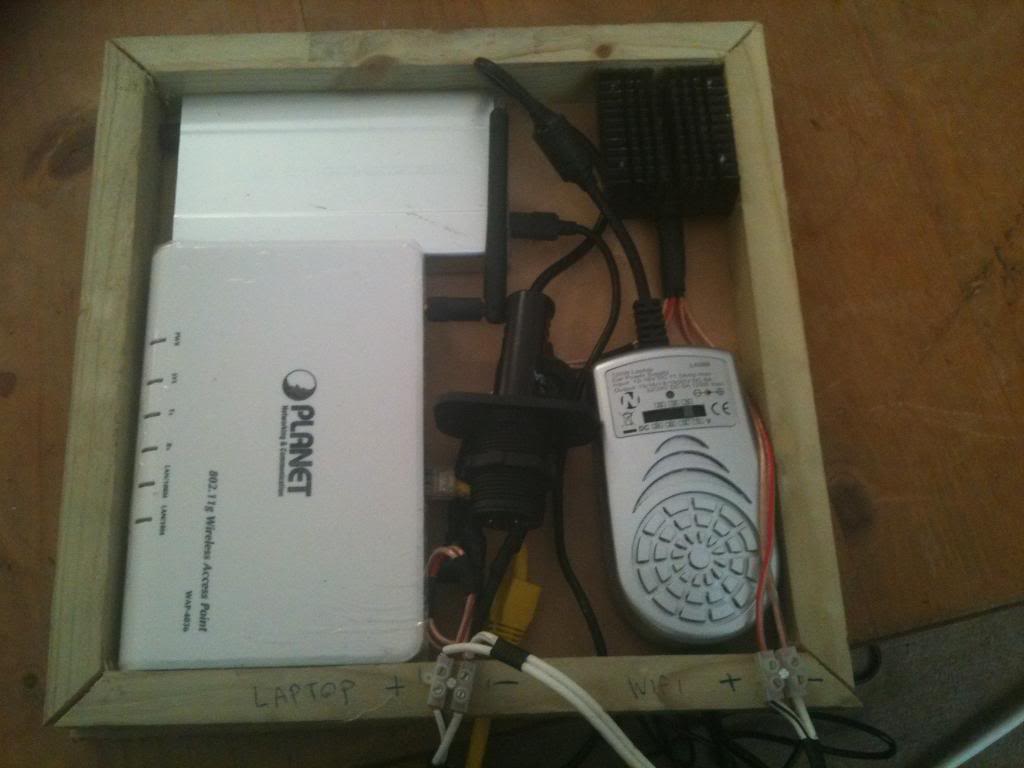
The power for the laptop will be provided by a shop bought in car laptop power supply. the power for the WAP (9v) will be provided from the cars 12volt electronics and be regulated with a 2a LM7809 voltage regulator.


Mounting.
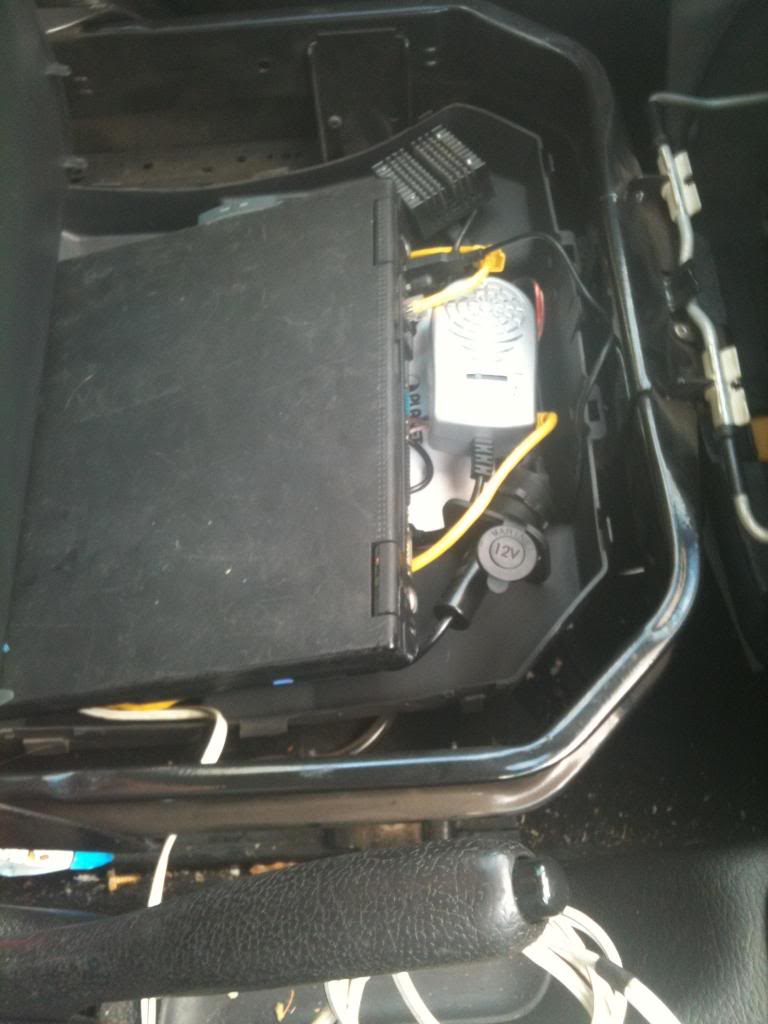
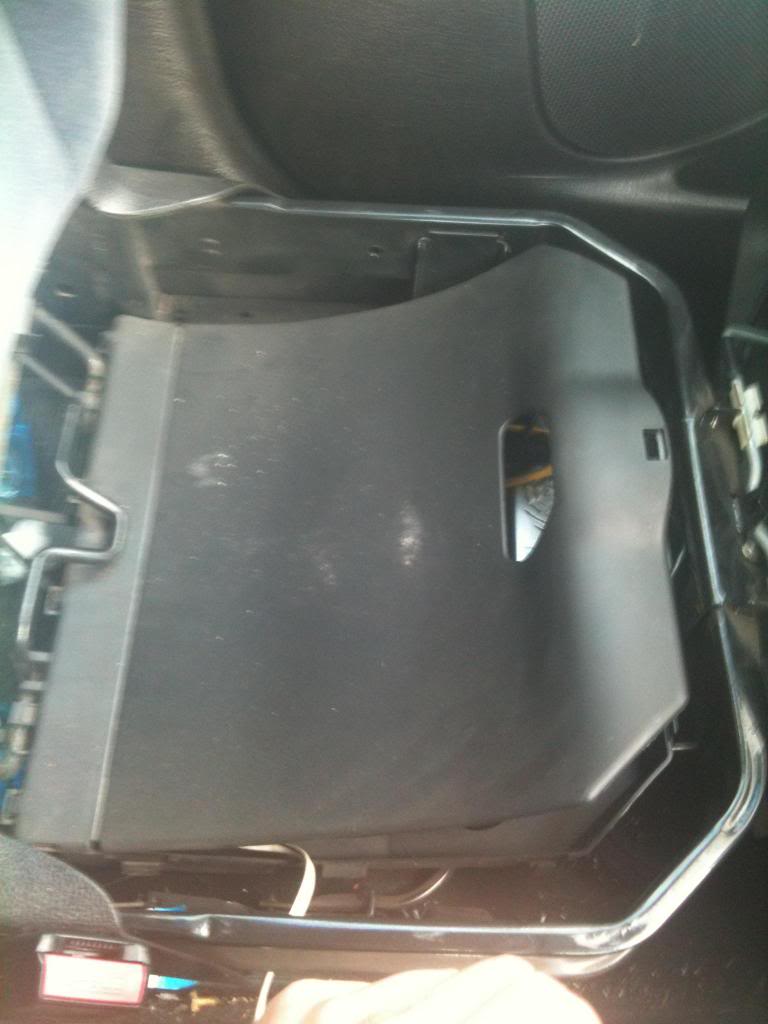
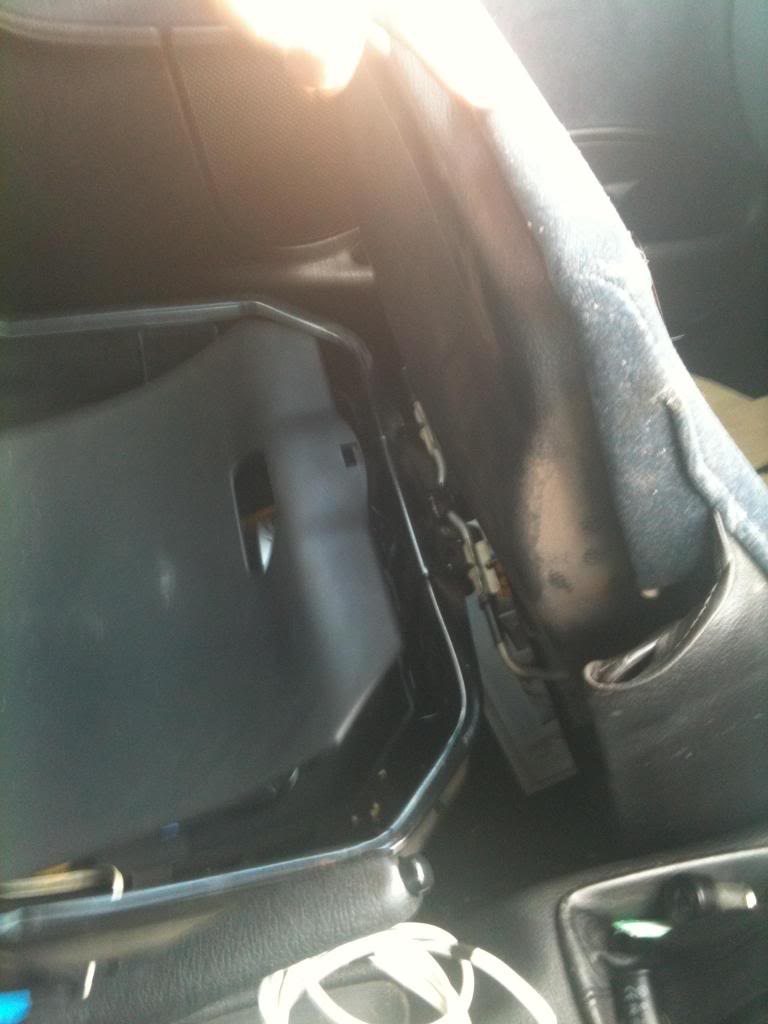
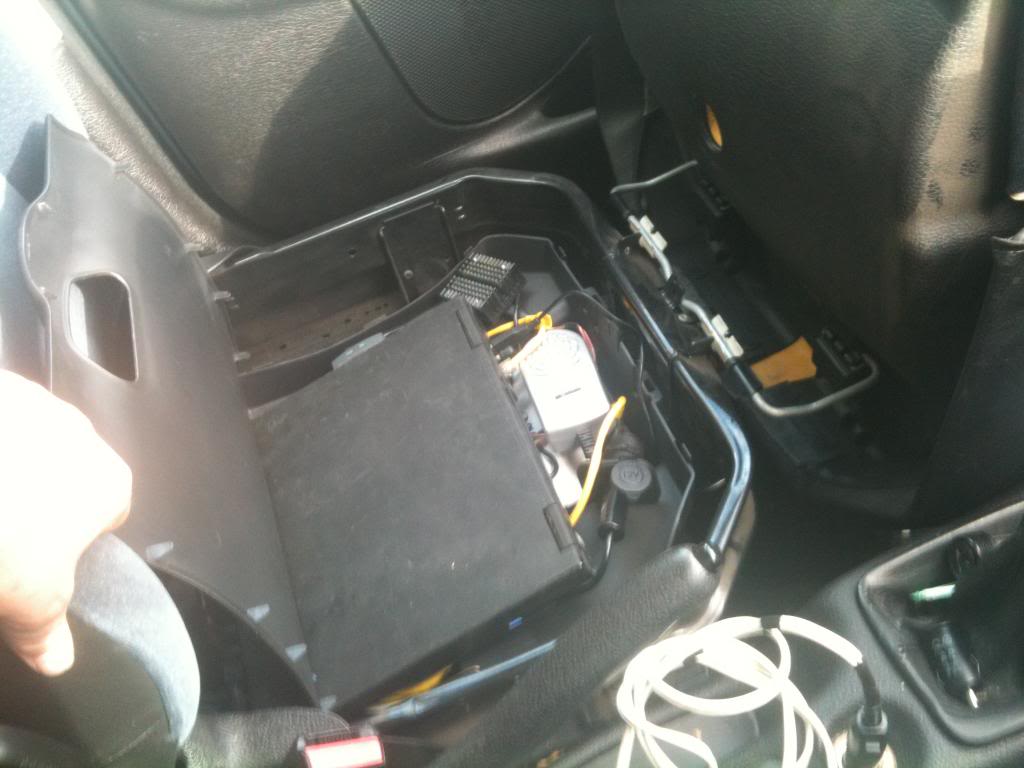
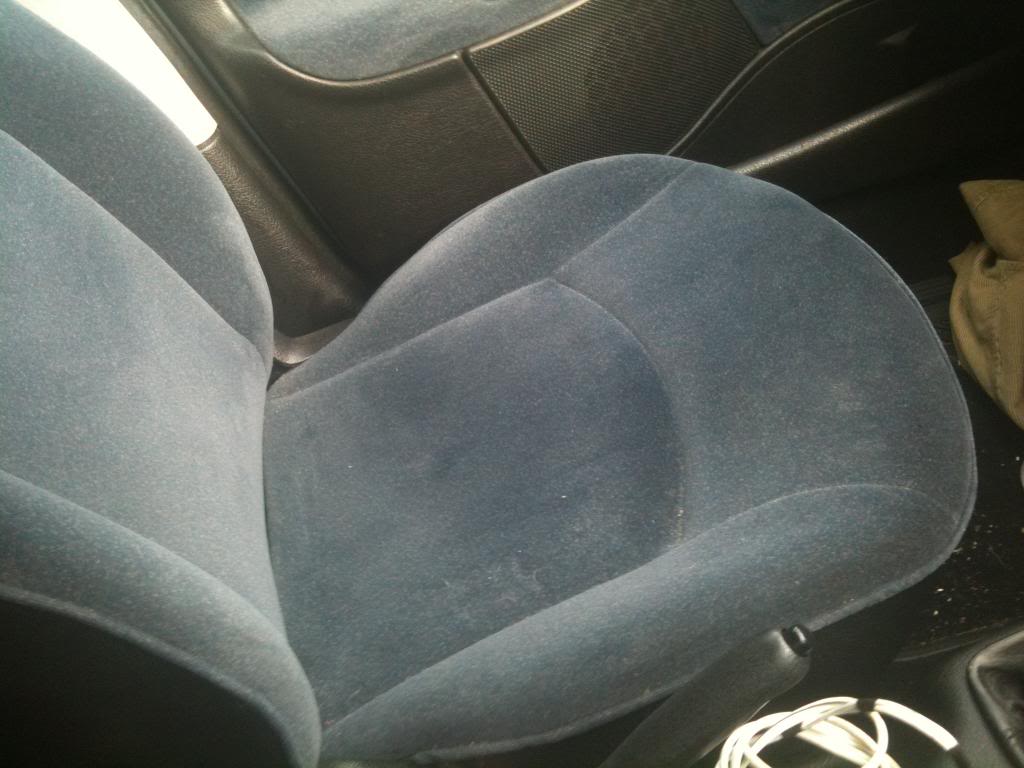
The front squab of my passenger seat lifts up to reveal a little storage compartment, the computer will sit under the seat in the front of the car, hidden from passing eyes,

All the fiddly electronics bits are build into a wooden box that sits in the bottom of the compartment,
the laptop sits on top.


How it all works.
I leave my house in the morning, and get in my car.
when I turn my car on, the laptop receives power and ideally boots up (no worries if it doesn't). additionally the wireless access point turns on.
as I drive down the road my iphone looses connectivity to my home network, but finds the car network pugnet and authenticates on this network.
if the computer has not started I use a free application on the iphone called NetAwake to send a packet to the computer requesting that it wakes up (wake on LAN is enabled on this laptop)
the computer turns on and boots, Itunes is in the startup folder and so automatically starts.

When I start the itunes remote application it searches the network for itunes servers, and finds the laptop.

I press play, the laptop plays songs (from the USB hard drive) through the laptops external audio connection, which connects to mu PureDAB highway radio, which transmits via FM to my stereo, and plays through all the speakers.


When I get home...
the laptop discovers my home network and connects
I turn off the car, this immediately kills the power to the access point (which turns off) and kills power to the laptop. -the laptop remains on powered by battery power.

I go inside.
start my regular computer, where I can use VNC to connect to the car laptop and update the itunes library with songs that I can just drag and drop wirelessly into my car!

until the laptop battery runs out. at which point windows knows that it's low on battery power and gracefully shuts down the machine.

Monday, June 11, 2012

Electronics lessons: Music effects: The distortion pedal

This is the first guitar pedal that I eve made...

What is distortion.
Distortion is the changing of a wave form from one form to another so as to distort it.

Technically speaking, a tone control distorts the signal, a envelop filter distorts the signal, anything that "colours" the signal also distorts it.

but if I stop being a smart ass for a second.

distortion to most people means fuzz.

History of overdrive.
It seems to make sense to me to start at the very beginning, and lets take a look at the physics of what's happening.

Many people try to make a distinction of what type of distortion they are listening to, if it's a hard clipping, or soft clipping, some people thing that an over drive and a distortion are different, they kind of are, but fundamentally it's all the same.

OK, distortion was around long before this, but lets set the scene...
To understand this analogy you;re going to need to know what a green back is.
A green back is a speaker made by the British speaker manufacturing company Celestion in the 60's or 70's.
It was a basic run of the mill speaker, which has gained cult status (and price) with it's inability to handle the power of the signals that people were trying to drive thought it.

Now you might think that from the description above of a basic speaker that's gained notoriety for sounding bad might make you think that I dislike it.
nothing could be further from the truth. the point I'm getting at here is that the magic sound of 60/70 British rock, (think Rolling stones/Yard birds/Led Zepplin) lays a lot in the mechanical and electrical limitations of the time.

Consider how a speaker works,
a coil of wire is suspended in a permanent magnet,
the coil of wire is subject to an electrical current, this makes the coil magnetic, where it will be either attracted to, or repelled from the permanent basket on the back of the cone.
the coil has a paper cone attached to it.
as the coil moves the paper cone moves, this moves air particles, which vibrate through the air and then the air vibrates against our ear drums and happy days we hear sound.

So we get that the coil is moving, and we get that we can turn the volume up and make it move more, but, the coil is attached (with what's called suspension) to the metal frame (spider) in the speaker construction. The size and stiffness of the suspension limits how far that speaker cone can move.
that means that for very large wave forms the speaker will not replicate exactly what is being asked of it.
it tries to reach the point where the signal applied it telling it to go, but excersion limits are met and the speaker cannot move any more.
additionally the suspension on the speaker slows down the cone as it reaches the excursion limit

So the following picture hopes to show you what I mean, I've drawn it on it's side so you can visualise a speaker cone going in and out.


The thick black line is zero, this is where the speaker normally rests.
the red line is the input to the speaker.
you see it rising, the green line (speaker position) moves with it, then we reach the blue line, this is nearing the excursion limits for the speaker, so whilst the red line continues to move, the green line is being slowed by the suspension of the speaker.

The red line continues to rise where it meets the black line, this is the excursion limit the speaker can no longer move at all past this point whilst the red line continues to be at this point the speaker sits as it's maximum excursion position waiting for the red line to fall.

This is, in the most traditional sense an over drive distortion.
the wave is quite smooth, (as the suspension prevents square edges to the sound wave) and as such will sound like a warm fuzz.

It is also possible to get over drive distortion from an amplifier.
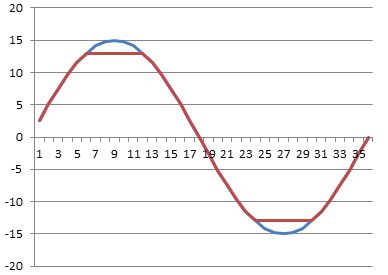
Consider the following chart.
the blue wave is what we want. the red wave is what we get


lets say we have an amplifier with supply rails of +15 and -15 volts, you we give the amplifier a 1v / -1v signal and say, amplify that, and set the gain to 15.

What should come out of the amplifier is a smooth wave (the same as went in) with peak values of + and - 15 volts.
but we can't actually drive the amplifier to the supply rail voltages, the most that we could get out is +13 and -13 volts, so the top and the bottom of the votlage is cut off.

This is a much harder clipping sound.

Now that we've listened to loads of music and realised that the classic hot sound of the 60/70s is so desirable what can we do to emulate that?
(clearly we don't want to run our amplifier at that level forever, and the amount of power that you need to put into a speaker cone to reach cone excursion limits makes your show loud, (and perhaps not suited to the venue size you have!)

So you want to fake it.


Well, now that we know what we're trying to fake, it's a very simple matter of finding a way to cut a little from the top and a little from the bottom of an audio wave.


So what we want to do is take a small wave form say 1 or 2 volts then shave a small amount of voltage off of it.

So what we want is a component that can give a low resistivity for small signals, and gradually that resistivity will increase until it hits a limit then it will only allow that amount of signal to pass.
kind of like some kind of flow control.


well, we don't exactly want flow control, but if we look at the diode we have the component that we need.

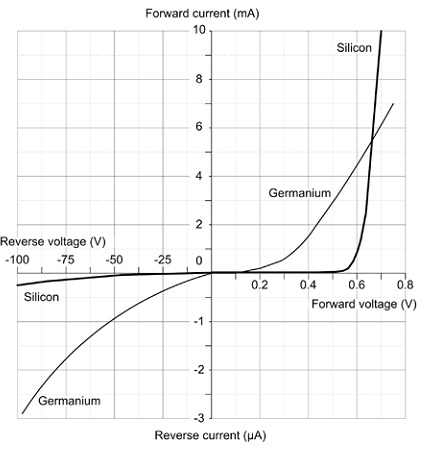
the following graph shows the voltage and current flow of a regular silicone an germanium diodes as they approach their forward conduction zones:


You see that (especially with the silicone diode) there is a gently slope on the voltage vs current graph, this is that component gradually decreasing it's resistance to a signal, until it reaches ~0.65 volts where it begins to conduct, at 0.7 volts the junction inside the diode is saturated and it's in full conduction mode.


So what does this mean for our distortion effect.

Well, quite simply, we wanted a component that we could use to clamp our voltage inside an artificial set of parameters that would mimic the gentle slowing due to suspension and then flat constraint of an over driven speaker. and with a diode we actually have that.


There are two ways of using diodes in a distortion circuit, these are often called hard and soft distortions.
what makes a distortion hard is very angular edges on the wave form when it flattens off, (see the picture of the amplifier distortion above, and soft distortion is more controlled, the distortion still exists, but it's smoother.

not only does the wave look smoother, but it sounds smoother too!.

There are two ways to use diodes to produce this distortion.

First we need to understand the building block that we're using.

two diodes are placed back to back, (and front to front)
this looks like a crazy way to put a diode,-surely they'll just conduct to ground regardless of the signal applied and there will be no output?

Well, no they won't just conduct to ground because as explained above, as the diode is switching on it has a resistance, and even when it's on there is a voltage drop.

So what actually happens is we clamp the signal line to only permit signals within a certain threshold, and limit any larger signals to that threshold.

So now we have a simple model.

for signals under 0.5 volts a diode acts much like an open circuit,
for (silicone) 0.5 - 0.7 volts a diode acts like a resistor with progressively less resistance being applied as the signal rises
for germanium diodes 0.2-0.3 volts acts like a resistor with progressively less resistance being applied as the signal rises
for signal over 0.7 volts the diode acts like a short circuit grounding the circuits and therefore clamping the signal to the activation energy threshold.


now that we have this component block figured out we can look at how to apply to to a circuit.

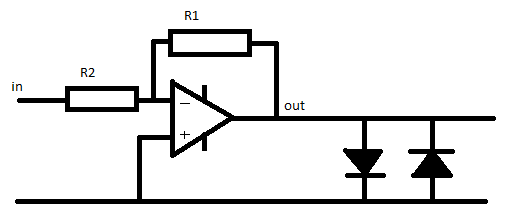
The first method of connection is to follow the amplifier that is used in the circuit with the component block.


This literally clamps the output to 0.7v, this type of circuit arrangement is suited to either Light emitting diodes or germanium diodes.
the use of silicone diodes produces a quiet hard clipping in this position, mixing a silicone diode and a germanium diode in series for the block can have a positive effect in making this clipping less harsh.


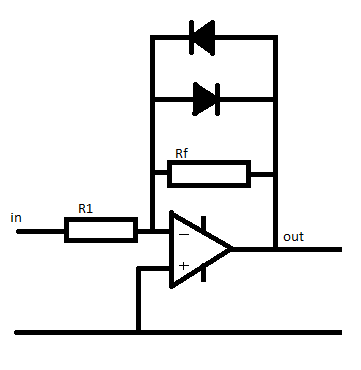
The second way to use this component block is in the feed back network of the inverting amplifier.

we put the network in parallel with the feedback resistor.

At low signals the diodes act like an infinitely large resistor.

so the value of 1/Rfn = 1/Rf + 1/diodeR(infinity) therefore the total value for the resistor network (Rfn) equals Rf

so if R1 = 100 Ohm, and Rf = 200 Ohms,
Gain = -Rf / R1 so the gain = 2

now as the signal gets larger the amplifier will put out a larger signal, when the output of the amplifier reached 0.55v the diodes are behaving like a resistor.
we'll (for the sake of simplicity) say that the value of this acting resistor is 200 Ohms.

now the feedback network has a resistivity if found by the equation
1/Rfn =  (1/200) + (1/200)
so Rfn = 100 Ohms

now the gain of the amplifier is
Gain =-rf/R1
gain = -100 / 100 = -1

so the gain has gone down.

Now the voltage continues to rise to above 0.7 volts, the diodes now act like short circuits.

the resistance of the feed back network a 1/Rfn = 1/200 + 1/0  so Rfn 0

and the gain is
-0/100 which also equals zero.

Remember a gain of 1 is unity.
the output = input x gain.

so a gain of zero actually turns the output off completely.
(but if that were to actually happen the there would be no voltage so the diodes would have infinite resistance again.

thus the voltage is again clamped in the region of the diode conduction threshold.


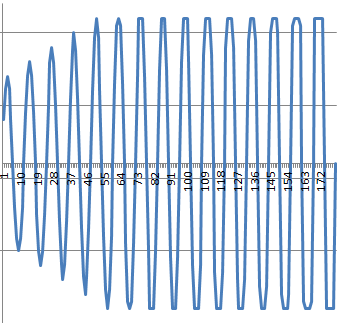
You can see in the graph below what a gradually increasing waveform looks like as it approaches the clipping region.
at the start there is no distortion, as teh wave gets gradually larger the clamping effect of the distortion begins to take effect, you see by the end of the graph the distortion is no longer smooth, the input signal is massive and the clipping is more and more choppy (and will sound worse)


Monday, June 04, 2012

Guide to RAID


There are many different levels of RAID, what I intend to do here is explain the most popular levels of RAID. which I believe to be RAID 1, RAID 5 and RAID 6. I will also discus RAID 0, and exactly why this is not actually a RAID level.
as it is useful, I will also explain the concepts of RAID 1+0.

RAID means Redundant Array of Independent Disks

Basically, using RAID is a way to mitigate the effects of a a hardware failure.

In each case what using RAID does, is extend data across multiple disks, with a view that should one disk fail, you'd be able to recover the data from the remaining disks without going through the trouble of sending the drives off to a data recovery company.


RAID 0, (striped disks)
In RAID 0 you must have at least 2 drives, however you can feasibly have any number of drives up to the limit that your controller will support. Ideally your drives must be of the same size, though that is not a definite requirement, however, if your drives are not the same size you will loose some of the capacity of the bigger drive.

the first term that you will need to understand is a stripe, a stripe is simply a block of data on a disk.


01) if you image that
02) this sentence is 
03) a piece of data, 
04) then you can see 
05) how it has been d
06) ivided into 10 eq
07) ual strips (repre
08) sented by a new l
09) ine) each 17 char
10) ectors in length.


so in the above example the block size on the disk is 17 bytes. so that's the size of a stripe.

With RAID 0 each one of these stripes is written to a separate disk
imagine a two disk example disk 1 on the left, disk 2 on the right.


01) if you image that  this sentence is 
02) a piece of data,   then you can see 
03) how it has been d  ivided into 10 eq
04) ual strips (repre  sented by a new l
05) ine) each 17 char  ectors in length.
06)
07)
08)
09)
10)
you can also see that where as when all the data was written on one disk it filled the disk (which was only ten lines big), by spreading the data across 2 disks, there is an effective doubling of capacity.

This is why disks must be equal size, is disk 1 can only contain 10 lines, but disk 2 is twice as big, then the RAID can only use as much space as it can equally allocate between the disks.

you can also see that if one disk dies we'll be left with this:
01) if you image that   
02) a piece of data,    
03) how it has been d  
04) ual strips (repre  
05) ine) each 17 char  
06)
07)
08)
09)
10)
basically, lots of corrupt files,

RAID means redundant array of independent disks, whist the disks in RAID 0 are an array of independent disks, there is no redundant hardware.

Incidentally if you would like to make 1 large volume from two different sized disks then you should investigate extending the volume.

What are the pro's of RAID0?

Makes bigger volumes
Faster read and write times as data can be read or written from two independent disks, (almost doubling the read/write time with two disks, tripling with three disks).
you can have any number of disks.

What are the cons of RAID 0?
It's not redundant, loosing 1 disk means loosing all the data
The more disks that you have, the more likely it is that your array will die sooner rather than later.

Probability of failure.
whilst of course there may be somewhere in the world a RAID 0array with fifty disks that has never failed, and yet plenty of 2 disk arrays that have failed.

Failure is never assured, but neither is it assured that the disk will keep running.

think of it this way, if the likelihood of a disk failing is 1 in a million. when you have two disks the likelihood of either one failing is 2 in one million.

if you have 20 disks, it's ten time more likely that one disk will fail and you'll loose all the data than if you had two disks. in a RAID 0 array a single failure means a complete loss of data, for this reason it's generally not advisable to use RAID 0, unless you really understand that you're likely to lose data, but you really require the increases in performance that this RAID level offers.


RAID 1 (mirrored set)
in RAID 1 you have to have to have at least 2 disks, however you can have three or more disks. with RAID 1 there is no increase in usable space of capacity. there is no striping, data is not divided into stripes. data is mirrored at a disk level.

again a visual example, disk 1 on the left, disk 2 on the right
01) data goes here  01) data goes here
02) more goes here  02) more goes here
03) even more data  03) even more data
you can see that whatever is written to disk 1 is also written to disk 2

if there are three disks the same data is written to all three disks
01) data goes here  01) data goes here  01) data goes here
02) more goes here  02) more goes here  02) more goes here
03) even more data  03) even more data  03) even more data
if one disk fails, then you can see that you can still read data from another disk, if you have 3 disks in a RAID 1 array then 2 disks could fail and you would still be able to access your data.

Pro's
Fast access to data, you can read simultaneously from as many disks as you have in your array, if you have 5 disks, you can read data five times as quickly.
it is fault tolerant, a disk can fail, and you won't loose any data.

con's
waste of disks, if you've got an array of two disks, you're effectively wasting the space of one of them, if you've got three disks, you're wasting two of them. -though at the benefit of two disks being able to fail at once.

RAID 1+0 (mirrored striped)
RAID 1+0 expands on the concepts above. you must have at least four disks to create a RAID 1+0 array.

Basically what this will do is create 1 set of 2 disks where data is striped across the two disks, and then also mirror that data to a second set of stripped disks.

Moving on from here, you're going to need to have that data stripe theory right in your mind.
you'll also need to be able to grasp what parity is.

Parity is something really clever, that can be explained really simply.
you can see that the problem with just mirroring (RAID 1) a piece of data is that it's incredibly inefficient. it also is restrictive in terms of volume size. if you've got 2 100GB disks, in order to have a 200GB array you have to throw away both 100GB disks and add 2 200GB disks.


How Parity Works:
I'm going to explain bit level parity using the example of 3 bits, then I'll expand to larger bit sizes so you can see how well it scales.

with parity, you always loose a bit, or in this example of RAID arrays a disk to parity.
a parity bit is a bit that would enable you to work out what you're missing if a disk fails in this example there are 2 disks for data, and one disk (or bit) for parity
1 2 P
=======
0 0
0 1
1 0
1 1
if you look above you can see that the disk has a series of data written to it. in order to calculate the parity, all you do is add up the amount of 1's that are written to the disk, if it's an odd amount you write 0, if it's an even amount you write 1, (and for the sake of parity, 0 is an even number)
1 2 P
=======
0 0 0 (there are no 1's, 0 is an even number so write 0 for parity)
0 1 1 (there is one 1, it's an odd number so the parity bit is 1)
1 0 1 (one 1 means an odd number of 1's, so the parity bit is 1)
1 1 0 (2 ones, 2 is an even number so the parity bit is 0)
no imaging that disk 1 fails
1 2 P
=======
? 0 0
? 1 1
? 0 1
? 1 0
thankfully, because you have a parity bit you can calculate what it's meant to be
1 2 P
=======
? 0 0 (well there was an even number of ones when the data was written, and disk 2 is a 0, so disk 1 can't be a one, it must be a 0)
? 1 1 (parity bit = 1, so there must have been an odd number of 1's, disk 2 is a 1, so disk 2 must have been a 0)
? 0 1 (parity bit = 1, so there must have been an odd number of 1's, disk 2 is a 0, so disk 1 must have been a 1)
? 1 0 (parity bit = 0, so there must have been an even number of 1's, disk 2 is a 1, so disk 1 must have also been a 1)
whilst the disk has failed, you can still see what was on the disk by virtue of the fact that you can calculate it, you can put a new disk into this array, and the data that was on the disk can be recalculated from the parity bit, and re-written to the new disk, as if nothing ever happened whilst it may not be immediately clear, parity can work on any number of disks
1 2 3 4 5 6 7 8 P
==================
1 1 1 1 0 1 0 1 0 (there are six ones, it's an even number so the parity bit is 0)

1 2 3 4 5 6 7 8 P
==================
1 1 ? 1 0 1 0 1 0 as the parity bit is a 0, you know that there were an even number of ones, disk 3 has failed leaving an odd number, so now you know that there must have been a 1 on that disk.

1 2 3 4 5 6 7 8 P
==================
1 1 1 1 0 1 ? 1 0 as the parity bit is a 0, you know that there was an even number of ones, disk 7 failed, but since you know that there are 6 1's in the remaining disks, and there were an even number of 1's that the data on disk 7 must have been a zero.

from this you can see that as you add disks to the array, you increase the size of the array, not only that but a disk (any disk) can fail, (1 at a time!) and your data is still safe.

whilst I didn't say at the start, any number of disks, but with a dedicated disk reserved for recording parity information is RAID 3, or RAID 4.

RAID 3 works at byte level, RAID 4 works at disk block level.

the exact parity method isn't as described above, -that's just a really simple example to make it easy to understand that it's possible to use just a single disk to protect an array of many other disks


    1 2 3 4 5 6 7 8 P
    ==================
01) 1 1 1 1 0 1 0 1 0
02) 1 0 1 0 0 0 1 0 1
03) 1 0 0 0 0 1 0 0 0

RAID 5 (Distributed Parity)
RAID 5 works almost exactly like RAID 4, you must have at least 3 disks, and will always loose the space of 1 disk to parity.

if you have 3 100GB disks you'd have 200GB of space, (200GB of data 100GB of parity information)
if you had 10 100GB disks you'd have 900GB of space (900GB of data 100GB of parity)

basically, RAID 5 differs from RAID 3 in that instead of having a disk dedicated to Parity, the parity block is spread around the disks,

where D = data and P = parity, the disks will look like this
    1 2 3
============
01) D D P
02) D P D
03) P D D
04) D D P
RAID 3, RAID 4 and RAID 5 all have increased read rates as data is read from multiple disks, both suffer from reduce write rates, due to the extra time taken to process the parity bit.


RAID 5, like RAID 4 will allow for any one disk in the array to fail.


RAID 6, is a lot like raid 5 in that there is parity, and the parity blocks are spread across all the disks, however, RAID 6 uses proprietary methods for calculating the partity, and stored parity information on 2 disks in the array.

this means that an array of 15 100GB disks would not have 1500GB space it'd actually only have 1300GB of space that'd be 200GB of parity information.

For this reason to get the best protection and efficiency RAID 6 is best used with large arrays, (12 disks or greater), and the proprietor calculations mean that hardware acceleration is almost essential.


RAID + RAID.
It is possible, either through the use of specialist hardware controllers, that support this feature, or a mix of hardware controllers and software configuration. to effectively multiple RAID levels.

it was mentioned earlier that RAID 1+0 was a possible configuration, through really requires 4 disks, and at least 2 extra disks added each time the array needs to be expanded.

The same is true of other RAID levels, you can have the protection of a Level, and add a second layer of protection on top of that. (which is better for very large arrays).

for example there may be twenty disks, each disk might be 1TB


a RAID 0 array is very attractive, 20TB of space in total, but it's twenty times more likely to fail than if there was a single really big disk, (even though such a disk doesn't really exist). Basically, a RAID 0 array is a bad choice, it's very likely to fail.

a RAID 1 array is a terrible choice, you'd get a 1TB disk, mirrored to 19 other disks! a massive waste of hardware!

A RAID 4, or 5 array is a possibility, at least at this point you're going to have 19 of your 20 1TB drives essentially added together, but with 20 disks in your array, it's likely that there may be multiple failures.

so really this leaves 3 possible options...

You use RAID 5, but you allocate one drive as a hot swap drive, this means that the drive sits unused until another drive fails and it's needed
1  2  3  4  5  6  7  8
=======================
D1 D2 D3 D4 D5 D6 D7 HS
This is a RAID 5 array.

how Imagine that drive 3 fails, the Hot spare takes over, and the array is rebuilt onto that drive. then when drive 3 is replaced, either the array will rebuild onto that drive leaving disk 8 as the hot spare again, or drive 3 will become the hot spare until such a time as another disk fails. then it'd assume that responsibility.
1  2  3  4  5  6  7  8
=======================
D1 D2 XX D4 D5 D6 D7 D3
in the case of this example, clearly you'd have 20 1TB disks, 1 is taken away for hot spare, 1 is taken away for Parity, you'd have an 18TB array.

either the hot spare, or one of the disks in the array could fail. at the same time(!)


You could also use use RAID 6,
this will lead to you having an 18TB array (18 data drives, 2 parity disks), you have better fault resistance because there are 2 Parity disks but there will be an increase in the time taken to write data to the disks. due to the fact that the parity has to be calculated using a complicated mechanism at each data write.

Lastly, you could have raid 5+0.

What this means is that you'd have 2 arrays, each would have 10 disks, arranged in a RAID 5 array, (9 data disks, 1 Parity disk) each array would be 9TB
then you add these disks together using a RAID 0 array.
This would give you a fairly well protected array, (any one disk from either array could fail) -you could have 2 disks failed at once, just one from either array...
you also get the added benefit of the increased read speed. (would be the same speed as RAID 6 as data is being read from 18 individual spindles), but the write operations would be faster as the parity calculation is easier, (unless you have hardware acceleration for RAID 6 calculations).

RAID 2 is intentionally omitted because practically nobody uses it.

(you're about halfway through!)

I'll say one thing, that's that whilst it's important to understand that RAID offers levels of protection, it's not critically important to understand how it all works, just what kind of level of protection you have, and how that effects solutions that you put in place.

RAID doesn't (usually) really relate to storage solutions for home, these are more the kinds of things that you'll be implementing in a business. certainly he last part about RAIDed RAID is really only the kind of stuff you'd be doing at a very large SAN type level, where you'd have a single controller and then perhaps 8 "shelves" which might contain 12 or 14 disks each...

anyway... where you might use these.

RAID 0 (striped) is a home solution, you're going to use this when you have perhaps 2 small drives, and you'd like to have one big drive, for example you have a couple of 250GB drives, but you really want a single volume of 500GB.
you'll use RAID 1 to add these together.

the fact that if one drive fails then the whole array fails, (and the fact that as you add more disks it becomes more likely that at least one would fail), means that RAID 0 is really not suited to business applications at all (unless you're combining it with other RAID solutions.

RAID 1 (mirrored) is the kind of thing you'll only be using on a business critical server.
usually in this example you'll be using hardware RAID to have the OS installed across 2 disks, of say an important domain controller at a specific location.

this means that if one disk in the array fails your machine will keep working whilst you're organising a replacement, with the best will and good hopes in the world, all disks ARE going to fail one day, the point is that you can't guarantee that you'll be able to replace that disk the same day.
in the case of a domain controller you might be talking about an office of 400 people that can't log on in the morning, if you have to send them home for the day because you can't replace the disk till the next day then you've lost over a man year of time (which is expensive!).

basically, you've got a disk that wasted, but when the time comes that one disk in the array fails, you'll be glad that you weren't relying on just that one disk, the cost of a man year of time, (thousands) is going to far outweigh the extra 100 spent at the start!

RAID 3 and RAID 4 (striped with dedicated parity) pretty much aren't really used anywhere in favour of using Raid 5 (striped with distributed parity).

you're going to use RAID 5 where you have at least three disks, and you want to protect those disks from failure.
an obvious (but contentious) example is when you're talking about database servers.

RAID 5 is well suited to database servers.

the read speed is very good (due to the use of multiple spindles), the write speed suffers slightly (so you may wish to consider either hardware acceleration or a different RAID level if you have a database that is very write intensive, or has frequent random data writes).

In addition to the faster read speed (than from a single large disk). you also have the expandability.

say for example you have a SCSI enclosure, you could start your enclosure with just 3 150GB drives, (giving you 300GB of space). and protection from the parity drive.
after a couple of years you may start to run out of space, you you can buy another 150GB drive. now you have 3 data drives and one parity (450GB of space).

a year later you add another drive and get 600GB of space for data.

Basically, the use of RAID 5 enables you to build your device as a starter device which is still protected. but is cheap because you start with a relativity expensive enclosure and 3 relativity inexpensive disks, over the course of time you can increase your storage space as required with a small investment, just the cost of the disk).

RAID 5 tends to only be used in business, (there aren't a lot of software implementations so specialist RAID cards that support the RAID level are required).


RAID 6 would again be used when you're setting up a drive that requires plenty of space, that needs to be protected but quite cheaply. (only loosing 2 disks to parity rather than loosing half the disks as you would in a mirrored scenario).
the difference between RAID 5 and RAID 6 (aside from the method of parity and amount of parity) relates to the amount of disks.

basically, you're going to use RAID 5 if you have say 10 disks or less.
RAID 6 if you have 12 disks of more. (11 disks, you may choose to use either!).

The reason for this is :
Probability of failure.

Basically it works like this,

there is a mean time to failure, this is expressed as the likelihood of failure for a given time,

say you have a batch of 100 disks, you might expect that over the course of ten years.
1 disk fails in year 1, (99 live on)
2 disks fail in year 2 (97 live on)
5 disks fail in year 3, (92 live on)
10 disks fail in year 4, (82 live on)
20 disks fail in year 5 (62 live on)
30 disks fail in year 6 (32 live on)
20 disks fail in year 7 (12 live on)
10 disks fail in year 8 (2 live on)
2 disks fail in year 9 (no disks from this batch or model live past 9 years) That's actual failure not just replaced and put in the bin.
(if you draw that it should make a reasonably nice Gaussian distribution)

what this means is that the probability of a failure of a disk in year 1 is 1 in 100 (0.01)
probability of a disk failure by year 2 is 3 in 100 (0.03) (3 out of 100 will have failed by year 2)probability of a disk failure by year 3 is 8 in 100 (0.08)
probability of a disk failure by year 3 is 18 in 100 (0.18)
probability of a disk failure by year 4 is 38 in 100 (0.38) (basically a 1 in three chance that you'll wake up to a failed disk)
probability of a disk failure by year 5 is 68 in 100 (0.68)
probability of a disk failure by year 6 is 88 in 100 (0.88)
probability of a disk failure by year 7 is 89 in 100 (0.98)
probability of a disk failure by year 8 is 100 in 100 (1)
probability of a disk failure by year 9 100 in 100 (1)

Imagine that you were using RAID 0 (striped with no mirrors or no parity) failure of 1 disk means you loose all your data.

what you're saying is that in the first year there's a 1 in 100 chance that all your data will go.

if you're using 100 drives in your RAID 0 array, that's basically saying you're going to loose all your data in year 1. (because statistically it's a certainty that 1 of those 100 will fail). -of course in life the statistics might not play out exactly.

if you're using RAID 5, or RAID 6 it's like saying that 1 drive will fail, but that's ok, you can replace that.

Fast forward to year 6, so far, you'll have replaced 38 out of your original order of 100 drives.
but now in year 6, it's expected that 20 drives are going to fail. if you're using RAID 5 then this becomes a problem.

if the drive failures were spread evenly throughout the year, you're expecting a drive failure roughly every 17 days.

and inevitably it'll play out like this (we're talking a big business here).

day 1 drive fails
day 2 you log a ticket to the help desk telling them to tell the procurement team to buy a new disk
day 3 the helpdesk log the ticket
day 5 the procurement team ask for a quote
weekend happens
day 9 the procurement team get a quote back from the supplier.
day 10 this quote is sent to a manager for approval
day 12 the quote is approved
another weekend happens
day 15 the procurement team ask for the disk to be ordered
day 16 the supplier receives the order and asks for another disk to be sent.
day 17 The disk is posted to you
day 17 another disk fails and all your data is lost!
day 19 the disk arrives with you perhaps even at the start of the day -it doesn't matter anyway, at this point so many disks are failing that you can't replace them as fast as they are failing.

Using RAID 6 means that 2 drives can fail at once. which effectively give you twice as long to replace the drives, in the example above, it doesn't matter that a second disk failed halfway through the procurement process, because in RAID 6 two disks CAN fail at once.

the above example is very simplistic and assumes that drive will fail predictably, this is more or less accurate, but does ignore the fact that specific manufactured batches of disks may be pre-disposed to failure.

you might end up with a bad batch and have all drives fail in year 1!


which brings us nicely to RAID + RAID.
Basically, you're only going to want to use RAID + RAID when you have many (many disks), and there isn't another way around it.

here I'm talking about very large SAN implementations, where your RAID controller is a physically server sized device, connected to many rack mounted shelves containing bunches of disks, (12 or 14 usually for individual shelves).
AND you want those drives to be presented as en enormous single data volume.

Practically, if you're designing solutions to that level then you're going to need a better understanding than I could give in a short guide.

(basically because at that level you're running into the risk and probability factors not only of disks, but of disk enclosures, interconnecting cables, head units, power strips, backup generators etc...)