Firstly, Merry Christmas!!
Two lessons ago I discussed arrays, and how to use them.
in the last lessons I discussed that Strings were in fact just arrays of characters.
We noted (with code) that it was easy enough to poke values into these arrays, and pretty simple to read them back out using the %s operator, in the same way that we'd used %f for reading floating point numbers, and %i for integers and %c for characters.
It's all very well looking at how a program can display strings, but what we really want is to learn how to manipulate those strings.
This lesson will introduce some functions for manipulating strings.
Firstly, it's important to say that the C language has pretty much no built in functions for using strings. so far we've only been including the standard input/output library (stdio.h), but now we're going to need to start using a library that's been written especially to use strings.
string.h
the first function that we'll look at is strlen.
strlen determines the length of a string, it's a number, clearly an integer number you don't get half a letter in a string.
Number = strlen(string);
so a quick program that makes use of this is
#include<stdio .h>
#include<string .h>
int main()
{
char hw[] = "Hello World";
int num;
num = strlen(hw);
printf("the string %s is %i characters long", hw, num);
}
Now let's look at copying strings between different arrays.
to copy a string, we need to use strcpy (string copy)
strcpy is a function that you pass two parameters to
strcpy(destination, source);
this is different from how you're used to copying thins saying copy this source to that destination.
here's a quick program to look at strcpy
#include<stdio .h>
#include<string .h>
int main()
{
char hw[] = "Hello World";
char ds[20];
strcpy(ds, hw);
printf("the start string is %s\r\n this is copied to string 2 which says %s", hw, ds);
}
The next thing that we're going to do is look at comparing strings.
The function for comparing strings is called strcmp
There are three possible results for the strcmp function
the are 0, (they are identical)
Less than zero, (the strings are different and the first string is alphabetically before the second string, (e.g A is alphabetically before B).
if more than zero is returned this tells you that the first string is alphabetically after the second string. (e.g C is alphabetically after B).
#include<stdio .h>
#include<string .h>
int main()
{
char string1[] = "hello";
char string2[] = "world";
int result;
result = strcmp(string1, string2);
if (result < 0)
{
printf("the result is less than zero (%d), so string 1 (%s) is alphabetically before string2 (%s)", result, string1, string2);
}
if (result == 0)
{
printf("the result is zero (%d), so string 1 (%s) is athe same as string2 (%s)", result, string1, string2);
}
if (result > 0)
{
printf("the result is greater than zero (%d), so string 1 (%s) is alphabetically after string2 (%s)", result, string1, string2);
}
}
Now we'll look at adding strings together, to add strings together, Or catenate strings we use the strcat function.
when using strcat, like strcpy the name of the destination string comes as the first variable passed to the function, then data you want to poke into it comes next.
#include<stdio .h>
#include<string .h>
int main()
{
char firstname = "john";
char lastname = "doe";
char fullname[50]; /*make an array at least big enough to hold the greatest expected data entry*/
/*Print the last name string*/
printf("uncorrected last name = %s\r\r\n", lastname);
/*see we need to write null values to each box of the string array -we'll use a for loop if we don't do this then some odd things can be displayed!*/
for (i=0;i<=49;i++)
{
fullname[i]='\0';
}
/*first put the firstname into the string*/
strcat(fullname, firstname);
/*now put last name in after that*/
strcat(fullname, lastname);
printf("fullname = %s", fullname);
}
And for now that's all I'm going to write about strings.
Monday, December 26, 2011
Monday, December 19, 2011
Coding lesson: Loops (lesson 12)
In the last lesson I spoke about conditional statements.
Now I'm going to have a look at how we do something repeatedly whilst something is true, or how we do something a finite number of times.
Firstly I'll look at the while function
the while function does something whilst a condition is satisfied.
for example
i = 1;
while (i<=10)
{
printf("i isn't 10!");
}
as i is never modified this statement is always true, and so the loop never finishes.
i = 1;
while (i<=10)
{
printf("i isn't 10!");
i = i+1;
}
you see we're modifying i now so that eventually the condition for the loop to end will be met.
the while statement checks the condition before it is executed.
if we want to run the code at least once, and also again and again whilst a condition is true we use the do function
do
{
printf("what's the password?: ");
scanf("%s", &passwordguess);
}
while(passwordguess!=password);
this will ask you for a password, and would keep running until the condition was false, (until the password guess matched the password)
The other kind of loops that we can use are for loops.
The for loop sets up conditions in the start statement, and runs until the condition is satisfied.
for(start value; condition; modified for each loop)
for
a = 0; /*start a at zero*/
a ==9; /*do this loop whilst this condition is true/*
a = a+1 /*add 1 to the value a on each loop*/
for(i=0;i<=9;i=i+1)
{
printf("A");
}
this prints the letter A ten times.
Monday, December 12, 2011
Coding lessons: C and conditions (Lessons 11)
So far I've discussed how to get some data into a program, and how to display data out of a program.
I looked at adding number data together. Different ways to store and group data.
but so far that's pretty useless without being able to make decisions about data pin software.
So in this lesson I'm going to discuss conditions and statements in C.
so first lets have a look at the kind of operators we use when looking at logical conditions.
Does A equal B?
Does A not equal B?
Is A greater than B?
Is A less than B?
Is A greater than or equal to B?
Is A greater and B or Greater than C?
Is A greater than B and greater than C?
in short we have, equal, not equal, greater than, less than, greater than or equal, less than or equal.
and we want a way of glueing multiple conditions together in an if this AND this, or and if this OR this kind of way.
we also want to know what to do:
if This then do this, otherwise do that instead.
what we're going to look at is IF
if is a function, and like all functions we have a function name, and then parameters to pass to it that are contained inside brackets.
if(conditions)
our conditions are all logic based
if 1 = 1 then...
except, we already have a function that happens when we write a=1;
so for the logical is a = b we say
if (a==b)
(double equals signs)
instead of saying then, we open new curly brackets
if (1==1)
{
printf("one equals one");
}
notice that the ilne with the if statement is not terminated with a semi colon
for not equal we use the symbol !=
if (1!=1)
{
printf("Oh dear, one doesn't equal one any more");
}
in some circumstances we may want to have alternative paths.
for this we use the else statement
if (1!=1)
{
printf("Oh dear, one doesn't equal one any more");
}
else
{
printf("It's OK, maths still works");
}
I also mentioned that we may like to use the greater than > or less than <
or greater than or equal to >= or less than or equal to <=
if (1<=5)
or more useful for programs would be saying is a variable something
if(a>=10)
Now there may be times when we want to glue a few things together.
In this case we say
is A equal to be, and equal to C?
if ((a==b)&&(a=c))
{
printf("A, B and C are all equal");
}
you can understand how the & symbol is used for AND statements, (well two of them)
for OR statements we use two pipe characters ||
if ((a>=b)||(a>=c))
{
printf("A is greater than or equal to either B or C");
}
you use brackets to contain statements in exactly the same way you would in regular mathematical expressions.
Finally, you may wish to have a lot of possible outcomes, in this case rather than writing out.
if (a==1)
{
...
}
if (a==2)
{
...
}
you use a switch function.
the switch function compares a variable against a series of outputs and runs code against a chosen output.
if no pre-defined output matches the variable then a default set of code can be run.
Lets say that variable A is some error code information.
where the following statements describe the error
if the error code is 0, the program is fine.
if the error code is 1, the program ran out of memory
If anything else happens then this is bad, because some kind of unknown condition has occurred.
so the code would look something like this:
switch (a)
{
case '0':
printf("no errors have been reported");
break;
case '1':
printf("This program requires more memory, you must have at least some memory to run this program");
break;
default:
printf("this program encountered an unexpected condition and should be shut down");
}
This should be enough information to get you writing some code that you can use to start manipulating data with.
a good example would be the body mass calculator made in a previous lab, rather than telling people what their body mass index is, then telling them to figure out for themselves if they have a problem you can instead use a nested if statement.
if (bmi>25)
{
printf("overweight");
}
else if(bmi > 20)
{
printf("ideal weight") /*at this point we know it's less than 25 else the previous statement would have been executed*/
}
else if(bmi>15)
{
printf("underweight");
}
Monday, December 05, 2011
Coding lessons: C and strings (lesson 10)
In the last C lessons I talked about Arrays, I sort of gave some poor examples of how you may want to use an array for storing co-ordinate data, (for a map or a graph?) but really I just needed to introduce the concept.
In programming a string is a series of characters, each and every word I type is a string, this sentence is a string.
Strings are groups of characters all placed side by side in an array.
Boxes
The simplest way to describe an array is to look at a single input as a box, our Char variable allows only a single character to be put into the variable, it's like a single box that's 8 bits wide (so it can store the 8 bit char.)
Arrays
An array is like a load of boxes all placed next to each other.
The word "example" is a string, it's an array of characters, that's 7 characters in length
e x a m p l e
so we have seven 8 bit wide boxes (one for each letter) placed side by side.
basically, a string is an array of characters,
BUT what separates a string from an array of charecters is that the last "data pocket" in the array that makes up a string is a special NUL character. (this is just a regular char with value 0)
We can create strings in two ways.
Either declare an array, then enter in the data, and enter in the NUL character ourselves, or we can declare and fill the string when declaring it.
#include <stdio .h>
int main()
{
char hello[6];
hello[0] = 'H';
hello[1] = 'e';
hello[2] = 'l';
hello[3] = 'l';
hello[4] = 'o';
hello[5] = '\0';
printf("%s", hello);
return(0);
}
but that is a very difficult way of working with strings, in order to do more complex stuff with strings we will need to include the library string.h
in this next example we can see that we can have the compiler automatically see that we're creating a string, and not only create an array of the correct size of what we're trying to put in there, but also add the NUL character into the end of the array also.
#include <stdio .h>
int main()
{
char hello[6];
char world[] ="world";
hello[0] = 'H';
hello[1] = 'e';
hello[2] = 'l';
hello[3] = 'l';
hello[4] = 'o';
hello[5] = '\0';
printf("%s %s", hello, world);
return(0);
}
Notice in both these examples that when poking characters into the array they are contained in a single quote.
single quotes for characters, double quotes for strings.
hello[0] = "H";
Doesn't work because as H is contained inside double quotes it's data type is a string. you can't put a string of data into a single char space of data. trying to do this will result in a program that throws errors whilst compiling.
Monday, November 28, 2011
Electronics Lessons: Uses for PWM
A while ago I wrote an electronics lesson post on how to use pulse width modulation to move a servo device.
However, servo control is not the only use for PWM.
There are a series of other ways in which PWM can be useful.
the first of which is persistence of vision.
persistence of vision is basically referring to an effect that can most closely be stated as the refresh rate of our eyes.
We all know that TV is a series of pictures that just blink incredibly fast, but due to persistence of vision we never see the "off" part where the picture changes.
This effect leads to a pretty cool thing that you can do with very fast on off light devices such as LEDs.
if you turn an LED on, it is a bright source of light.
if you turn an LED off, it shows no light.
if you turn an LED on, then off, then on then off repeatedly (with equally measures of on and off) then the LED will appear around half as bright as when it's constantly on.
(I mean on and off really fast, measured in milliseconds!!)
if you turn the light on for 1 millisecond, then off for 3 milliseconds and repeat the light will seem 1/4 as bright as the fully on LED, on for 3 milliseconds and off for 1 millisecond and the light seems 3/4 as bright.
This means, (with some clever work from the device turning the power on and off) than you can produce some really nice effects, such as variable LED lighting, or pulsing LED's that smoothly transition from dim to bright.
Another use is playing audio, yes making sound.
and on/off square wave will sound just like a buzzer. but if you add a capacitor, (which can store energy) your mostly on pulses now start to charge the capacitor and bring the wave cycle up, and then when you transition to mostly off cycles the capacitor discharges and your wave form falls.
Creating a smooth audio wave from a digitally stored PWM signal.
an example of this can be seen in this project:
http://hackaday.com/2011/06/16/beginner-concepts-using-a-low-pass-filter-to-smooth-pwm-output/
Monday, November 21, 2011
Electronics lessons: revisiting the relay
So a few weeks ago I introduced the relay, in my planning of what I'd like to appear next in this blog I realised that I forgot to include a mention of precautions that should be taken when dealing with electromagnetic relays.
As you know electromagnets can be used to generate electricity.
you have a coil of wire, you put a magnet inside of it, then you take the magnet away.
the collapsing magnetic field causes electricity to be generated.
When you have energised a relay you have created a magnet. when you turn a relay off you cut electricity going to the coil, the magnetic field collapses, and much like in a generator electricity is generated in the coil.
This spike of electricity occurs in the relay coil, and will travel throughout the circuit, if there are electrically sensitive parts, (transistors, or micro controllers) in the circuit these can be damaged by this electrical charge, which travels backwards through the circuit.
this "back EMF" backward electromotive force, can be limited by putting a diode in parallel with the relay like so: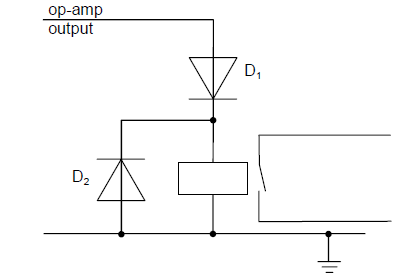
During normal operation electricity flows from positive to negative.
the relay is energised
When the coil collapses the relay becomes a generator, but a generator that's connectted the wrong way around.
now a large voltage spike is introduced to the circuit, backwards, this voltage spike may be greater than a components maximum rating for reverse polarity connecttion: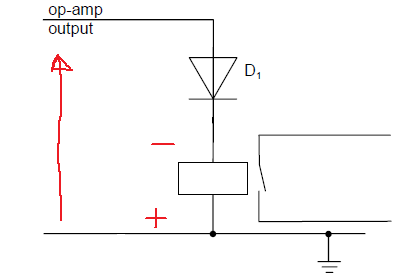
the result is that the components may die.
putting a protection diode in means that rather than travelling backwards through the sensitive components, (where not inconsiderable work needs to be done to breakdown a component) the path the voltage spike takes is through the diode right back to the other side of the relay coil.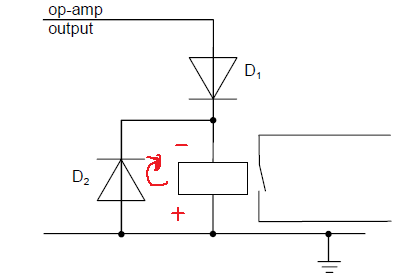
As you know electromagnets can be used to generate electricity.
you have a coil of wire, you put a magnet inside of it, then you take the magnet away.
the collapsing magnetic field causes electricity to be generated.
When you have energised a relay you have created a magnet. when you turn a relay off you cut electricity going to the coil, the magnetic field collapses, and much like in a generator electricity is generated in the coil.
This spike of electricity occurs in the relay coil, and will travel throughout the circuit, if there are electrically sensitive parts, (transistors, or micro controllers) in the circuit these can be damaged by this electrical charge, which travels backwards through the circuit.
this "back EMF" backward electromotive force, can be limited by putting a diode in parallel with the relay like so:
During normal operation electricity flows from positive to negative.
the relay is energised
now a large voltage spike is introduced to the circuit, backwards, this voltage spike may be greater than a components maximum rating for reverse polarity connecttion:
the result is that the components may die.
putting a protection diode in means that rather than travelling backwards through the sensitive components, (where not inconsiderable work needs to be done to breakdown a component) the path the voltage spike takes is through the diode right back to the other side of the relay coil.
Monday, November 14, 2011
Coding Lessons: C and Arrays (lesson 9)
Arrays are a pretty important part of the way in which information is stored. This is true of both programming on computers, and (as a hint of things to come) also when programming embedded micro controllers for projects that you may create.
You create arrays when you want to store many items of the same type of data, and you want them to be stored in adjoining memory locations to make locating or sorting them easy.
This could be (for example) a series of temperature measurements.
So we have the idea that an array is a series or collection of data, you can imagine it as a table row.
something like this
[1][2][3][4][5][6][7][8]
and we've covered that the data is of the same type, (all int, or all char, etc) so now lets have a look at how we define and element and how we use an element.
Remember we define a single value like this
int x;
that is I want this type of data (int) stored as this variable name (x)
defining an array is not much different.
int x[8];
I want to store integers (int) as this variable name (x) and I want this many pockets to put data in (8)
When you access an array it is treated like a normal piece of data.
for example.
If I had a program.
int x;
int y;
int z;
I have 3 bits of data.
I can say
x = 1;
y = 2;
z = 3;
and call them like this
printf("x = %d\r\n", x);
printf("y = %d\r\n", y);
printf("z = %d\r\n", z);
but if I use an array I can store all the data in adjoining memory.
now I say
int coordinates[3];
coordinates[0]=1;
coordinates[1]=2;
coordinates[2]=3;
and I can recall the data from it's storage location, in much the same way as using standard data;
printf("x = %d", coordinates[0]);
and so on.
Now this interesting thing for anyone paying attention there is that we're not starting counting from 1, Just as data pins on microchips start counting with pin0, pin1 etc in arrays we count our first data "pocket" as 0
Multi Dimensional Arrays
You may have noticed that a single table row is a little, well limiting, I gave an example of a coordinate above.
Imagine you're drawing a graph (x,y), what are you going to do? declare multiple arrays
int datapoint1[2];
int datapoint2[2];
...
int datapoint8[2];
or are you going to try to make an array that is:
int datapoints[16];
(where 0 = x1, 1 = y1, 2=x2, 3 = y2, 4 = x3... -far too confusing)
or instead would it make more sense to define your array in multiple dimensions. more like a table?
int datapoints[8][8];
Now you can store your x an y values in a way that makes sense to you.
The thing that you should note is that this is not an array that looks like a table 8 columns wide and 2 rows deep, this table is 8 wide, 8 deep, there are 256 data pockets.
storing 2d co-ordinates like this would be a bit of a waste of memory.
2 dimensional arrays are not the limit, you can create incredibly complex multi dimensional arrays.
int array[10][10][10]; = 1000 array pockets
int array[10][10][10][10]; = 10,000 array pockets
you see how it adds up fast.
On a modern computer with near limitless amounts of memory this is unlikely to be a problem, you can waste memory, like making an 8x8 256 pocket array for storing 16 values, to make 8 graph points on a line graph.
but on a lower spec'd device (like an embedded processor) you might want to be more careful with your memory use.
in this case your 2d array for a graph might be
int points[8][2];
and you'd have data
[x1][x2][x3][x4][x5][x6][x7][x8]
[y1][y2][y3][y4][y5][y6][y7][y8]
Monday, November 07, 2011
The Workbench/shop stock list
I've had enough of posting lessons for a little while so I'm going to post a little commentary.
back to a subject visited earlier in the year, the what tools should you buy list.
So far I looked at some very basic Electronics tools:
http://ah-screwit.blogspot.co.uk/2011/07/workbenchshop-stock-lists-electronics.html
As that post says, this was prompted by an article on Hack a day that was asking for comments on what are essential workshop stocks.
There was a £60 spend on the very basic electronics workbench and roughly £130 spent on woodworking tools (well you really should make nice cases for your projects!)
So of the original £600 budget I still have around £400 to spend.
During the course of introducing components I've suggested making a logic level indicator
http://ah-screwit.blogspot.com/2011/07/logic-level-indicator.html
This will save you a whole load of time making the circuit over and over and money, it's much cheaper to make this than to buy it.
So far on the list of stuff that you really should have in your workshop/workbench we have:
multimeter
soldering iron
Iron stand
breadboard/choipping board/work surface protector
solder sucker/braid
breadboard
Clamps
Saw
Tape measure
Square
Marking Tools
Hammer
Punch
Chisel
Drill
Drill bits
Screw drivers
Safety Gloves
So lets start adding to that list.
By now you must have figured out that there are a few tools that are rather specialised, (solder suckers can only be used for sucking up molten solder) whilst other tools seems to be able to complete a variety of tasks with no ill effect. -as well as being able to solder a soldering iron is also a really good tool for burning wood, (that's if you're into creating wood burning drawings.
I've realised that there is a pretty essential item missing from the list.
Pliers
A decent set of pliers will include both needle nose and bull nose pliers.
If you're doing Electronics then you'll want a small variety, you'll also want a set of side cutters.
If you do bead craft then you'll mainly be interested in needle nose pliers, and side cutters.
Large work (and metal work) will likely require larger pliers.
A lot of needle nose pliers and have wire cutters built into them, and can also be used for holding nails as you begin to hammer them (saving your fingers!) three uses in a single tool. you should definitely get that!
A set of small pliers
http://www.maplin.co.uk/5-piece-miniature-plier-set-31557
this 5 piece set has bul nose, needle nose, end cutters, side cutter and curved needle nose.
£12.99 can't go wrong.
I think that takes care of all the change from the first £200 and gives you a pretty full tool box capable of working with both wood and electronics.
But lets look at expanding that...
As much as when you're starting out you clearly won't just spend £200 right off the bat on new stuff for a hobby. that list is very far from an exhaustive list of the kind of stuff you;re going to want to have around when you start to get seriously involved in the (very rewarding) world of DIY stuff, or hobby making and fixing.
now we'll start looking at some more specialist tools, these are the kind of non-essential stuffs, but also the high price items, this is where the money starts to disappear fast! so this is also where you may start to specialise. (As you may have gathered from the wide variety of lessons and projects in this blog I'm rubbish at specialising, for the tools I have, to buy new would be thousands, even buying some second hand at car boot sales etc I've probably spent thousands!
Wood Working
If you are into wood working, this is the time you need to start considering some real power tools.
if you cut a lot of boards then you will probably want to invest in a Circular saw (£50), a set of long straight edges to use as a fence when using the circular saw (this could just be a long length of wood) you'll probably want to finish the edges and corners of wooden box projects with rounded or moulded edges, or inlay router detail, so you'll want a router and a set of bits (£50) if you ever want to cut out objects that are not straight you'll want to consider getting a scroll saw/jigsaw (£50) finishing project sanding large table tops by hand isn't great, you want a power sander, maybe even more than one, a belt sander for really ripping into a course surface (£50) and a sheet sander for more detailed work (£50) if you ever plan on doing DIY that involves say hanging a door or making rough timber smooth then you'll likely want a power plane (£50)
now you have £100 of that £600 budget left. if you;re doing big wood working projects, you'll likely need to bolt something together one day, so you'll want a ratchet set (£30) and you're going to need somewhere to work, a couple of folding "workmate" benches, which are about £30 each.
that's £600 gone. (£200 in previous blogs and £400 on those last tools)
now you can comfortably make small electronics projects and do some very nice woodworking projects. even with £600 spent there is still no table saws pillar drills, the planner is hand held, not a table. the more "into" making things you get, and the more your skill develops, the more tools you will inevitably buy.
Electronics
Lets assume thatyou want to specialise in electronics. and want to cover a mix of analogue and digital projects.
First tool you're going to want is an oscilloscope, these can be had from eBay for as little as £20, for an old analogue scope. but can also go right up into hundreds or thousands for digital storage scopes. you can get scopes that attach to your PC. this isn't the place for talking about how to chose a scope. but right now we;ll budget about £100 for a scope. that will be a reasonable new scope, or a great second hand scope.
You'll also want a function generator for giving your circuits signals that you control. that again will cost you about £100.
You're also going to spend around £50 on good leads and probes to connect them all together.
You should consider getting a microcontroller development board. I mainly use PIC chips from Microchip a programmer for these costs around £20 for a generic one.
You may also chose AVR or similar programmers cost around the same, you could also just buy a single chip development board, the arduino costs about £20, but why buy just that board when you could get a programmer for the who AVR range from Atmel for a similar price?? my pickit2 programmer also programmes a variety of EEPROM chips.
you now have £130 change.
but you're now making some big circuits, one breadboard isn't cutting is, you need more.
you also want components, LEDs resistors, crystals resonators for the chips, capacitors, the chops that you are using. a set of draws to keep components sorted (£30). that £130 will disappear fast!
Metal Working
I haven't posted many metal working projects just yet, that's because they tend to be big, and bulky, taking lots of time and space. metal working is also a pretty specialised and expensive arena to be in.
that £400 change you have from the initial lessons.
welder £100 - £1000 (don't buy a sub £100 welder) and the only welder you'll get that is good for that money is a stick welder. (useless for sheet metal work) (I'll call this £200)
a big vice (£50)
a big blow torch (for brazing) (£50)
a set of hammers and dollies (£50)
a decent leather bag (£25)
brazing supplies (£25)
Fabric / Textiles
Textiles is an amazingly rewarding crafting experience. don't be suckered into thinking it's girl stuff and easy because it's just not!
You're going to want at a minimum some pinking shears, (they cut those non fraying jaggered edges)
needles, threads.
if you're doing big stuff a dewing machine is a must, (basic machine will set you back £100, avoid any one called mini or travel sold for around £30, they are rubbish.
however, most of the expense of your textiles crafting supplies is going to be materials cost. fabric is just not cheap!
Auto Mechanics
Gone are the days of having just a single set of cresent spanners and a flat head screw driver.
today if you want to work on a car you need some serious equipment.
the old stock tools are still needed.
Feeler guages for checking plug gaps and valve clearance (£10)
Spring Compressors (£50)
Circlip Pliers (£10)
Pressure gauge (£30)
Rachet and spanner set (£100) - yes seriously a hundred beer tokens. go to Halfords, get their 200 piece professional set, it's expensive, but it's got pretty much every socket you;ll ever need and is guaranteed for life, if you ever break a socket you go to a store with the broken socket, (that are all embossed Halfords professional) show them the socket and they replace it. you don't even need a receipt, all their professional stuff is guaranteed for life. tell them you lost the recipt but still want then to honour the promise, (clearly that's a UK only thing) if you're not in the UK then consider your nearest large tool supplier who are happy to put crazy guarentees on quality
A set of torque wrenches, (small medium and large) (£100)
a drain pan, (for catching oil) (£10)
a good trolley jack (£50 - £100)
Ramps (£50)
axle stands (£30) - seriously get Axle stands, I was working on my car the other day I heard a creak, I rolled out from under it to check out the noise, five seconds later the car fell of the scissor jack, the brake disc/rotor that was ten seconds before right above my chest was now on the floor.
well that's actually £500 spent, (though you may find what's called a lifting kit including ramps and jacks together for a good price, but I've still not included any diagnostic gear fault code readers. (the code reader I have for my car is a specialist Peugeot one that I need to have a dedicated laptop for as well!)
It's when you get seriously into the hobby that the serious money starts to be spent!
Monday, October 31, 2011
Electronics lessons: The Relay
So, a while ago we covered the switch, how contacts are made and how they are broken, the different types of switch that you could get, toggle switches and slide switches.
but the thing is, all those switches relied on you pressing a button.
We talked about how the transistor acts like an electronic switch, but the problem here is that the transistor cannot handle, (as in physically, cannot handle will get too hot and melt) huge currents, also in some projects you may want to physically isolate some parts of the circuit away from other parts.
You may for example have a circuit that has parts exposed where you might touch them, but it's ok as it's very low voltages, but elsewhere in the circuit you may be using mains voltages to turn on a light, in this case what you need to use is a relay.
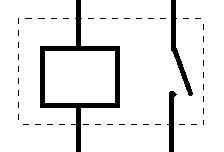
A relay is a kind of electronic switch. The traditional relay is made with two normal switch contacts,one of these is held in a fixed position whilst the other is on a stiff sprung arm, but is able to move.
Traditional relays have a electro magnet contained inside, when activated this electro magnet pulls the sprung arm towards it, either opening or closing switch contacts. The symbol for a relay is a small box to indicate the electromagnet with a normal switch symbol alongside this, the switch contacts are contained inside a dotted outline to show that they are controlled by the relay.
We talked about how the transistor acts like an electronic switch, but the problem here is that the transistor cannot handle, (as in physically, cannot handle will get too hot and melt) huge currents, also in some projects you may want to physically isolate some parts of the circuit away from other parts.
You may for example have a circuit that has parts exposed where you might touch them, but it's ok as it's very low voltages, but elsewhere in the circuit you may be using mains voltages to turn on a light, in this case what you need to use is a relay.
A relay is a kind of electronic switch. The traditional relay is made with two normal switch contacts,one of these is held in a fixed position whilst the other is on a stiff sprung arm, but is able to move.
Traditional relays have a electro magnet contained inside, when activated this electro magnet pulls the sprung arm towards it, either opening or closing switch contacts. The symbol for a relay is a small box to indicate the electromagnet with a normal switch symbol alongside this, the switch contacts are contained inside a dotted outline to show that they are controlled by the relay.
Monday, October 24, 2011
Changing Venetian Blinds
There are many reasons why you may want to change the slatted blinds in your house, perhaps you are re-decorating, changing the scenery, perhaps the old ones have been there a long time, or perhaps, like me, you have cats which are little bastards that chew everything they get near to.
Having chewed a couple of blind slats, the blinds now have to be changed, since I was doing this anyway it seemed only fitting that I should write and post up a small how to do this, there will be plenty of pictures.
Firstly, this is the damaged blind slats.
To remove the old blinds look at where the blinds are hung on the wall, these binds, (originally from B&Q) have a small sliding door that you open to be able to remove the top of the blind from it's bracket.
Once the door is opened the blind can be removed from this end, and will come out the other end without the need to remove the door on that side.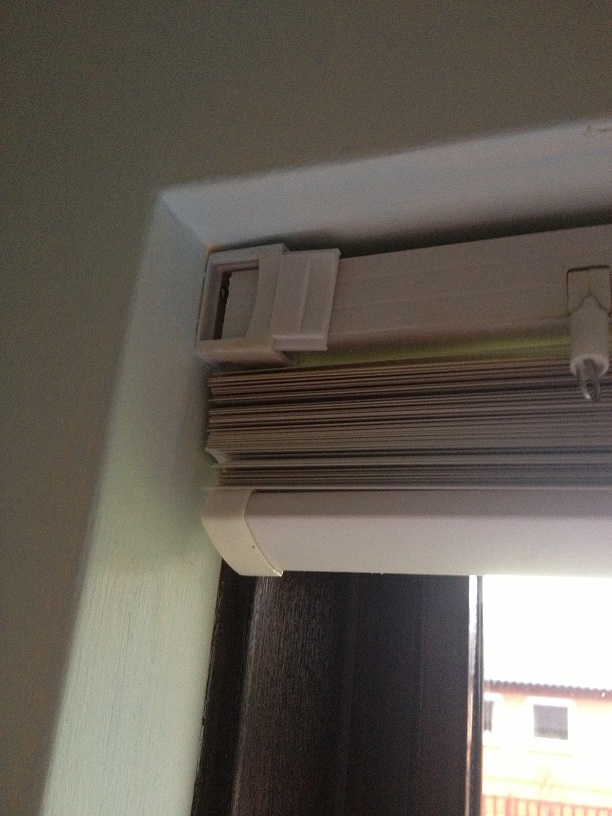
When you are buying the replacement blind you are pretty unlikely to find a blind that will fit your window perfectly, (you'd think in a fairly modern house where every house looks like the last, the people who make cookie cutter houses might have talked to the people who make binds and maybe decided on what a good window size was, but apparently that would have been too hard.
So start by measuring the width of the window (left to right) in this case the window measured 115cm you then need to measure the height of the window from top to bottom, this is called the drop and for the blind I'm changing the drop needs to be 103cm
Then you need to go to the shop and buy the closest fitting blind, in my case this was a 110cm wide blind with a drop of 180cm.
Once you've purchased your blinds, you'll then need to go about making them fit.
Making them fit width wise is pretty easy, (but very time consuming.)
I need to shorted my blind by 7cm, this means removing 3.5cm from each side.
Start by using a small hack saw to cut 3.5cm from each end at the top bracket part that holds the strings, then using scissors, but 3.5cm from each end of each and every slat -I did warm you it was time consuming!!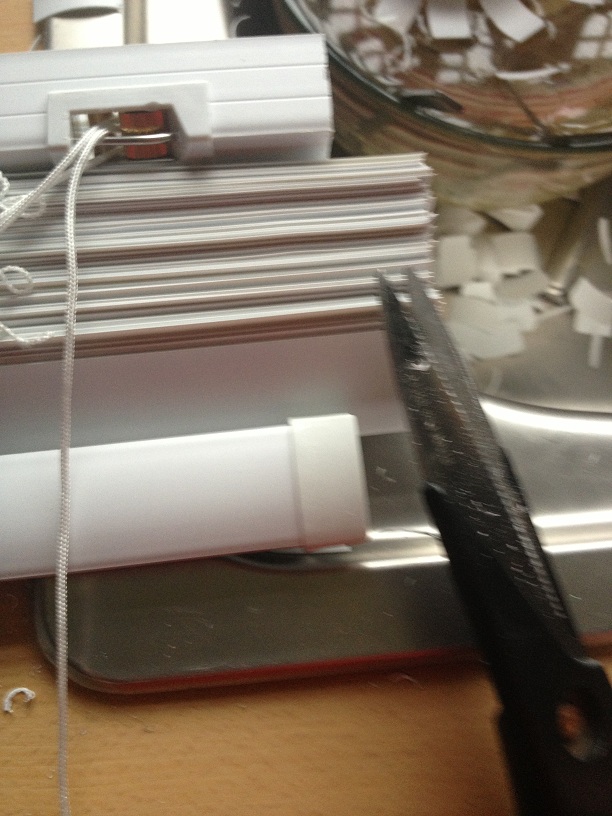
Once you're done altering the top bracket and the slats, you now need to shorten the bar at the bottom.
To do this you need to remove the plastic end caps -which should pull off, then as before cut 3.5cm from each end with a saw.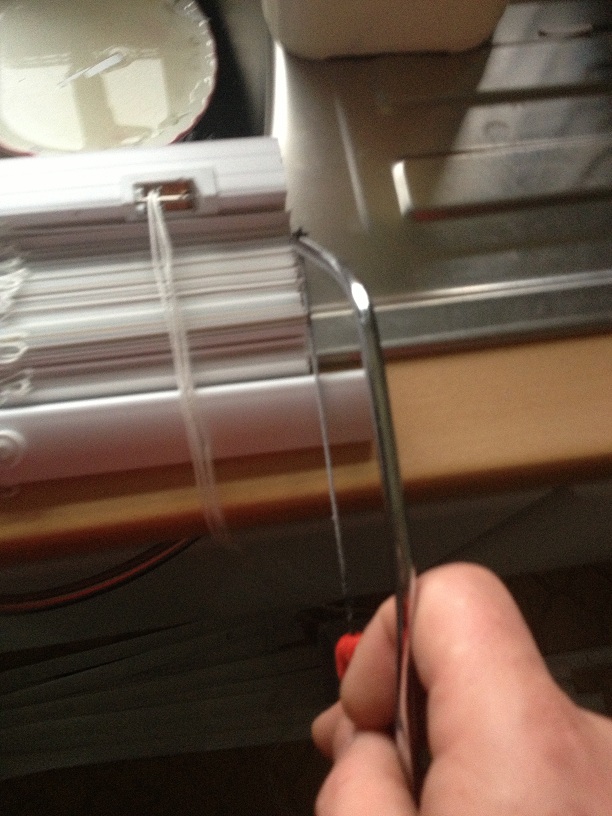
now that the blind will fit into the window recess, put the blind into the bracket, and the top and let the blinds go down, the drop of the blinds is still far too great for the window.
chose a slat that's a couple of slats lower than the slat that you think should go at the bottom, (the aim is to have a couple of slats sitting on the bottom bar so that the blind doesn't distort when you change the slat angles.) mark this slat, a big black marker pen will do the trick, or cutting it up with the scissors.
Now take the blind out of the windows and rest it on a large flat surface.
The bottom bar has a series of white plugs in it, these need to be prized out so that you can get the the pull strings for the blind.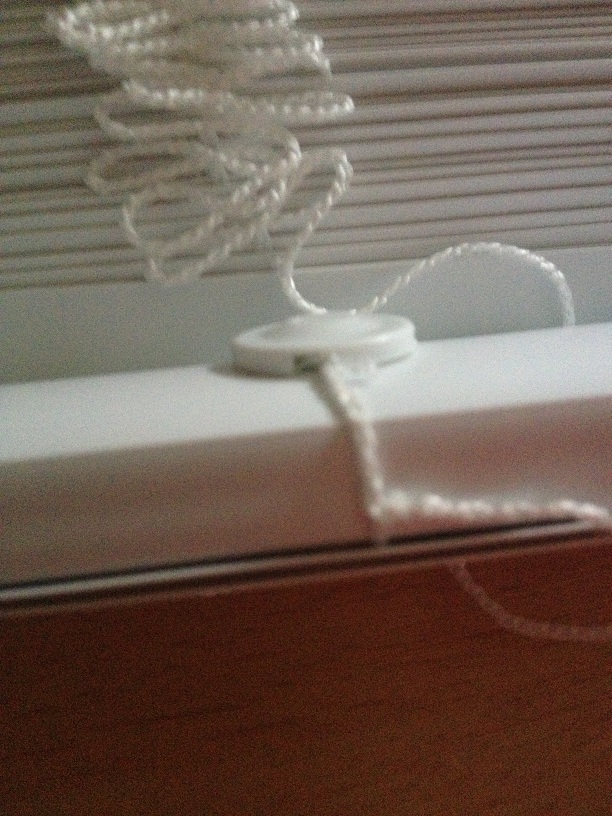
once the clips are out, you should be able to remove the strings the hold up the blinds, which are held into the bar with a small knot. when you undo the knot the pull strings for the blind should come out of the bar.
the bar will now be held in the threaded ladder part of the setup that controls the blinds angle.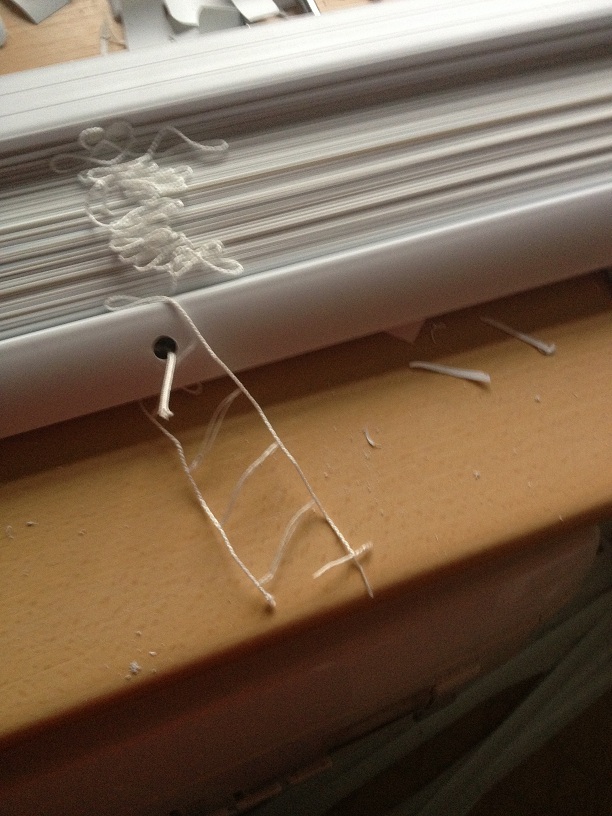
you can just slid the bar sideways out of this laddered thread.
Pull the main threads out of the slats, up to the slat that you marked, (clearly do take out the slat that you drew all over!) then pull the slats sideways out of the laddered thread.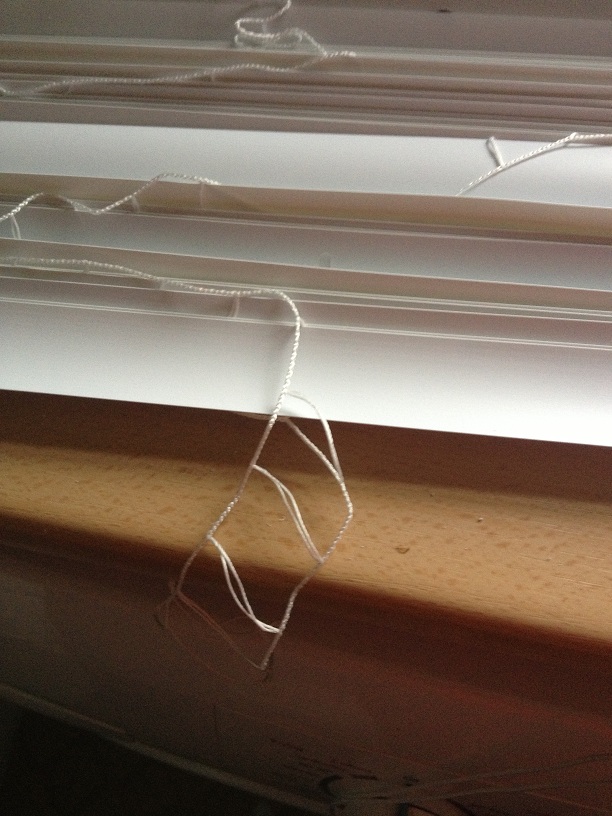

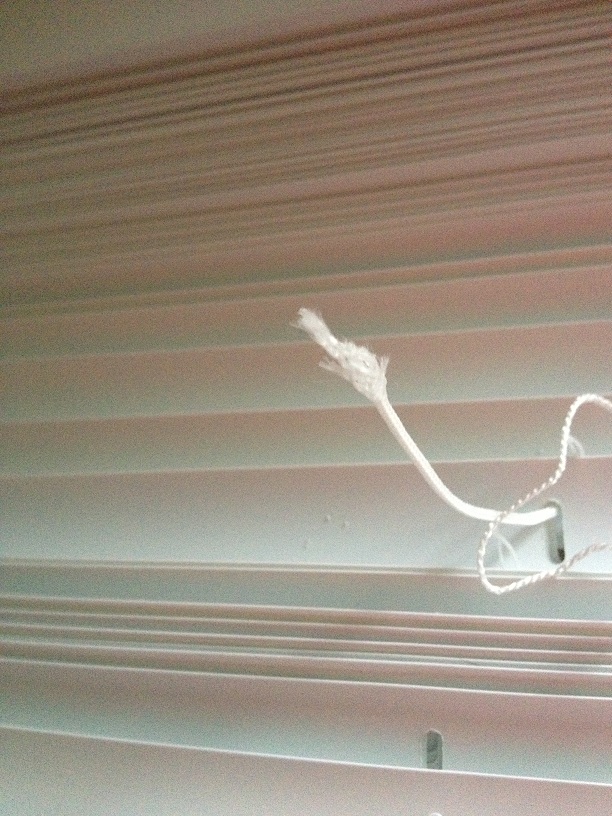


Once you've threaded the draw cord through, you'll need to tie a small knot in the string so that the bar will sit on this and raise/lower with the string.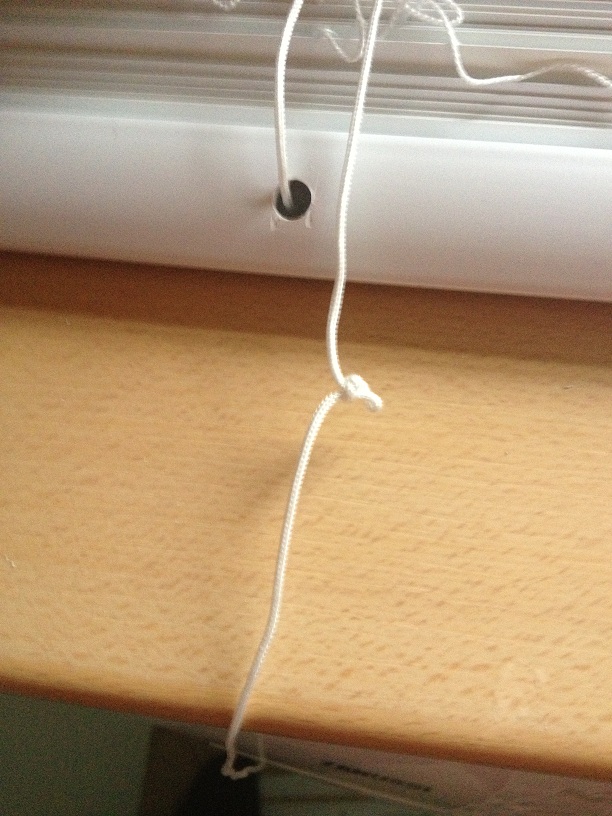
Then cut off the spare string. and remove all but about three of the laddered thread.
Now you can poke the end of the string into the hole in the bottom of the blind, twist up and poke in the dangling thin ladder threads into this hole also. then pop the small cap back on to hold the threads inside the bar.
Finally hang the blind into the brackets that were already on the wall, and adjust the draw strings as necessary.
(to adjust the draw strings pull the knot from the toggle and tie a new know further up the draw string for the toggle to rest on, and cut away the draw string that is spare.)
Finally, step back and admire your handy work. :)
the blind slats that were removed can be kept for the future in case the cats decide that they would like to have a chew on the blinds again :)
Having chewed a couple of blind slats, the blinds now have to be changed, since I was doing this anyway it seemed only fitting that I should write and post up a small how to do this, there will be plenty of pictures.
Firstly, this is the damaged blind slats.
To remove the old blinds look at where the blinds are hung on the wall, these binds, (originally from B&Q) have a small sliding door that you open to be able to remove the top of the blind from it's bracket.
Once the door is opened the blind can be removed from this end, and will come out the other end without the need to remove the door on that side.
When you are buying the replacement blind you are pretty unlikely to find a blind that will fit your window perfectly, (you'd think in a fairly modern house where every house looks like the last, the people who make cookie cutter houses might have talked to the people who make binds and maybe decided on what a good window size was, but apparently that would have been too hard.
So start by measuring the width of the window (left to right) in this case the window measured 115cm you then need to measure the height of the window from top to bottom, this is called the drop and for the blind I'm changing the drop needs to be 103cm
Then you need to go to the shop and buy the closest fitting blind, in my case this was a 110cm wide blind with a drop of 180cm.
Once you've purchased your blinds, you'll then need to go about making them fit.
Making them fit width wise is pretty easy, (but very time consuming.)
I need to shorted my blind by 7cm, this means removing 3.5cm from each side.
Start by using a small hack saw to cut 3.5cm from each end at the top bracket part that holds the strings, then using scissors, but 3.5cm from each end of each and every slat -I did warm you it was time consuming!!
Once you're done altering the top bracket and the slats, you now need to shorten the bar at the bottom.
To do this you need to remove the plastic end caps -which should pull off, then as before cut 3.5cm from each end with a saw.
now that the blind will fit into the window recess, put the blind into the bracket, and the top and let the blinds go down, the drop of the blinds is still far too great for the window.
chose a slat that's a couple of slats lower than the slat that you think should go at the bottom, (the aim is to have a couple of slats sitting on the bottom bar so that the blind doesn't distort when you change the slat angles.) mark this slat, a big black marker pen will do the trick, or cutting it up with the scissors.
Now take the blind out of the windows and rest it on a large flat surface.
The bottom bar has a series of white plugs in it, these need to be prized out so that you can get the the pull strings for the blind.
the bar will now be held in the threaded ladder part of the setup that controls the blinds angle.
Pull the main threads out of the slats, up to the slat that you marked, (clearly do take out the slat that you drew all over!) then pull the slats sideways out of the laddered thread.
now slide the bar into the place on the laddered thread where your marked slat was, and thread the pull strings back into the bar.
(if you cut the nylon pull strings, then make be frayed now. use a lighter to heat the frayed end of the nylon cord, then whilst it is still warm quickly twist it between your fingers.
(if you cut the nylon pull strings, then make be frayed now. use a lighter to heat the frayed end of the nylon cord, then whilst it is still warm quickly twist it between your fingers.
Once you've threaded the draw cord through, you'll need to tie a small knot in the string so that the bar will sit on this and raise/lower with the string.
Now you can poke the end of the string into the hole in the bottom of the blind, twist up and poke in the dangling thin ladder threads into this hole also. then pop the small cap back on to hold the threads inside the bar.
Finally hang the blind into the brackets that were already on the wall, and adjust the draw strings as necessary.
(to adjust the draw strings pull the knot from the toggle and tie a new know further up the draw string for the toggle to rest on, and cut away the draw string that is spare.)
Finally, step back and admire your handy work. :)
the blind slats that were removed can be kept for the future in case the cats decide that they would like to have a chew on the blinds again :)
Monday, October 17, 2011
Fixing an amplifier 1
The problem with this amplifier is that the input jack is a little hit and miss.
When you plug the input in, there is a 50:50 chance if the amp will make a noise, wiggling or holding the jack seems to make the circuit complete, so it seems that the amplifier is working, but the jack is not.
However, along the way, I managed to break this amplifier more than it already was, and had to replace part that were non-standard with standard parts that I had to customise.
The amplifier in question is a Peavey Backstage amp, a tiny little guitar practice amp thing.
The basic problem is that sometimes you plug the guitar in and it works, sometimes you plug the guitar is and it doesn't work.
sometimes you plug the guitar in and it works, but only if you wiggle the jack lead around in the socket.
Basically, the input jack has for one reason or another seen better days, and could do with repairing.
Start by disconnecting the speaker wires, to ensure that you re-attach them with the correct polarity, (and thus correct phase) write down which terminal the white wire comes from and which wire the blue one comes from.
Next, remove the four screws on the top of the amplifier, and sliding out the tray that holds the electronics, push from the front, to the back.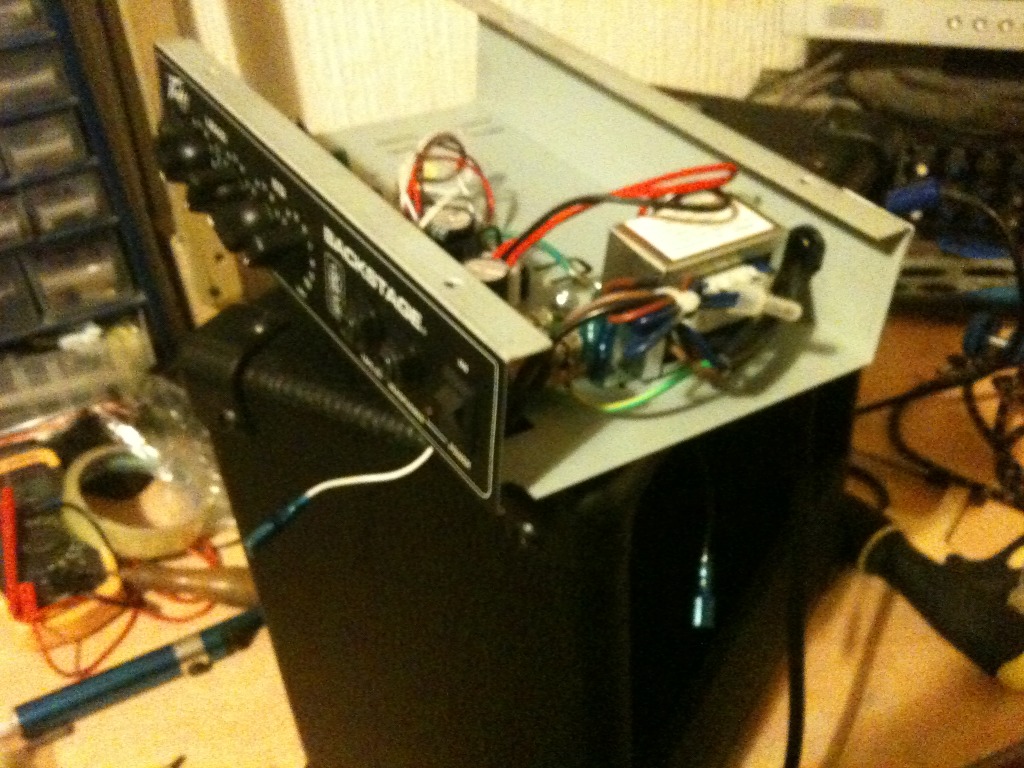
next remove the wiring for the transformer, and output power transistors as these are mounted on the chassis case, and remove the circuit board from the case.
In order to remove the circuit board from the case, you'll have to remove the plastic knobs from the front panel, these just pull off, or at least should just pull off.
This is where the first "challenge" of the build started, when removing the knobs the potentiometer came apart on two of the controls!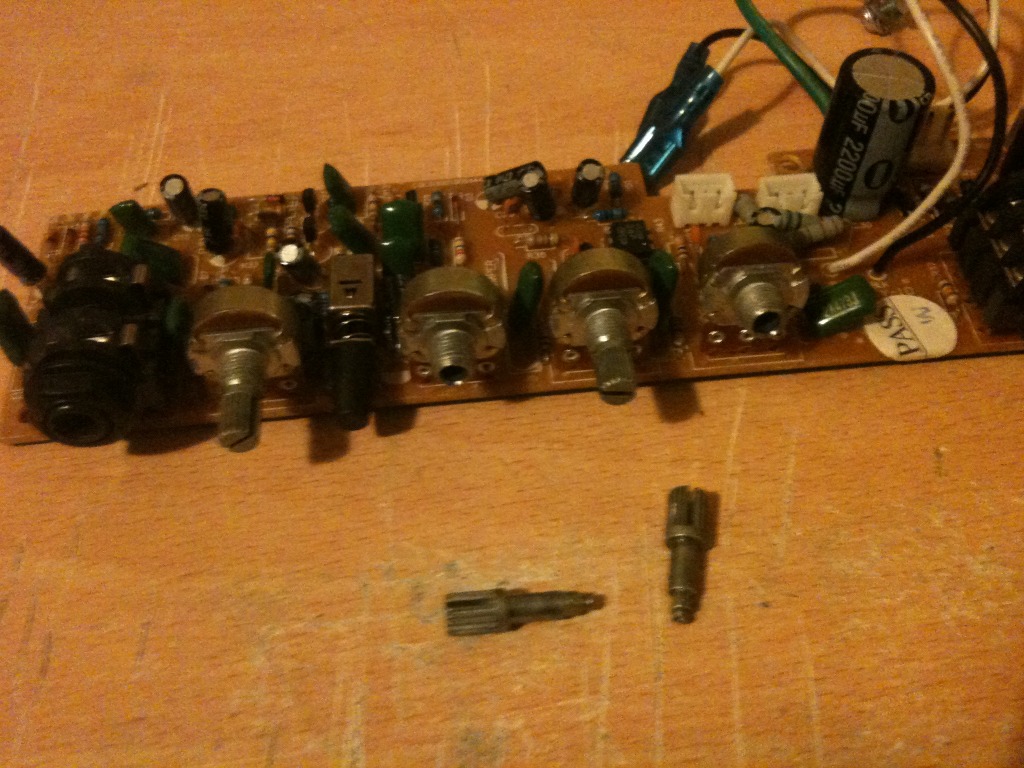
This is no trouble, all I needed to do was replace the potentiometers. I could see that they were the small type, (mini pot) as the body was about the size of a 1penny piece, (instead of the regular size of just smaller than a 2penny piece).
looking at the body of the pot I was able to determine that I needed a B47K (linear 47k pot) and an A10K (I think) (Analogue 10k pot)
So I nipped to the shops and bought 2 mini pots of the correct size.
the only trouble is, rather than receive pots with a stubby shaft with straight splines attached, I received a pot with a long smooth shaft. Alas, I found that I could buy small splined pots, if I were willing to wait a few weeks and pay twice as much, or I could use the pots that I could get and make them fit.
to make them fit, I need to shorten the shaft, and then put a texture into the shaft such that the plastic knob will have something to grip.
so, step 1,
Put the pot next to one of the existing ones on the board, use a marker to mark the length that the shaft needs to be.
step 2, cut the shaft.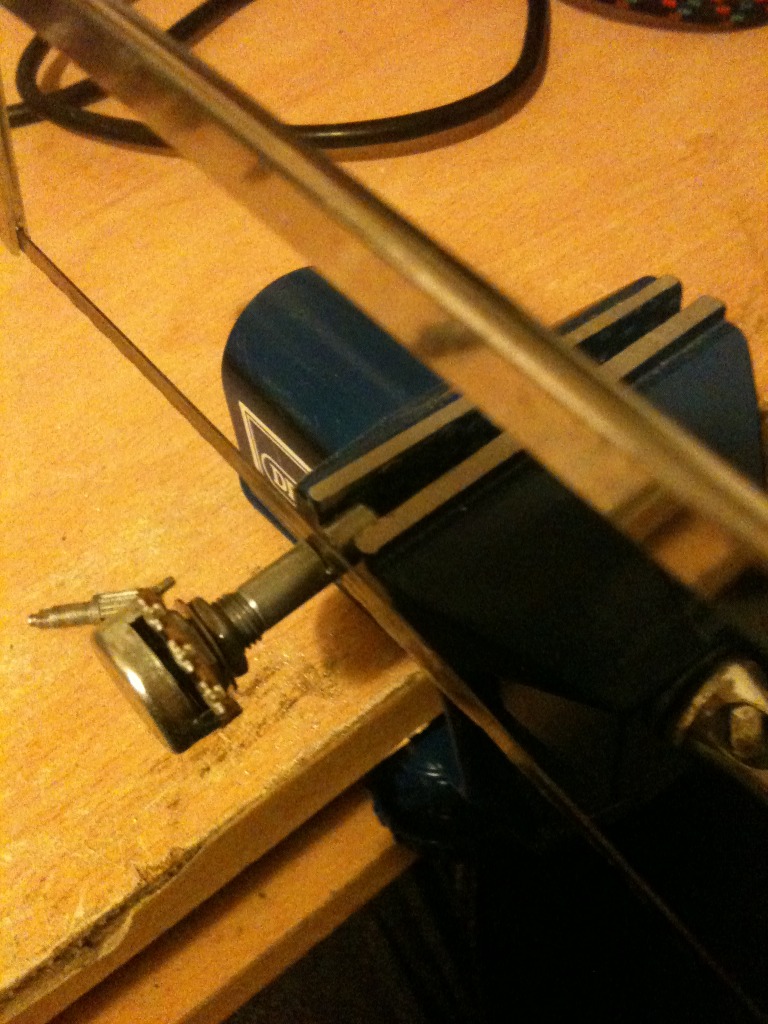
step 3, hold the newly shortened shaft in a vice, and using a needle file score a spiral pattern into the shaft.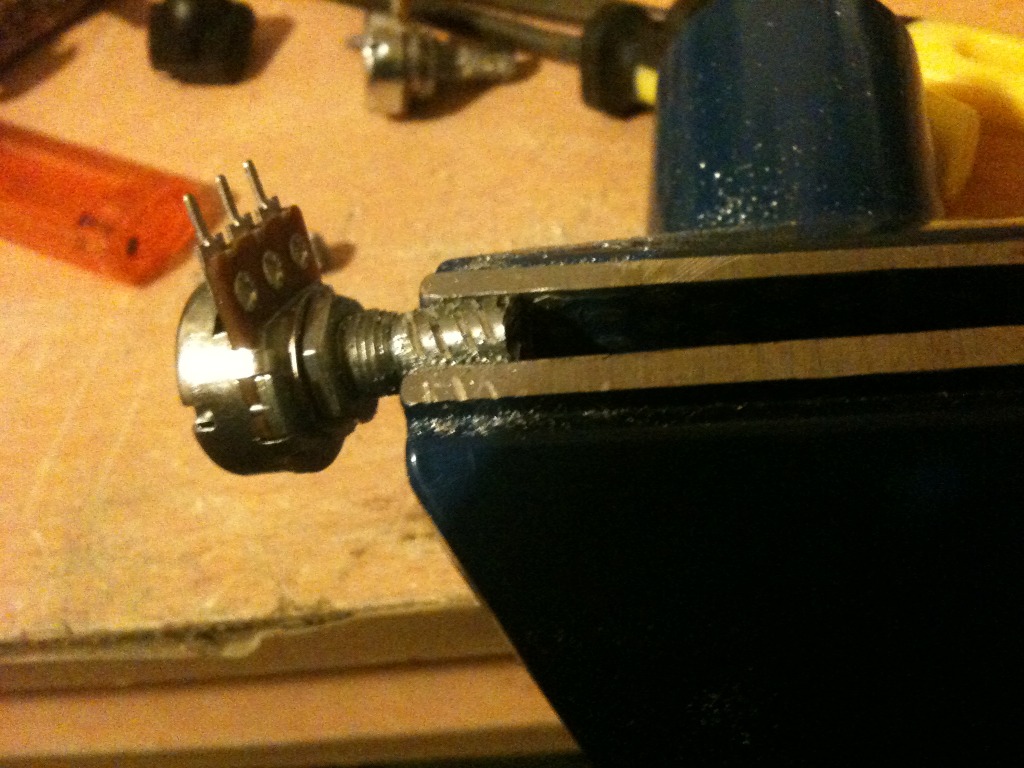
step 4, reverse the spiral pattern to give a knurled looking finish.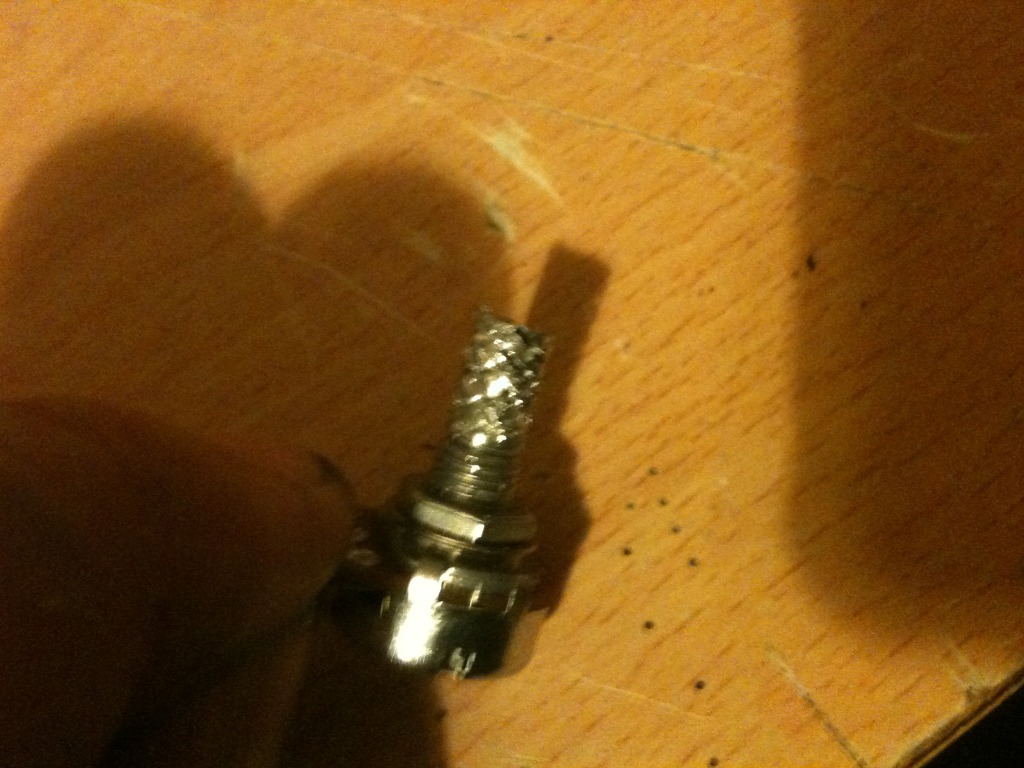
Here's a picture showing an unaltered pot next to my newly customised one.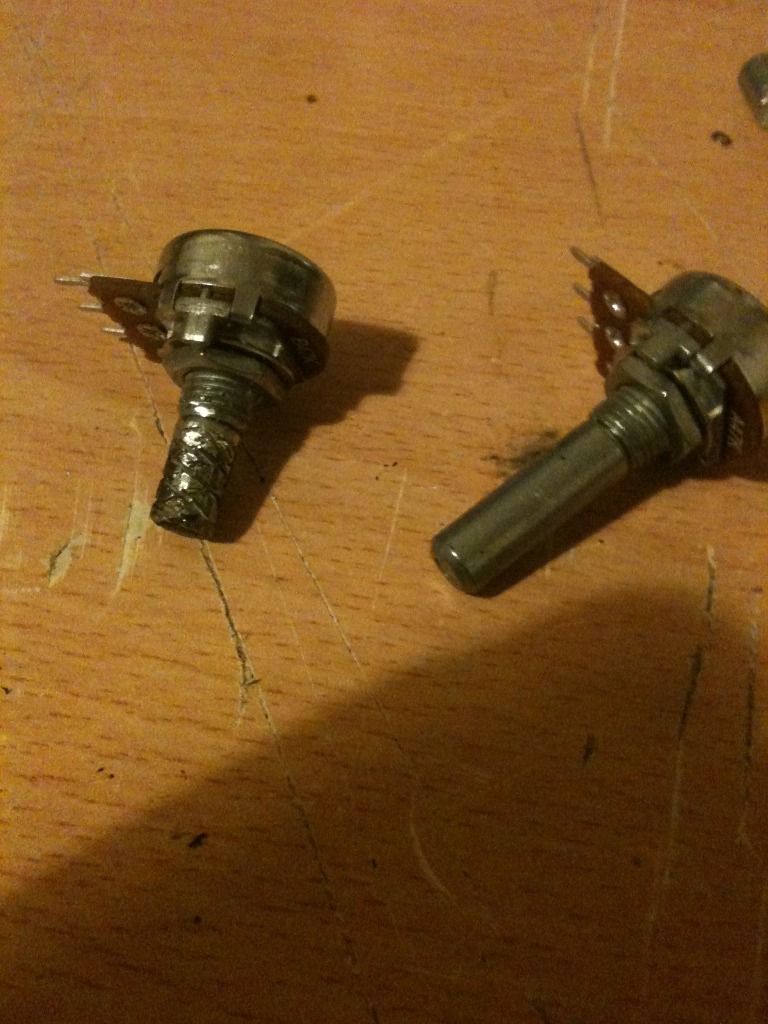
now solder in your new pots.
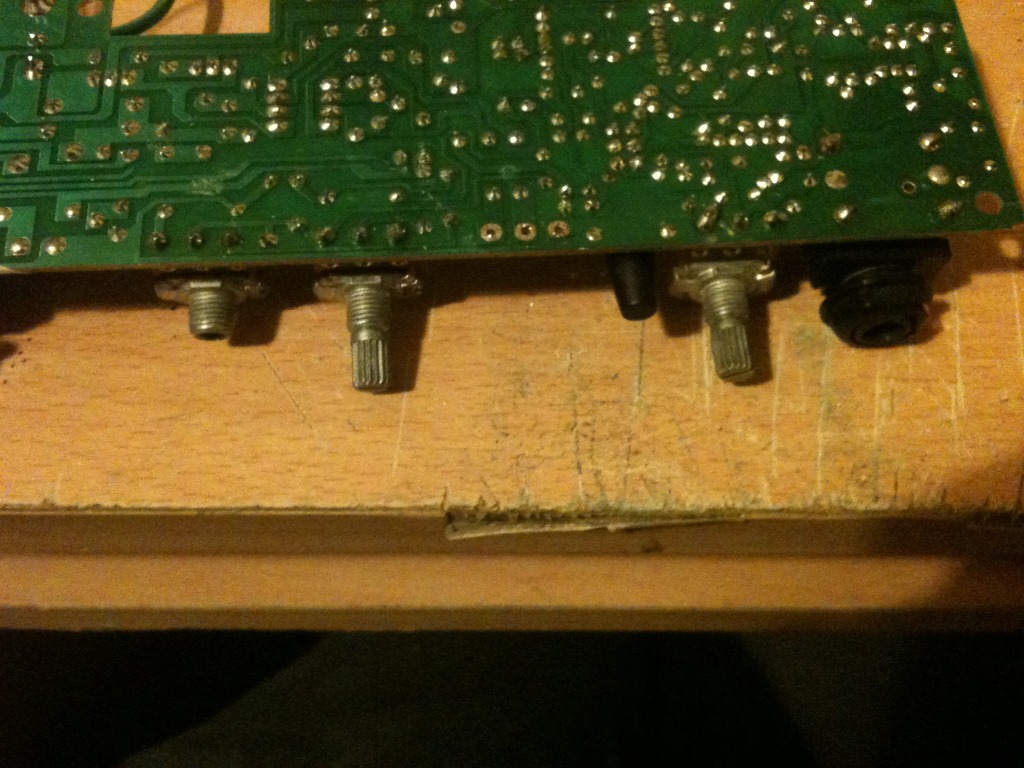
Now it's time to replace that jack socket.
simply remove the jack socket by de-soldering it's 4 legs, pull out the part and solder a new one in!
screw the circuit board, back to the chassis.
plug in the transistors and transformer again.
slide the amplifier tray into the back of the amplifier.
insert the four screws into the top that hold the tray to the amplifier body.
re-attach the speaker.
now test the amplifier.
When you plug the input in, there is a 50:50 chance if the amp will make a noise, wiggling or holding the jack seems to make the circuit complete, so it seems that the amplifier is working, but the jack is not.
However, along the way, I managed to break this amplifier more than it already was, and had to replace part that were non-standard with standard parts that I had to customise.
The amplifier in question is a Peavey Backstage amp, a tiny little guitar practice amp thing.
The basic problem is that sometimes you plug the guitar in and it works, sometimes you plug the guitar is and it doesn't work.
sometimes you plug the guitar in and it works, but only if you wiggle the jack lead around in the socket.
Basically, the input jack has for one reason or another seen better days, and could do with repairing.
Start by disconnecting the speaker wires, to ensure that you re-attach them with the correct polarity, (and thus correct phase) write down which terminal the white wire comes from and which wire the blue one comes from.
Next, remove the four screws on the top of the amplifier, and sliding out the tray that holds the electronics, push from the front, to the back.
next remove the wiring for the transformer, and output power transistors as these are mounted on the chassis case, and remove the circuit board from the case.
In order to remove the circuit board from the case, you'll have to remove the plastic knobs from the front panel, these just pull off, or at least should just pull off.
This is where the first "challenge" of the build started, when removing the knobs the potentiometer came apart on two of the controls!
This is no trouble, all I needed to do was replace the potentiometers. I could see that they were the small type, (mini pot) as the body was about the size of a 1penny piece, (instead of the regular size of just smaller than a 2penny piece).
looking at the body of the pot I was able to determine that I needed a B47K (linear 47k pot) and an A10K (I think) (Analogue 10k pot)
So I nipped to the shops and bought 2 mini pots of the correct size.
the only trouble is, rather than receive pots with a stubby shaft with straight splines attached, I received a pot with a long smooth shaft. Alas, I found that I could buy small splined pots, if I were willing to wait a few weeks and pay twice as much, or I could use the pots that I could get and make them fit.
to make them fit, I need to shorten the shaft, and then put a texture into the shaft such that the plastic knob will have something to grip.
so, step 1,
Put the pot next to one of the existing ones on the board, use a marker to mark the length that the shaft needs to be.
step 2, cut the shaft.
step 3, hold the newly shortened shaft in a vice, and using a needle file score a spiral pattern into the shaft.
step 4, reverse the spiral pattern to give a knurled looking finish.
Here's a picture showing an unaltered pot next to my newly customised one.
Now remove the old broken pots from the amplifiers circuit board, (Don't do this at the start, else you may forget which is meant to be the analogue one and which is the linear one!)
now solder in your new pots.
Now it's time to replace that jack socket.
simply remove the jack socket by de-soldering it's 4 legs, pull out the part and solder a new one in!
screw the circuit board, back to the chassis.
plug in the transistors and transformer again.
slide the amplifier tray into the back of the amplifier.
insert the four screws into the top that hold the tray to the amplifier body.
re-attach the speaker.
now test the amplifier.
Thursday, October 13, 2011
Electronics lessons: Pulse width modulation
Right now, this lesson is going to be useless.
Because in this lesson there is no application.
What this means is that this is another lesson of reasonably boring theory,
All I can say is hang in there, there are plenty of applications for pulse width modulation, so this is an important thing to get your head around.
Pulses
Often times in anything modern, we take existing words and try to shoe-horn new meanings into them, like how we describe an integrated circuit as a chip. it's not a chip really, it's definitly not a potato product, and it's not a small piece of anything really, (yes it is a small piece of a silicon wafer that was removed during production) but the name is poor.
The word pulse in pulse width modulation however is perfectly used.
imagine pulse in your wrist, goes on, goes off, goes on, goes off.
the pulse button on a blender, (used for turning on and off).
something that is pulsating.
An electronic signal that rises and falls between logic levels is perfectly described as a pulse.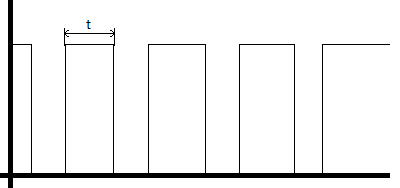
Firstly:
All pulses have a rising edge, (where the voltage rises).
All pulses have a duration, (marked as t on the above diagram).
All pulses have a falling edge, (where the voltage falls).
There is also a period of time when the voltage is low.
A series of pulses is a pulse train.
pulse trains may have a defined repeating interval, -but this may also not happen.
pulses may not appear regular as above, the off time may be longer or shorter, and the pulse duration may vary. pulse trains do not have to appear as signals with regularity, indeed in pulse width modulation, the width of pulses changes specifically as a way to convey information.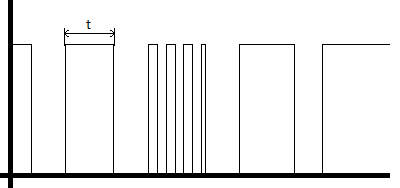
One of the more popular uses of pulse width modulation is servo control.
Servos (as in the little hobby RC servos) are controlled by Pulse width modulation.
basically, a short pulse tells the motor to move all the way to the left of the travel, whilst a long pulse means move all the way to the right.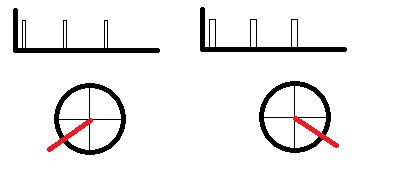
In servo control, pulses may be between 800 microseconds, and 2200 microsecond, with a pulse interval of 20 milliseconds.
To make a servo move all the way to the left extreme of travel, you need to:
Turn on the pulse, (rising edge)
Wait for 800us (pulse width)
Turn off the pulse, (falling edge)
wait for 19,200us (off time) - to make up the 2milisecond pulse interval expected.
repeat
To make a servo move all the way to the right extreme of travel, you need to:
Turn on the pulse, (rising edge)
Wait for 2200us (pulse width)
Turn off the pulse, (falling edge)
wait for 17,800us (off time) - to make up the 2milisecond pulse interval expected.
repeat
Varying the duration that the pulse stays on for, (between 800us and 2200us) causes the arm on the servo to go to any position to control.
for example, to centre the arm, you need to send pulses with a duration on 1.5miliseconds, 1500us
Sunday, October 09, 2011
Electronics Lessons: The Amplifier
OK, we looked at a transistor amplifier, and will go on to look at operational amplifier circuits.
One thing that I didn't do was measure how "good" these amplifiers were. I think that everyone has had a bad experience with an amplifier at one time of another, something that just sounded weird, and not quite right. but perhaps you didn't even notice until you heard something better, then went back and listened to the same amplifier again.
So lets look at amplifiers on some more detail, explaining some of the words used.
-this is just a quick guide to some terms that you will find in amplifiers, their use and design.
Distortion (clipping)
The easiest way to explain clipping distortion is to look at what causes it.
Imagine that you have an amplifier that have a positive supply voltage of +5V, and a negative supply voltage of -5V.
The amplifier has an input signal applied to it of +/- 1V peak to peak and a gain of 2.
The input is a lovely sine wave, rising an falling between 1 and -1 volts,
The output wave is a similarly lovely since wave between 2 and -2 volts.
Now if you increase the gain to six.
you would expect the output wave to now rise and fall between +6 and -6 volts in the same perfect sine wave, except, it can't the supply voltage to the amplifier circuit is only 5v so instead the wave goes up to 5v, then there is a plateau where the top of the sine wave should be, before it levels out and falls to -5v and plateaus again where is should be falling below this.
You are effectively over driving the amplifier, trying to force it to amplify beyond it's means. the top and bottom of the signal gets clipped off.
Headroom
headroom is a weird one, it's not something that you're ever going to see on a data sheet, because it's just a made up figure, it's something that you either have, or don't have, but I include it because I feel that it's important.
Headroom is a measure of how much power you have left in the amplifier. For example: say you need at least 100W of sound to fill a particular room with sound, that would suggest that you need to buy a 100W amplifier right?
Well sort of yes, and sort of no, if you need the full 100W of the amplifier, then you'll be turning the amplifier up full driving it to it's limits (and possibly beyond and possibly clipping the signal) then you've not specified a big enough amplifier. Sure you fill the room with sound, but what about the quality of that sound?
If you need a 100W amplifier to fill a room with sound, you're better suited to buying a 200W amplifier, in that way you only need to turn it up half way to get your 100W of power, the amplifier is operating well within it's limits, you won't be driving components or circuits to their limits and thus will get a cleaner sound.
Frequency Response.
The frequency response of an amplifier shows how well it responds to particular frequencies, If you look back to the floor standing speaker project the frequency response of speakers was discussed in reasonable detail, with amplifiers frequency response tends to be less determined by mechanical considerations, (as with speakers, and how much mass/air/distance can be travelled, and more by electrical characteristics of the components used, for example a capacitor has reactance, (right now you can think of that as resistance that varies with frequency. inductors also have a resistance that varies with frequency. This means that certain ranges signals will pass through the components easier than other signals, (with a different frequency range), and the amplifier may have superior gain at a given frequency range, or indeed an entirely reject other frequency ranges.
This differing frequency range in amplifiers is why, (for example) guitar amplifiers, (higher frequencies) are different to bass guitar amplifiers, (lower frequencies), which are again different from keyboard amplifiers, (which need a much broader frequency response.
Bandwidth
The bandwith of am amplifier describes a frequency range at which a given amount of gain can be produced, outside of the bandwidth of an amplifier gain drops off, (both above and below the frequency range). Bandwidth and frequency response, whilst different, may be used interchangeably in marketing literature
Total Harmonic Distortion (THD)
Total harmonic distortion, the absolute bane of anybody shopping for an amplifiers life.
kind of important, kind of a rubbish figure, it says so much and yet not nearly enough.
The basic premise is:
when you alter a signal, (say in an amplifier), each component may distort the signal slightly, and those distortions are usually in the form of adding harmonic compnents to the wave.
What this means is that for a signal, Ahz, there may be distortions at Bhz, Chz and Dhz, (where BCand D frequencies are harmonics of A).
It's possibly worth knowing that a pure sign wave plus decaying harmonics of it's fundamentals eventually sums to a square wave - but I'll explain that one another time) -just trust me, a sine wave is like a pure sweet whistle, a square wave is like a buzzer. -so you can see how adding harmonics to a signal, (and distorting that signal) can make it sound bad?
Anyway... the Total harmonic distortion is described as:
the power of all the added harmonic wave forms, divided by the power of the original source wave form (after amplification).
so if we have a output, amplified wave form A at 90W
and the harmonics at B - 5W, C = 3W, D = 2W
we have 5+3+2 =10 / 90
Therefore THD = 0.111
As you can see, what we're saying here is that you put a signal into your 100W amplifier, of the signal that comes out 10watts of it is just distortion. (whether that distortion sounds good or not is anyone's guess).
Further compounding the problem of THD figures is what type of distortion is added?
Crossover distortion adds harmonics in the levels that are audiable, (and don't sound "good").
whilst clipping distortion, produces more of a square wave, (like an overdrive guitar pedal), yes adding distortion, but adding it in such a way that some may actually find it pleasing to listen to, - and most of the distortion may even be very high order harmonics that are not even audible!
(in short, THD is useful when combined with lots of other information, but at the same time totally useless on it's own!)
Tuesday, October 04, 2011
Electronics Lesson: Breadboards
When you're first starting out making a project a bread board is an invaluable tool, it allows you to quickly throw together circuits and test things out.
To a person that's never seen one before they can be a little strange, it is after all just a little plastic board with a whole heap of holes in it.
But it's the copper tracks underneath those holes that make this useful.
Under the holes there are a series of U shaped coper tracks, when you push a component into a hole it makes contact with one of these tracks. you can then attach another component to another end of this track and you'd connected two components together.
The picture shown above shows the way in which the tracks flow.
At the very top and bottom of the board you have a blue line and a red line, these are to indicate power rails, (what they are normally used for). These run from left to right.
You see how the lines are solid? this indicates that the power rail runs the entire length of the board, if the line has a gap in it, this indicates that the power rail also has a break in it, (thus you can have 8 power rails instead of the 4 on this board, (2 at the top, 2 at the bottom)
The holes in the middle run from top to bottom. the only gap in these rails is the big break in the middle of the board. this big break is the width of a standard small chip, (like a 741, or a 555).
Just as a foot note:
the reason it's called a breadboard is because before this nifty little plastic board with copper tracks was invented people use to use either actual breadboard, (big wooden kitchen chopping boards).
they would use a screw, with a screw cup, then trap wires between the breadboard and brass screw cup to create electrical connecttions.
Even though it's no longer a wooden board, the name has just kinda stuck.
Friday, September 30, 2011
Weekend Project: Paraffin lamp
Ok, so this project started out when I saw a cool looking oil lamp.
It's quite a famous amongst the hacker world lamp since it was features on both Make: and hackaday (at least).
it's the light bulb oil lamp.
The original creator had some kind of, wow cool groovy political message, about recycling, and energy, but since they were burning fuel oil, they should have just done away with all that bollocks and just said, "look what I made, aint it cool?"
I forgot to take photos during the build, so I'm just going to describe the process.
to start you need a lightbulb, any old light bulb will do, but I chose a clear (rather than pearl) bulb so that the fuel source, (purple meths) could be seem clearly. I also chose an Edison screw style bulb rather than the (more common in the UK) bayonet style fitting, the bayonet fitting might allow for a cool frame to be built to support the bulb, but the two connections on the base do make this harder to make.
To create this you will need,
A light Bulb.
Some kind of hand drilling tool, (I used a perfboard track cutter), you could use either a bradel, or a gimlet from your woodworking tool box.
A screw driver/small chisel/butter knife. (basically a flat bladed thing you can use to carefully pry
A piece of wick (I cut a small section from a dishcloth/tea towel.
Some needle nosed pliers.
Start by using your hand drilling tool to gently attack the soft solder spot at the bottom of the bulb, your aim is to drill through the solder.
Once you've gotten through the solder stop. now you need to use your pry tool (screwdriver/knife) to gentle lift up the base of the brass screw cap where it meets the glass. go careful, too much force and you're going to break the glass.
Once you've managed to lift the cap a little you'll see a kind of putty/clay substance that attaches the brass cap to the glass bulb. go carefully and using the screwdriver/small knife start scraping at this substance. the idea is to carefully get rid of it.
after a while of scraping the brass screw base will just pop off of the glass bulb.
You'll now be left with a sealed glass bulb, one end round and bulb like, the other will be flat, you'll see two wires poking out that are sealed into the glass of the bulb, and a glass stem that goes inside the bulb, to the filament holders.
Use the screwdriver to carefully score the glass in a straight line and the very top of where the wires go into the glass that becomes the stem.
when you have a thin line scored in the glass, rest the bulbous end of the glass on something soft (like a roll of electrical tap), one the other end place a screw driver into the hole where the stem is, (where you have just scored. carefully, use another screw driver to tap the screw driver that is inside the stem.)
not too hard, a short sharp tap is all it should need to stress the glass, where it should crack and separate along the score line you just made.
Now use your needle nose pliers to reach inside the small hole that is now in the glass bulb. and crush/snap any large bits of the filament holder and stem.
Now turn the bulb bulbous side up and the stem, filament and filament holders should fall out the bottom.
Now, quarter fill the bulb with a slow burning oil fuel, (something like meths or white spirit, definitely not petrol). push one end of the wick through the hole where the solder was brass screw base.
Put the other end of the wick into the hole in the bulb so that it reaches the bottom and touches the liquid fuel.
Wait until the wick has absorbed some fuel.
find a base for your bulb, (I used a roll of electrical tape).
Light your lamp.
Monday, September 26, 2011
Coding Lessons: C and included header files (lesson 8)
In the last lesson I introduced the idea of putting either complicated or repetitive lines of code into a function of their own in order to reduce the amount of typing that you may need to do.
Now, I'm going to introduce a radical new concept, what if as well as using a function multiple times in that program, you also want to use that same function in multiple programs, are you going to copy and paste your function hundreds of times into your new code?
In the same way as you don't re-write all the code to actually do the getting of characters onto the screen, (you just use the printf function, you don't write out all the code each time) you also don't want to have to re-write (or copy paste) the code for your repetitive functions.
You might be wondering, since I've just said that printf is a function, where is this function? where is it declared? where is it called?
Well, you'll notice that the first line of every program that we've written so far has #include, (that means include this file), then the name of a file, the fact that the file name is in little triangular brackets means that it's in the tcc includes folder.)
well, those functions, Printf, scanf (and a whole load more) are declared in that stdio.h file.
you see that exporting those functions to a header file is useful, what's contained in the header file is just code, (exactly like we write), but it's used again and again, (in every program we've written so far).
so lets have a look at including our own header files.
so we start the code in the usual fashion
(include the standard header files from the includes directory of the Tcc compiler)
now we'll include our own header file, but this time from the same source directory.
see how it's included in quote marks, and not brackets. that means from this path, rather than from your library.
of course, copying header files might not be your idea of a great time so you could put your header into the main includes folder in the tcc directory, or you might want to start a header library of your own and include like this:
After this we write the main part of the program exactly as before.
inside our source directory we also need to have the header file, (called bmi.h)
this header file is literally, a line to declare a function exists, and the function, exactly the same as the last lesson:
float bodymassindex(h, w);
float bodymassindex(int h, int w)
{
float result;
/*bmi = mass(kg) / height^2(m)*/
result = h * h;
result = result/10000;
result = w/result;
return(result);
}
in completion the source code looks like this:
File 1, source.c
#include <stdio.h>
#include "bmi.h"
int main()
{
int weight, height;
float bmi;
printf("BMI Calculator\r\n");
printf("Enter your weight in Kilos:");
scanf("%d", &weight);
printf("Please enter your height in centimeters:");
scanf("%d", &height);
bmi = bodymassindex(height, weight);
printf("your BMI is: %f\r\n", bmi);
printf("\r\n\r\nUnderweight = < 18 -="-" .5=".5" 24.9="24.9" 29.9="29.9" 30="30" br="br" greater="greater" n="n" nnormal="nnormal" nobesity="BMI" noverweight="25" of="of" or="or" r="r" weight="18.5">
}
File 2, bmi.h
float bodymassindex(h, w);
float bodymassindex(int h, int w)
{
float result;
/*bmi = mass(kg) / height^2(m)*/
result = h * h;
result = result/10000;
result = w/result;
return(result);
}
Complied and run, this program looks exactly the same as the program fro mthe last two examples.
Now, I'm going to introduce a radical new concept, what if as well as using a function multiple times in that program, you also want to use that same function in multiple programs, are you going to copy and paste your function hundreds of times into your new code?
In the same way as you don't re-write all the code to actually do the getting of characters onto the screen, (you just use the printf function, you don't write out all the code each time) you also don't want to have to re-write (or copy paste) the code for your repetitive functions.
You might be wondering, since I've just said that printf is a function, where is this function? where is it declared? where is it called?
Well, you'll notice that the first line of every program that we've written so far has #include, (that means include this file), then the name of a file, the fact that the file name is in little triangular brackets means that it's in the tcc includes folder.)
well, those functions, Printf, scanf (and a whole load more) are declared in that stdio.h file.
you see that exporting those functions to a header file is useful, what's contained in the header file is just code, (exactly like we write), but it's used again and again, (in every program we've written so far).
so lets have a look at including our own header files.
so we start the code in the usual fashion
(include the standard header files from the includes directory of the Tcc compiler)
#include <stdio.h>
now we'll include our own header file, but this time from the same source directory.
#include "bmi.h"
see how it's included in quote marks, and not brackets. that means from this path, rather than from your library.
of course, copying header files might not be your idea of a great time so you could put your header into the main includes folder in the tcc directory, or you might want to start a header library of your own and include like this:
#include "../../mylibrary/bmi.h"
After this we write the main part of the program exactly as before.
int main()
{
int weight, height;
float bmi;
printf("BMI Calculator\r\n");
printf("Enter your weight in Kilos:");
scanf("%d", &weight);
printf("Please enter your height in centimeters:");
scanf("%d", &height);
bmi = bodymassindex(height, weight);
printf("your BMI is: %f\r\n", bmi);
printf("\r\n\r\nUnderweight = <18 -="-" .5=".5" 24.9="24.9" 29.9="29.9" 30="30" br="br" greater="greater" n="n" nnormal="nnormal" nobesity="BMI" noverweight="25" of="of" or="or" r="r" weight="18.5">
}inside our source directory we also need to have the header file, (called bmi.h)
this header file is literally, a line to declare a function exists, and the function, exactly the same as the last lesson:
float bodymassindex(h, w);
float bodymassindex(int h, int w)
{
float result;
/*bmi = mass(kg) / height^2(m)*/
result = h * h;
result = result/10000;
result = w/result;
return(result);
}
in completion the source code looks like this:
File 1, source.c
#include <stdio.h>
#include "bmi.h"
int main()
{
int weight, height;
float bmi;
printf("BMI Calculator\r\n");
printf("Enter your weight in Kilos:");
scanf("%d", &weight);
printf("Please enter your height in centimeters:");
scanf("%d", &height);
bmi = bodymassindex(height, weight);
printf("your BMI is: %f\r\n", bmi);
printf("\r\n\r\nUnderweight = < 18 -="-" .5=".5" 24.9="24.9" 29.9="29.9" 30="30" br="br" greater="greater" n="n" nnormal="nnormal" nobesity="BMI" noverweight="25" of="of" or="or" r="r" weight="18.5">
}
File 2, bmi.h
float bodymassindex(h, w);
float bodymassindex(int h, int w)
{
float result;
/*bmi = mass(kg) / height^2(m)*/
result = h * h;
result = result/10000;
result = w/result;
return(result);
}
Complied and run, this program looks exactly the same as the program fro mthe last two examples.
Friday, September 23, 2011
Coding Lessons: C and functions (lesson 7)
OK so we learned a little about accepting inputs, and made a sort of useful tool into the bargain. -I say sort of useful because there are online versions everywhere, the point wasn't to create a useful tool, the point was to introduce manipulating the variables.
Now lets take a step back and look at some simple functions.
we always have a main function, this is where the "meat" of our program goes.
but lets says that we have a defined function
we'll take something simple, like A+B
now we can write C = A+B.
but what if this were actually a really complicated equation, and we're using it hundreds of times, are we going to write it out each time? copy and paste code?
what if we notice a mistake -then we'll hace to correct all the hundreds of times we've written this out.
I guess it's not easier to write c = add(a, b) but for a more complex function this is useful.
what if it weren't adding, what if it were calculating VAT, a change in rate means that you have to search all your code, but if you had a function for calculating VAT, you'd only need to change that function.
Lets' look again at BMI.
as before we include standard libraries:
#include <stdio.h>but this time there is a change, we don't jump right into our main function, we tell the program that there is another function.
float bodymassindex(h, w);
Everything in the first half of this example is the same as the last lesson, show prompts, gather data.
int main()
{
int weight, height;
float bmi;
printf("BMI Calculator\r\n");
printf("Enter your weight in Kilos:");
scanf("%d", &weight);
printf("Please enter your height in centimeters:");
scanf("%d", &height);
But in this example the data processing has been moved out to a function, we pass that function the numbers,
bmi = bodymassindex(height, weight); it returns a result, which we then carry on using as normal.
printf("your BMI is: %f\r\n", bmi);
printf("\r\n\r\nUnderweight = <18 -="-" .5=".5" 24.9="24.9" 29.9="29.9" 30="30" br="br" greater="greater" n="n" nnormal="nnormal" nobesity="BMI" noverweight="25" of="of" or="or" r="r" weight="18.5">}
the function is written underneath the main part of the program, but in reality it works just the same as the program.
in the main program we expect an integer error code to say if execution has completed sucessfully, so the main part of the program is declared as int main()
We're expecting a floating point to be returned, so we declare the function as a float.
float bodymassindex(int h, int w)
also we tell the function what sort of variables it'll be getting, notice that they have to be the same type (in this case integers), but they don't need the same names, so I shortened height to h and weight to w.
then we come to the function, just as in the last example this calculates the BMI number
{
float result;
/*bmi = mass(kg) / height^2(m)*/
result = h * h;
result = result/10000;
result = w/result;
Then the function returns it's result using the return function.
return(result);
}
Put all together the code looks like this: (and gives the same output as the last lesson).
#include <stdio.h>
float bodymassindex(h, w);
int main()
{
int weight, height;
float bmi;
printf("BMI Calculator\r\n");
printf("Enter your weight in Kilos:");
scanf("%d", &weight);
printf("Please enter your height in centimeters:");
scanf("%d", &height);
bmi = bodymassindex(height, weight);
printf("your BMI is: %f\r\n", bmi);
printf("\r\n\r\nUnderweight = <18 -="-" .5=".5" 24.9="24.9" 29.9="29.9" 30="30" greater="greater" n="n" nnormal="nnormal" nobesity="BMI" noverweight="25" of="of" or="or" r="r" span="span" weight="18.5">
}
float bodymassindex(int h, int w)
{
float result;
/*bmi = mass(kg) / height^2(m)*/
result = h * h;
result = result/10000;
result = w/result;
return(result);
}
The difference is that this code is much more maintainable, you might not see it for a small program like this, (in fact it's arguable more work to put in functions than just write the calculations in the code), but if this were a part of a much larger, millions of lines of code program, using this function technique means that you can correct errors without having to search through all lines of code.
It can also reduce lines of code, say I was doing this calculation 3 million times, the calculation is only 3 lines long, but that means that over all this will take 3 million lines of code in my source.
if I decided that I needed height cubed instead of squared, I'd have to alter 1 million lines.
using a function I only need to call the function 1 million times so instead of three million lines of code, I have one million, plus the 9 lines involved in setting up and actually doing the function.
now if I decide that I want height cubed instead of squared, I change 1 line of code.
Tuesday, September 20, 2011
Coding Lessons: C A simple Program (lesson 6)
So far we've only looked at how to get values into and out of the console.
so lets look at a very simple program, we'll still accept inputs from the command line, and output them to the command line. but, the thing that makes this different is that it's a program that actually does something.
Since the world is becoming obsessive of its weight, lets make a BMI calculator.
BMI is a number, it is derived by knowing your weight in kilos, and dividing that by your height in meters squared.
BMI = M / H^2
We'll be including the stadard io library, and opening our main program as usual
{
After this we want to sort out our variables, there is weight and height, (you'd expect these to be whole numbers, so we'll declare them as integers).
float bmi;
After this we'll do some nice user prompts, and grab some inputs,
printf("BMI Calculator\r\n");
printf("Enter your weight in Kilos:");
scanf("%d", &weight);
printf("Please enter your height in centimeters:");
scanf("%d", &height);
now that we have those inputs we need to transform them,
to do this we'll square the height first, (multiply it by itself)
then we'll need to divide that number by 100 (squared) to get the height in meters, (from the height entered in centimeters.
In order to reduce the amount of variables that I'll be declaring, I'll re-use the floating point variable over and over, pushing the results of equations into it, then using it in the next equation:
/*bmi = mass(kg) / height^2(m)*/
bmi = height * height;
bmi = bmi/10000;
bmi = weight/bmi;
After this we'll display the BMI figure, and a explanation of what it actually means:
printf("your BMI is: %f\r\n", bmi);
printf("\r\n\r\nUnderweight = <18 -="-" .5=".5" 24.9="24.9" 29.9="29.9" 30="30" br="br" greater="greater" n="n" nnormal="nnormal" nobesity="BMI" noverweight="25" of="of" or="or" r="r" style="color: red;" weight="18.5">}
Put it all together and you have:
so lets look at a very simple program, we'll still accept inputs from the command line, and output them to the command line. but, the thing that makes this different is that it's a program that actually does something.
Since the world is becoming obsessive of its weight, lets make a BMI calculator.
BMI is a number, it is derived by knowing your weight in kilos, and dividing that by your height in meters squared.
BMI = M / H^2
We'll be including the stadard io library, and opening our main program as usual
#include <stdio.h>
int main(){
After this we want to sort out our variables, there is weight and height, (you'd expect these to be whole numbers, so we'll declare them as integers).
int weight, height;
Then we'll need something that will take the result of the equation above for BMI, there is a very good chance that this will be a number with decimal places, so we'll declare a floating point numberfloat bmi;
After this we'll do some nice user prompts, and grab some inputs,
printf("BMI Calculator\r\n");
printf("Enter your weight in Kilos:");
scanf("%d", &weight);
printf("Please enter your height in centimeters:");
scanf("%d", &height);
now that we have those inputs we need to transform them,
to do this we'll square the height first, (multiply it by itself)
then we'll need to divide that number by 100 (squared) to get the height in meters, (from the height entered in centimeters.
In order to reduce the amount of variables that I'll be declaring, I'll re-use the floating point variable over and over, pushing the results of equations into it, then using it in the next equation:
/*bmi = mass(kg) / height^2(m)*/
bmi = height * height;
bmi = bmi/10000;
bmi = weight/bmi;
After this we'll display the BMI figure, and a explanation of what it actually means:
printf("your BMI is: %f\r\n", bmi);
printf("\r\n\r\nUnderweight = <18 -="-" .5=".5" 24.9="24.9" 29.9="29.9" 30="30" br="br" greater="greater" n="n" nnormal="nnormal" nobesity="BMI" noverweight="25" of="of" or="or" r="r" style="color: red;" weight="18.5">}
Put it all together and you have:
#include <stdio.h>
int main()
{
int weight, height;
float bmi;
printf("BMI Calculator\r\n");
printf("Enter your weight in Kilos:");
scanf("%d", &weight);
printf("Please enter your height in centimeters:");
scanf("%d", &height);
/*bmi = mass(kg) / height^2(m)*/
bmi = height * height;
bmi = bmi/10000;
bmi = weight/bmi;
printf("your BMI is: %f\r\n", bmi);
printf("\r\n\r\nUnderweight = <18 -="-" .5=".5" 24.9="24.9" 29.9="29.9" 30="30" br="br" greater="greater" n="n" nnormal="nnormal" nobesity="BMI" noverweight="25" of="of" or="or" r="r" weight="18.5">}
Compile and run to see the following:
D:\coding\lesson6>source.exe
BMI Calculator
Enter your weight in Kilos:85
Please enter your height in centimeters:195
your BMI is: 22.353714
Underweight = <18 .5=".5" br="br">Normal weight = 18.5û24.9
Overweight = 25û29.9
Obesity = BMI of 30 or greater
D:\coding\lesson6>
BMI Calculator
Enter your weight in Kilos:85
Please enter your height in centimeters:195
your BMI is: 22.353714
Underweight = <18 .5=".5" br="br">Normal weight = 18.5û24.9
Overweight = 25û29.9
Obesity = BMI of 30 or greater
D:\coding\lesson6>
Thursday, September 15, 2011
Electronics Lessons: Wire and current
If you're reading more than just the lesson content (reading my project write ups too). You'll see that in the write up for the speakers I talked about wire gauge and current handling capability.
Which brings up an interesting point.
It's all too easy to consider a length of wire as an ideal conductor by ideal we mean:
That there is no power loss in the wire.
That the wire doesn't heat up.
That there is no voltage drop in the wire.
In short that there is no resistance in the wire.
current
An electric current is the movement of electrons through a substance. the harder it is for those electrons to move, the more resistivity that substance has.
Resistance is a real true opposition to the movement of electrons, hence a real opposition to the flow of current.
So what causes Resistance?
Basically, as the electrons travel through the material that is a conductor they bump and jostle with the atoms inside the conductor.
So why does Wire matter.
I suppose the easiest way to explain this is to go back to considering the electricity supply as water contained in a large bucket of header tank.
Think of a piece of wire as like a tube attached to the bottom of that bucket.
The longer the tube is the harder it is for water to rush out of the bucket, so the really long tube is providing resistance to the water flowing, now if you make the tube a lot shorter the water will run out the bottom of the bucket a lot faster.
Now consider making the tube a much larger diameter, again it's much easier for the water to flow through the tube.
The same is true of electricity and wire.
The thinner a piece of wire the less paths there are for electrons to flow through that piece of wire. the more chance that they'll be bumping into the atoms in the wire. The thicker the piece of wire, the more atoms there are, and therefore the more ways round those atoms.
It's like you've added another lane to a road and thus the electron traffic flows more freely.
The Calculations
In order to calculate the resistivity of a piece of wire. You need to know three things.
The cross sectional area of the wire, (it's thickness, if it's a round piece of wire, the are will be (Pi * d/2)^2
you need to know the length, from end to end.
And last but not least you need to know the p value of the wire, (it's conductivity).
R = pL/A
You can find a table of P values (expressed as Ohms per centimetre) here
That table also lets you see the kind of conductivity of the wires... this can lets you make some intelligent design choices.
Skin Effect
Skin effect is a bit of a strange phenomenon, and probably doesn't really fit into beginner lessons, but I can't really see that this will be covered in a second more advanced lesson about wire selection. So I figured it's be best to cover it here.
Skin effect starts to come into play when you're transmitting electrical signals at a high frequency.
Basically, rather than using the whole cross sectional area of the wire, the electrons only travel near the surface of the wire, not moving at the core of the conductor very much, or even at all.
Because the electrons are only flowing down a part of the wire, this has the effect of removing lanes in a road, there is more congestion, more resistance to the traffic of electrons.
Below is a diagram, it shows a particular gauge/thickness of wire.
next to this is the path that the electrons are using, you can see that at high frequency, the inside core of the wire isn't used any more.
Rearranging all the black pixels in the picture (so the same area of wire in use if this was a low frequency signal) shows you just how significantly smaller the effective gauge can be when the skin effect comes into play. -which can have knock on effects to the resistance of the wire, and the way it heats up, hence it's current carrying limits.
If can halve the diameter of your wire (depending on the gauge to begin with), so if you're planning on transmitting high power at high frequencies (for example if you're building a switch mode power supply) remember to include this into consideration when choosing your materials.
Conductor types
Perhaps one of the most important things that you're going to have to decide each time you buy wire is the type of wire you buy, that's multi strand/multi core vs. single strand/single core. Multi core has lots of smaller wires all bunched together, whilst single strange, well, only has a single strange.
There is a common misconception that using multi core wire will lessen the effects of skin effect (described above), however this is not true, all the conductors in the wire are connectted and act as a single solid core connector so the skin effect still happens in multi core wires.
So why have different types of wire?
Well single stand wire is a single piece of metal, if you move a single piece of metal enough is will flex a few times, but eventually it'll break. (suffers from fatigue) so this wire is not useful for applications where the wire will be constantly flexed e.g. a network patch cable, a musical instrument cable (guitar lead) computer cables.
Solid core wire is easier to manufacture, and thus is a little cheaper than multi core wires. So in applications where the wire won't be flexing, e.g. computer network structured cabling, Telecom structured cabling etc, you'd use solid core wire.
Solid core wiring also has less exposed surface area than lots of small conductors so corrodes far less slowly than multi core wiring.
The picture below shows a multi core wire next to a solid core wire, both are insulated (green) the black area shows the conductors, here you can see that, because there will always be small spaces when packing round objects next to each other, that for the same diameter outer cable a multi core wire will have a higher resistance, because the total conductor area is smaller.
Beneath the two conductors of equal diameter is a representation of how much conductor area is actually in the multi core wire, the red is again the space between the wires, just all pushed to the outside and the conductor all pushed to the middle.
Designing products: A Case study
A good example of the kind of design choices that you can make can be seen in the Telecom industry. Traditionally copper wire has always been used for wiring carrying the signals to the pole outside your house and from the pole to the inside of your house, however, during the 80's the price of copper soared in price, making it incredibly expensive to put copper wires in, so during this time the Telecom companies switched to using aluminium wires rather than copper, at a much reduced cost.
Aluminium is not as good of a conductor as copper, it also has a higher resistance (and hence greater transmission losses), but it did the job and was much cheaper.
Being an engineer isn't always about creating the fanciest design, it's about creating the best design, making the right decisions rather that the best decisions.
In this case for voice calls aluminium is a perfectly valid design choice.
There is of course a drawback, people with aluminium cabling living over a certain distance from the exchange, often find that they are unable to receive broadband, but in the 80's long distance broadband was just a pipe dream.
Considerations
The point of including the information above is basically to say: Chose all your components carefully. Different wire gauges constructions and materials all have different electrical properties characteristics and costs. There is no one tool to fit all jobs, and no one material to fit all jobs either.
Wire has resistance, so if you've got a really long wire with a thermistor on the end as a remote temperature sensor, don't expect to get the same values as in your test board where your thermistor was sat right onto the circuit analysing the readings.
With wire you have resistance, with resistance you have voltage drop, and heating inside the wire. no wire is a perfect conductor. get your wire sizes wrong on your mains wired project and you could end up burning down the house.
A basic chart for copper wire vs resistance at different gauges is shown on this page:
http://www.cirris.com/testing/resistance/wire.html
Subscribe to:
Posts (Atom)