Friday, September 30, 2011

Weekend Project: Paraffin lamp

Ok, so this project started out when I saw a cool looking oil lamp.

It's quite a famous amongst the hacker world lamp since it was features on both Make: and hackaday (at least).

it's the light bulb oil lamp.

The original creator had some kind of, wow cool groovy political message, about recycling, and energy, but since they were burning fuel oil, they should have just done away with all that bollocks and just said, "look what I made, aint it cool?"

I forgot to take photos during the build, so I'm just going to describe the process.

to start you need a lightbulb, any old light bulb will do, but I chose a clear (rather than pearl) bulb so that the fuel source, (purple meths) could be seem clearly. I also chose an Edison screw style bulb rather than the (more common in the UK) bayonet style fitting, the bayonet fitting might allow for a cool frame to be built to support the bulb, but the two connections on the base do make this harder to make.

To create this you will need,
A light Bulb.
Some kind of hand drilling tool, (I used a perfboard track cutter), you could use either a bradel, or a gimlet from your woodworking tool box.
A screw driver/small chisel/butter knife. (basically a flat bladed thing you can use to carefully pry
A piece of wick (I cut a small section from a dishcloth/tea towel.
Some needle nosed pliers.

Start by using your hand drilling tool to gently attack the soft solder spot at the bottom of the bulb, your aim is to drill through the solder.

Once you've gotten through the solder stop. now you need to use your pry tool (screwdriver/knife) to gentle lift up the base of the brass screw cap where it meets the glass. go careful, too much force and you're going to break the glass.
Once you've managed to lift the cap a little you'll see a kind of putty/clay substance that attaches the brass cap to the glass bulb. go carefully and using the screwdriver/small knife start scraping at this substance. the idea is to carefully get rid of it.
after a while of scraping the brass screw base will just pop off of the glass bulb.

You'll now be left with a sealed glass bulb, one end round and bulb like, the other will be flat, you'll see two wires poking out that are sealed into the glass of the bulb, and a glass stem that goes inside the bulb, to the filament holders.

Use the screwdriver to carefully score the glass in a straight line and the very top of where the wires go into the glass that becomes the stem.
when you have a thin line scored in the glass, rest the bulbous end of the glass on something soft (like a roll of electrical tap), one the other end place a screw driver into the hole where the stem is, (where you have just scored. carefully, use another screw driver to tap the screw driver that is inside the stem.)
not too hard, a short sharp tap is all it should need to stress the glass, where it should crack and separate along the score line you just made.

Now use your needle nose pliers to reach inside the small hole that is now in the glass bulb. and crush/snap any large bits of the filament holder and stem.

Now turn the bulb bulbous side up and the stem, filament and filament holders should fall out the bottom.

Now, quarter fill the bulb with a slow burning oil fuel, (something like meths or white spirit, definitely not petrol). push one end of the wick through the hole where the solder was brass screw base.
Put the other end of the wick into the hole in the bulb so that it reaches the bottom and touches the liquid fuel.

Wait until the wick has absorbed some fuel.
find a base for your bulb, (I used a roll of electrical tape).
Light your lamp.


Photobucket

Monday, September 26, 2011

Coding Lessons: C and included header files (lesson 8)

In the last lesson I introduced the idea of putting either complicated or repetitive lines of code into a function of their own in order to reduce the amount of typing that you may need to do.

Now, I'm going to introduce a radical new concept, what if as well as using a function multiple times in that program, you also want to use that same function in multiple programs, are you going to copy and paste your function hundreds of times into your new code?

In the same way as you don't re-write all the code to actually do the getting of characters onto the screen, (you just use the printf function, you don't write out all the code each time) you also don't want to have to re-write (or copy paste) the code for your repetitive functions.

You might be wondering, since I've just said that printf is a function, where is this function? where is it declared? where is it called?

Well, you'll notice that the first line of every program that we've written so far has #include, (that means include this file), then the name of a file, the fact that the file name is in little triangular brackets means that it's in the tcc includes folder.)

well, those functions, Printf, scanf (and a whole load more) are declared in that stdio.h file.

you see that exporting those functions to a header file is useful, what's contained in the header file is just code, (exactly like we write), but it's used again and again, (in every program we've written so far).

so lets have a look at including our own header files.

so we start the code in the usual fashion

(include the standard header files from the includes directory of the Tcc compiler)
#include <stdio.h>

now we'll include our own header file, but this time from the same source directory.

#include "bmi.h"

see how it's included in quote marks, and not brackets. that means from this path, rather than from your library.

of course, copying header files might not be your idea of a great time so you could put your header into the main includes folder in the tcc directory, or you might want to start a header library of your own and include like this:
#include "../../mylibrary/bmi.h"


After this we write the main part of the program exactly as before.
int main()
{
    int weight, height;
    float bmi;
    printf("BMI Calculator\r\n");
    printf("Enter your weight in Kilos:");
    scanf("%d", &weight);
    printf("Please enter your height in centimeters:");
    scanf("%d", &height);
    bmi = bodymassindex(height, weight);
    printf("your BMI is: %f\r\n", bmi);
    printf("\r\n\r\nUnderweight = <18 -="-" .5=".5" 24.9="24.9" 29.9="29.9" 30="30" br="br" greater="greater" n="n" nnormal="nnormal" nobesity="BMI" noverweight="25" of="of" or="or" r="r" weight="18.5">
}


inside our source directory we also need to have the header file, (called bmi.h)

this header file is literally, a line to declare a function exists, and the function, exactly the same as the last lesson:
float bodymassindex(h, w);
float bodymassindex(int h, int w)
{
    float result;
    /*bmi = mass(kg) / height^2(m)*/
    result = h * h;
    result = result/10000;
    result = w/result;
    return(result);
}


in completion the source code looks like this:

File 1, source.c
#include <stdio.h>
#include "bmi.h"
int main()
{
    int weight, height;
    float bmi;
    printf("BMI Calculator\r\n");
    printf("Enter your weight in Kilos:");
    scanf("%d", &weight);
    printf("Please enter your height in centimeters:");
    scanf("%d", &height);
    bmi = bodymassindex(height, weight);
    printf("your BMI is: %f\r\n", bmi);
    printf("\r\n\r\nUnderweight = < 18 -="-" .5=".5" 24.9="24.9" 29.9="29.9" 30="30" br="br" greater="greater" n="n" nnormal="nnormal" nobesity="BMI" noverweight="25" of="of" or="or" r="r" weight="18.5">
}

File 2, bmi.h
float bodymassindex(h, w);
float bodymassindex(int h, int w)
{
    float result;
    /*bmi = mass(kg) / height^2(m)*/
    result = h * h;
    result = result/10000;
    result = w/result;
    return(result);
}

Complied and run, this program looks exactly the same as the program fro mthe last two examples.

Friday, September 23, 2011

Coding Lessons: C and functions (lesson 7)

OK so we learned a little about accepting inputs, and made a sort of useful tool into the bargain. -I say sort of useful because there are online versions everywhere, the point wasn't to create a useful tool, the point was to introduce manipulating the variables.


Now lets take a step back and look at some simple functions.

we always have a main function, this is where the "meat" of our program goes.

but lets says that we have a defined function

we'll take something simple, like A+B
now we can write C = A+B.

but what if this were actually a really complicated equation, and we're using it hundreds of times, are we going to write it out each time? copy and paste code?

what if we notice a mistake -then we'll hace to correct all the hundreds of times we've written this out.

I guess it's not easier to write c = add(a, b) but for a more complex function this is useful.
what if it weren't adding, what if it were calculating VAT, a change in rate means that you have to search all your code, but if you had a function for calculating VAT, you'd only need to change that function.

Lets' look again at BMI.


as before we include standard libraries:
#include <stdio.h>but this time there is a change, we don't jump right into our main function, we tell the program that there is another function.

float bodymassindex(h, w);

Everything in the first half of this example is the same as the last lesson, show prompts, gather data.
int main()
{
    int weight, height;
    float bmi;
    printf("BMI Calculator\r\n");
    printf("Enter your weight in Kilos:");
    scanf("%d", &weight);
    printf("Please enter your height in centimeters:");
    scanf("%d", &height);
But in this example the data processing has been moved out to a function, we pass that function the numbers,
    bmi = bodymassindex(height, weight); it returns a result, which we then carry on using as normal.
    printf("your BMI is: %f\r\n", bmi);
    printf("\r\n\r\nUnderweight = <18 -="-" .5=".5" 24.9="24.9" 29.9="29.9" 30="30" br="br" greater="greater" n="n" nnormal="nnormal" nobesity="BMI" noverweight="25" of="of" or="or" r="r" weight="18.5">}
the function is written underneath the main part of the program, but in reality it works just the same as the program.
in the main program we expect an integer error code to say if execution has completed sucessfully, so the main part of the program is declared as int main()
We're expecting a floating point to be returned, so we declare the function as a float.
float bodymassindex(int h, int w)
also we tell the function what sort of variables it'll be getting, notice that they have to be the same type (in this case integers), but they don't need the same names, so I shortened height to h and weight to w.

then we come to the function, just as in the last example this calculates the BMI number 
{
    float result;
    /*bmi = mass(kg) / height^2(m)*/
    result = h * h;
    result = result/10000;
    result = w/result;
Then the function returns it's result using the return function.
    return(result);
}


Put all together the code looks like this: (and gives the same output as the last lesson).


#include <stdio.h>
float bodymassindex(h, w);
int main()
{
    int weight, height;
    float bmi;
    printf("BMI Calculator\r\n");
    printf("Enter your weight in Kilos:");
    scanf("%d", &weight);
    printf("Please enter your height in centimeters:");
    scanf("%d", &height);
    bmi = bodymassindex(height, weight);
    printf("your BMI is: %f\r\n", bmi);
    printf("\r\n\r\nUnderweight = <18 -="-" .5=".5" 24.9="24.9" 29.9="29.9" 30="30" greater="greater" n="n" nnormal="nnormal" nobesity="BMI" noverweight="25" of="of" or="or" r="r" span="span" weight="18.5">
}

float bodymassindex(int h, int w)
{
    float result;
    /*bmi = mass(kg) / height^2(m)*/
    result = h * h;
    result = result/10000;
    result = w/result;
    return(result);
}


The difference is that this code is much more maintainable, you might not see it for a small program like this, (in fact it's arguable more work to put in functions than just write the calculations in the code), but if this were a part of a much larger, millions of lines of code program, using this function technique means that you can correct errors without having to search through all lines of code.

It can also reduce lines of code, say I was doing this calculation 3 million times, the calculation is only 3 lines long, but that means that over all this will take 3 million lines of code in my source.

if I decided that I needed height cubed instead of squared, I'd have to alter 1 million lines.

using a function I only need to call the function 1 million times so instead of three million lines of code, I have one million, plus the 9 lines involved in setting up and actually doing the function.

now if I decide that I want height cubed instead of squared, I change 1 line of code.

Tuesday, September 20, 2011

Coding Lessons: C A simple Program (lesson 6)

So far we've only looked at how to get values into and out of the console.

so lets look at a very simple program, we'll still accept inputs from the command line, and output them to the command line. but, the thing that makes this different is that it's a program that actually does something.

Since the world is becoming obsessive of its weight, lets make a BMI calculator.

BMI is a number, it is derived by knowing your weight in kilos, and dividing that by your height in meters squared.

BMI = M / H^2

We'll be including the stadard io library, and opening our main program as usual

#include <stdio.h>
int main()
{

After this we want to sort out our variables, there is weight and height, (you'd expect these to be whole numbers, so we'll declare them as integers).

  int weight, height;
Then we'll need something that will take the result of the equation above for BMI, there is a very good chance that this will be a number with decimal places, so we'll declare a floating point number
    float bmi;


After this we'll do some nice user prompts, and grab some inputs,
    printf("BMI Calculator\r\n");
    printf("Enter your weight in Kilos:");
    scanf("%d", &weight);
    printf("Please enter your height in centimeters:");
    scanf("%d", &height);


now that we have those inputs we need to transform them,
to do this we'll square the height first, (multiply it by itself)
then we'll need to divide that number by 100 (squared) to get the height in meters, (from the height entered in centimeters.

In order to reduce the amount of variables that I'll be declaring, I'll re-use the floating point variable over and over, pushing the results of equations into it, then using it in the next equation:
    /*bmi = mass(kg) / height^2(m)*/
    bmi = height * height;
    bmi = bmi/10000;
    bmi = weight/bmi;

After this we'll display the BMI figure, and a explanation of what it actually means:
    printf("your BMI is: %f\r\n", bmi);
    printf("\r\n\r\nUnderweight = <18 -="-" .5=".5" 24.9="24.9" 29.9="29.9" 30="30" br="br" greater="greater" n="n" nnormal="nnormal" nobesity="BMI" noverweight="25" of="of" or="or" r="r" style="color: red;" weight="18.5">}


Put it all together and you have:
#include <stdio.h>

int main()
{
    int weight, height;
    float bmi;
    printf("BMI Calculator\r\n");
    printf("Enter your weight in Kilos:");
    scanf("%d", &weight);
    printf("Please enter your height in centimeters:");
    scanf("%d", &height);
    /*bmi = mass(kg) / height^2(m)*/
    bmi = height * height;
    bmi = bmi/10000;
    bmi = weight/bmi;
    printf("your BMI is: %f\r\n", bmi);
    printf("\r\n\r\nUnderweight = <18 -="-" .5=".5" 24.9="24.9" 29.9="29.9" 30="30" br="br" greater="greater" n="n" nnormal="nnormal" nobesity="BMI" noverweight="25" of="of" or="or" r="r" weight="18.5">} 

Compile and run to see the following:

 D:\coding\lesson6>source.exe
BMI Calculator
Enter your weight in Kilos:85
Please enter your height in centimeters:195
your BMI is: 22.353714


Underweight = <18 .5=".5" br="br">Normal weight = 18.5û24.9
Overweight = 25û29.9
Obesity = BMI of 30 or greater

D:\coding\lesson6>

Thursday, September 15, 2011

Electronics Lessons: Wire and current

If you're reading more than just the lesson content (reading my project write ups too). You'll see that in the write up for the speakers I talked about wire gauge and current handling capability.

Which brings up an interesting point.

It's all too easy to consider a length of wire as an ideal conductor by ideal we mean:

That there is no power loss in the wire.
That the wire doesn't heat up.
That there is no voltage drop in the wire.
In short that there is no resistance in the wire.

current
An electric current is the movement of electrons through a substance. the harder it is for those electrons to move, the more resistivity that substance has.

Resistance is a real true opposition to the movement of electrons, hence a real opposition to the flow of current.

So what causes Resistance?
Basically, as the electrons travel through the material that is a conductor they bump and jostle with the atoms inside the conductor.

So why does Wire matter.
I suppose the easiest way to explain this is to go back to considering the electricity supply as water contained in a large bucket of header tank.

Think of a piece of wire as like a tube attached to the bottom of that bucket.

The longer the tube is the harder it is for water to rush out of the bucket, so the really long tube is providing resistance to the water flowing, now if you make the tube a lot shorter the water will run out the bottom of the bucket a lot faster.

Now consider making the tube a much larger diameter, again it's much easier for the water to flow through the tube.

The same is true of electricity and wire.
The thinner a piece of wire the less paths there are for electrons to flow through that piece of wire. the more chance that they'll be bumping into the atoms in the wire. The thicker the piece of wire, the more atoms there are, and therefore the more ways round those atoms.
It's like you've added another lane to a road and thus the electron traffic flows more freely.

The Calculations
In order to calculate the resistivity of a piece of wire. You need to know three things.

The cross sectional area of the wire, (it's thickness, if it's a round piece of wire, the are will be (Pi * d/2)^2
you need to know the length, from end to end.
And last but not least you need to know the p value of the wire, (it's conductivity).

R = pL/A

You can find a table of P values (expressed as Ohms per centimetre) here

That table also lets you see the kind of conductivity of the wires... this can lets you make some intelligent design choices.

Skin Effect
Skin effect is a bit of a strange phenomenon, and probably doesn't really fit into beginner lessons, but I can't really see that this will be covered in a second more advanced lesson about wire selection. So I figured it's be best to cover it here.

Skin effect starts to come into play when you're transmitting electrical signals at a high frequency.
Basically, rather than using the whole cross sectional area of the wire, the electrons only travel near the surface of the wire, not moving at the core of the conductor very much, or even at all.
Because the electrons are only flowing down a part of the wire, this has the effect of removing lanes in a road, there is more congestion, more resistance to the traffic of electrons.

Below is a diagram, it shows a particular gauge/thickness of wire.
next to this is the path that the electrons are using, you can see that at high frequency, the inside core of the wire isn't used any more.
Rearranging all the black pixels in the picture (so the same area of wire in use if this was a low frequency signal) shows you just how significantly smaller the effective gauge can be when the skin effect comes into play. -which can have knock on effects to the resistance of the wire, and the way it heats up, hence it's current carrying limits.


If can halve the diameter of your wire (depending on the gauge to begin with), so if you're planning on transmitting high power at high frequencies (for example if you're building a switch mode power supply) remember to include this into consideration when choosing your materials.

Conductor types
Perhaps one of the most important things that you're going to have to decide each time you buy wire is the type of wire you buy, that's multi strand/multi core vs. single strand/single core. Multi core has lots of smaller wires all bunched together, whilst single strange, well, only has a single strange.

There is a common misconception that using multi core wire will lessen the effects of skin effect (described above), however this is not true, all the conductors in the wire are connectted and act as a single solid core connector so the skin effect still happens in multi core wires.

So why have different types of wire?
Well single stand wire is a single piece of metal, if you move a single piece of metal enough is will flex a few times, but eventually it'll break. (suffers from fatigue) so this wire is not useful for applications where the wire will be constantly flexed e.g. a network patch cable, a musical instrument cable (guitar lead) computer cables.

Solid core wire is easier to manufacture, and thus is a little cheaper than multi core wires. So in applications where the wire won't be flexing, e.g. computer network structured cabling, Telecom structured cabling etc, you'd use solid core wire.

Solid core wiring also has less exposed surface area than lots of small conductors so corrodes far less slowly than multi core wiring.

The picture below shows a multi core wire next to a solid core wire, both are insulated (green) the black area shows the conductors, here you can see that, because there will always be small spaces when packing round objects next to each other, that for the same diameter outer cable a multi core wire will have a higher resistance, because the total conductor area is smaller.

Beneath the two conductors of equal diameter is a representation of how much conductor area is actually in the multi core wire, the red is again the space between the wires, just all pushed to the outside and the conductor all pushed to the middle.


Designing products: A Case study
A good example of the kind of design choices that you can make can be seen in the Telecom industry. Traditionally copper wire has always been used for wiring carrying the signals to the pole outside your house and from the pole to the inside of your house, however, during the 80's the price of copper soared in price, making it incredibly expensive to put copper wires in, so during this time the Telecom companies switched to using aluminium wires rather than copper, at a much reduced cost.

Aluminium is not as good of a conductor as copper, it also has a higher resistance (and hence greater transmission losses), but it did the job and was much cheaper.

Being an engineer isn't always about creating the fanciest design, it's about creating the best design, making the right decisions rather that the best decisions.

In this case for voice calls aluminium is a perfectly valid design choice.

There is of course a drawback, people with aluminium cabling living over a certain distance from the exchange, often find that they are unable to receive broadband, but in the 80's long distance broadband was just a pipe dream.

Considerations
The point of including the information above is basically to say: Chose all your components carefully. Different wire gauges constructions and materials all have different electrical properties characteristics and costs. There is no one tool to fit all jobs, and no one material to fit all jobs either.
Wire has resistance, so if you've got a really long wire with a thermistor on the end as a remote temperature sensor, don't expect to get the same values as in your test board where your thermistor was sat right onto the circuit analysing the readings.

With wire you have resistance, with resistance you have voltage drop, and heating inside the wire. no wire is a perfect conductor. get your wire sizes wrong on your mains wired project and you could end up burning down the house.

A basic chart for copper wire vs resistance at different gauges is shown on this page:
http://www.cirris.com/testing/resistance/wire.html

Tuesday, September 13, 2011

Electronics Lesson: Switches

What is a switch?
This subject seems so simple that is barely warrants dedicating a lesson to it right?

I'm sure you already know what a switch is, you probably used one to turn on the computer that you're using to read this on, and you use several switches to type the address into the address bar of your browser, you used one to click a link to get here, you use switches when you turn on your car, turn on the lights, work an electric kettle etc. You know what a switch is, you use them all the time.

But there are a few terms and a few considerations that I thought it'd be good to go over.

A simple switch is just an on/off device, it lets you make or break an electrical connection. consider it as two pieces of wire, you either hold them together or apart, the only difference in that in a switch there are some bits that hold the wires for you.

A simple thing that you can do to make a switch it use a block of wood, a paper clip and two thumb tacs (the brass kind, not plastic.)

You attach the wire to the spike of the drawing pin by wrapping the bare end around it, then slot this through the drawing pin and push it in the piece of wood, then you wrap some wire round the spike of your second drawing pin and out this about the length of the drawing pin away from the first pin.
Now you can slide the paper clips over the second pin to "make" the circuit, or slide it off the drawing pin to break the circuit.

The symbol for a switch is not too dissimilar to what is seen above.

Kinda looks like that paper clip assembly huh?

Poles
Poles refer to the amount of connections that can be made.

A simple on off switch that has a single input and a single output is a single pole switch.

Like a light switch, any switch with a single input is a single pole switch, regardless of the amount of ways the switch can be flipped or turned.

Throw
Throw refers to the amount of outputs that a switch has, so if a switch has output B or output B it's going to be double throw, if it's got three output contacts it'll be triple throw.

However, after triple we don't often us quadruple, quintuple, sextuple, we'd just say 4-way, 5-way and 6-way etc.

Symbols
The circuit symbol for the single pole single throw (SPST) switch was pictured above, here it is again:

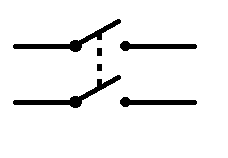
The double pole single throw (DPST) switch has two switches encased in the same packaging, and is actuated by the same level or button:
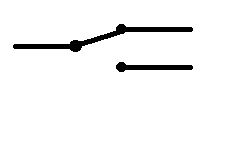
The single pole double throw (SPDT) switch has a single input and a choice of either output A or B:
The double pole double throw switch has a circuit symbol similar to this, but obviously with two switches marked.
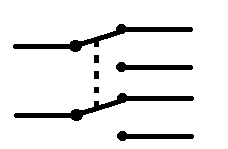
You can see that these switches are infinity stackable. you can have 6pole double throw switches just by stacking more and more switches.

Momentary
Momentary means that the switch returns to it's off position after you release your finger, it's got a spring in it that pushes the button back up again. like a horn in a car.

Latching
Latching means that when you push a switch down, it stays down, until you push it again, a bit like one of those pens where you click once to extend the pen to write, and click a second time to put the switching part of the pen away again.

Normally Open
Normally open switches are switches where the contacts are usually apart, you push to make the circuit, you push to connect wires inside the switch, again like a car horn or a doorbell.

Normally Closed
Normally closed switches are ones where the circuit is normally complete and you push the switch to interrupt or break the circuit, your pushing the switch disconnects the wires inside. switches like this are like the window switches in burglar alarm systems.

Push
Fairly simple, a push switch is one that you push on.

Toggle
A toggle switch has a toggle or knob sticking up, you flick it one one position to another.

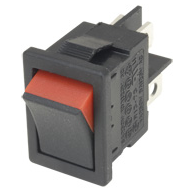
Rocker
Rocker switches are switches that rock from side to side to be on or off, a typical light switch in the UK is a rocker switch
Slide
Slide switches are ones that you slide from side to side to turn on or off (or select the pole that you want to be on).

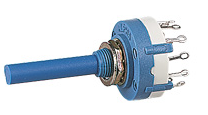
Rotary
Rotary switches are ones that you turn to select an output.
Key
Key switches require a key to turn them, like your car ignition, these switches are used as a safety or security feature, the key ignition stops anyone being able to just start your car, that's security. A key switch can be used to turn of power to a workshop stopping anybody but the keyholder from turning the power on, this means that the workshop cannot be used without a supervisor being present, increasing safety.

Rating
Just as wires have a current rating, so do the contacts and internal part of a switch. contact ratings for small projects (switching using 9v battery) usually don't matter. However if you want to switch mains voltages ensure that the part that you buy is rated for the current that you're planning on switching, and ensure that it's rated for the voltage too, if you put too higher voltage through a switch that's not meant for it, then all that happens it that the voltage jumps between the contacts as a spark, so your switch doesn't actually switch anything!

Bouncing (and de-bouncing)
Perhaps the hardest thing with switches is explaining the idea of bouncing.
basically, if you only intend on building analogue circuits you can switch off now ('scuse the pun.)
however those with digital desires should read on.

Switch bounce is a phenomenon where as you either open of close a switch as the contacts touch or slide into place the switch rapidly bounces between an on an off state before finally either switching on or off as you'd wanted. This is usually caused by two things, either the contacts inside the switch are made of springy metal, and the genuinely bounce when they are snapped into place. with other switches this can be caused by dirty contacts as they slide over each other, so you have clean metal touching making a circuit, then a spot of corrosion breaks the circuit before clean metal slides in again making a circuit.

This happens so fast that, while you can measure it on an oscilloscope you couldn't measure it with a volt meter, you couldn't perceive it in a light that you were switching.

but in digital circuits you're usually dealing with very fast components,
say for example you're making a counter system where you want to count people into a club, every time someone walks through the door you press a button. and a different button when they come out.

Lets say that you've counted in 100 people, the trouble is each time you pressed the switch it bounced. it changed rapidly, on, off, on, off, on, off, on. then you let go of the switch and it bounces again, off, on, off, on, off...
now instead of counting in 1 person (your circuit expects 1 switch press for 1 person) it's received what it sees as 6 switch presses. so even though there is only 100 people in your club, your counter says 600 and you're reached your fire limit for the building, you can't let people in because your counter says that there are already too many people and you loose money.

What if there is a fire, as you evacuate your switches don't bounce as much when you could people out, your counter said 100 in, but only says 95 out. now people are risking their lives looking for 5 people in a burning building.
Or worse, you manage to count 100 in successfully, but your switches are bouncing as you're counting people out, 99 people have left and your counter bounced and says 100 have. now some guy is burning to death, but nobody knows.

So, clearly for some projects de-bouncing switches is just good because it saves against false data, other times it's vital, and can put lives in danger if it's not done!

Thankfully it's quite simple to stop switching bounce, all you need to do is sample the switch input at a reasonably reduced rate.
So our on, off, on, off, on off, on bounces happen within say 100th of a second. all we need to do is reduce out sample rate, so say every 200ths of a second, or less, that way this bouncing or chattering happens outside of our sample time and we don't see it.

Friday, September 09, 2011

Electronics Lessons: Capacitors and tone controls

The tone control was the first hack I ever did (changing the capacitor values in my guitar). It's so simple that it's something anyone can do, take a device say like a guitar, change some values see what happens.
You don't have to take the guitar apart, you can build a completely separate box with two jack sockets a capacitor and a variable resistor that sits in the middle like a foot pedal so that you can play with the values that you'd like to use.

Frequency pitch and music
This isn't really a lesson about what makes up sound waves, but if you have the ability to play with a wave shaping synth program I heartily recommend it, I don't have any specific recommendations, but ideally you're looking for something that you can see the wave form of, as this will help you visualise what you're doing to the actual signal as you pass through the different parts of the circuit.

The Sine wave is the simplest wave it sweeps up and down in a smooth motion, the sound of this is a perfect whistle.

If you increase the frequency of the note, then you increase the pitch of the note.
for example if you have one note at a set certain frequency, if you double this frequency, then the note appears to be one octave higher than the preceding note.

Higher frequency = Higher pitched sounds.

Now music, isn't (or at least usually isn't) made of perfect sine waves. when you pluck a guitar string for example you get the first wave at the main frequency, but then there are other frequencies that appear in the wave, these are called fundamentals.

For example,
If we take a 3v 500Hz wave form (purple), and add to that a 2v 1KHz waveform (red), and add to that a 1v 2KHz waveform (blue), we end up with a wave that looks like this (black.)

In this case 500Hz is our core frequency, and the 1K and 2K waveforms are the fundamentals.

Capacitance and Reactance
Aside from the Power storage, and DC blocking capabilities of capacitors discussed in previous posts (the capacitor and the transistor amplifier).
Another property of capacitors is that they have a reactance.

Reactance is in the most basic terms the resistance of the capacitor to AC waveforms.
If you have a different value of capacitor, you have a different level of reactance to a specific frequency. Also with the same value of capacitor but a different frequency you get a different reactance.

Reactance is determined by the equation

Xc = 1/(2 * pi * F * C)

So, lets say that you have a 1uF capacitor, and a 500Hz frequency.
Xc = 1/(2 * pi * 500 * 0.000001)
Xc = 1/0.00314) = 318Ohms

Now lets say that you have the same 1uF capacitor, and a 1KHz frequency (our first fundamental)

Xc = 1/(2 * pi * 1000 * 0.000001)
Xc = 1/0.00628) = 159Ohms

Now lets work the same cap but with the 2KHz frequency

Xc = 1/(2 * pi * 2000 * 0.000001)
Xc = 1/0.0125) = 80Ohms

The Tone control (Treble cut)
Earlier I talked about how a musical note wasn't just one frequency, it was a main frequency with other fundamental frequencies imposed on it.

The simplest type of tone control is the treble cut control.
Basically, knowing that a capacitor will have a different reactance to different frequencies we can design a circuit that will have the properties of providing an easy path to ground for the higher frequencies (where the reactance is lower), and yet still allow the lower frequencies (where the reactance is higher) to continue un-grounded to the load (in the case of a guitar then load is an amplifier).

So what we want to do is take our waveform that's made up of three frequencies, and decide how we want to change it.
Since this is a treble cut, we'll assume that we've decided that the note sounds too "bright" and so we want to remove some of the higher frequencies and make the note sound a little less bright, a bit deeper, more jazz like.

We want to try to lessen that 2000Hz signal that's in that waveform.

Above I used an example 1uF capacitor and looked at the waveforms that appear across three octaves (remember double the frequency add one to the octave) and we got the following values of reactance.

500Hz, Xc = 318Ohms
1KHz, Xc = 159Ohms
2KHz, Xc = 80Ohms

So if we took that original signal, we're providing a really easy path to ground for 2KHz signals.
and a fairly, but not quite as easy path to ground for the 1KHz signal, and a difficult path to ground for the 500Hz signal.

So lets imagine that our load resistor is 200Ohms (e.g the input impedance of the imaginary amplifier is 200Ohms)
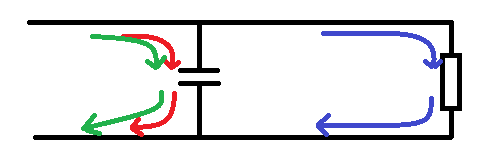
In the diagram below we see that the highest frequencies (red) pass through the capacitor to ground as this is the path of least resistance.
We also see the mid frequencies (green) pass to ground as 159Ohms is also less than 200.
But our 500Hz signals carry on and pass through the load.


Now lets put a 50Ohm resistor in there:
Now the total resistance of the path is the reactance plus 50
500Hz, Xc = 318Ohms + 50 = 368
1KHz, Xc = 159Ohms +50 = 209
2KHz, Xc = 80Ohms + 50 = 130

Now we see that the path through the load is the easier path for the mid (green signals) so they pass through to ground through the load along with the 500Hz signal. the 2KHz (red) signal is still grounded through the tone control.


Now for different playing styles we're going to want to be able to adjust the tone control such that we can choose what frequencies are going to be grounded, through the capacitor, and which ones we want to go through the load (amplifier).

We just figured out that by adding additional resistance to the capacitors reactance we can allow some frequencies to pass, whilst denying others, so basically what we're saying is that we want to use a variable resistor.

By using a variable resistor we can vary the total resistance to ground for the signals. turning the resistor up higher will add additional resistance to the capacitors reactance, making it more difficult for the higher frequencies to travel through the capacitor to ground, in turn making the signal sound brighter.
Turning the resistor down makes the path to ground easier. in turn stripping the brightness from the note and making it sound darker.


Values of capacitor
The values of capacitor make a huge difference to the sound. the 1uF capacitor used above can be see to strip away values of 2KHz and 1KHz so the sound getting through is only the really low values, if you put this sized capacitor onto a normal guitar (not bass guitar) the sound that you're going to get will be really muddy and low, you'll have stripped too much of the brightness out.

Also, because the value of the capacitor is so large, it's always going to have a smaller reactance than the input of an amplifier.

So what you really need to look for is a smaller value of capacitor.
You'll also want to choose your component values in accordance with the instrument that you;re dealing with.
For example Bass guitars are several octaves lower than a standard guitar, so you'll need a bigger cap value to take this into regard, there is no point putting a very small cap to reduce 10KHz signals on a bass guitar, because the instrument just doesn't produce these signals!

As seen above, the bigger the capacitor, the lower the frequencies that will pass through it to ground, and hence the darker the sound.

In general on an electric guitar you'll find the following values are good for the kind of tones that are described.

2200 - 6800pF will give a warm bright tone.
0.01 - 0.047uF will give a warm tone with a dark/blues/jazz edge to it
0.1uF and higher give a real dark sound, but remember if the capacitor value is too big that sound goes from dark, to muddy.

If you find that the sound that your guitar makes is too bright, then you should consider replacing the capacitor in the tone pot on your guitar for one that is a little bigger, experiment to find the right value to please your ears.

Tuesday, September 06, 2011

Coding Lessons: C and more inputs (Lesson 5)

So in the last lesson we dealt with only integers, in the same way as lesson 2 introduced the idea of variables, and we focused on one type of input (mostly so that I could keep my focus and the lesson wouldn't go on too long).

Now we're going to take a look at all the other types that are available to us.

Other Variables
We did integers pretty much to death in the last lesson, looking at how to declare, then how to read them, how to over flow them.

Remember how I said that the scanf statement looked like the printf statement. and worked in much the same way too?
Well just like the printf statement you can specify the width of the number, you can add modifiers (long, short signed and unsigned) to the type...

For example
%9ld would take an input that was 9 characters in width, and was a long integer.

So lets go over getting variables into a program.
We'll of course start by making a program, (so create a new lesson 5 folder and a new source file etc).

Then start writing the source in the normal way:
#include<stdio.h> int main() {
and declare some variables of different types that we'll be using to store the data entered by users in.
short int whole_number; char character1, character2; float not_whole_number;

Now lets start asking the user of the program to enter data,
Again we'll start by asking the user to enter the first char that we defined:
printf("enter char1:"); scanf("%c", &character1);

Then we'll ask the user to enter that short int:
printf("enter the short int:"); scanf("%hd", &whole_number);
remember we use the modifier h after the % sign to specify that it's a short integer.

Now we'll ask the user to enter the next character, (chracter2):
printf("Enter the char2:"); scanf("%c", &character2);

And finally get them to enter that floating number:
printf("Enter the float:"); scanf("%f", &not_whole_number);

now let's display back to the user the values that they entered:

printf ("the values entered were\r\n"); printf ("char1:%c, shortint:%hd, char2:%c, float:%f",character1, whole_number, character2, not_whole_number);

and finish our main function by closing the curly bracket:
}

The complete code should look like this:
#include<stdio .h>
int main()
{
short int whole_number;  
char character1, character2;  
float not_whole_number;
printf("enter char1:");
scanf("%c", &character1);
printf("enter the short int:");
scanf("%hd", &whole_number);
printf("Enter the char2:");
scanf("%c", &character2);
printf("Enter the float:");  
scanf("%f", &not_whole_number);
printf ("the values entered were\r\n");
printf ("char1:%c, shortint:%hd, char2:%c, float:%f",character1, whole_number, character2, not_whole_number);
}

Now you need to compile your program, and run it to make sure that it works.
D:\coding\lesson5>tcc lesson5.c
 D:\coding\lesson5>lesson5.exe
enter char1:a
enter the short int:1
Enter the char2:
Enter the float:1.2
the values entered were char1:a, shortint:1, char2: , float:1.200000  
D:\coding\lesson5>

Something strange happened there, we were able to enter the first character input, and the integer, but after that we were only able to enter the floating point number, and when displayed the program seemed to put a line break in unexpectedly.

Buffers
What happened there was no mistake, it looks a little weird, but what happened there was that when we entered that that short integer, we entered the number then hit enter.
so what we actually entered was
1\n
Now we told the program to look at the keyboard buffer, and read a short integer from it, so it took the one leaving \n in the keyboard buffer.
then we told the program to look for a char in the keyboard buffer, and it found \n and used that.

So the reason that the program didn't wait for us to enter a value, is because it already found one.
the reason that there is a line break in the output results is because that's what the character is (\n), so as I said, there is no mistake, the program is just doing what it was asked.
So how can we get data into that variable?

well, we can either just fill the keyboard buffer with what we want: (entering all the variables at once) and the scanf statements will just pick out the data that they are interested in.
D:\coding\lesson5>lesson5.exe enter char1:a4b6.7 enter the short int:Enter the char2:Enter the float:the values entered were char1:a, shortint:4, char2:b, float:6.700000

or, we can do it the proper way and flush the input buffer before reading it so that we know that it's empty and only getting what we want.

Flushing buffers

to flush the buffers in a program, (that is erase them all and make them ready to accept new input, we use the function;
flushall();
So all we need to do now is re-visit that code, and flush the buffers before reading inputs.

#include<stdio .h>
 int main()
{
short int whole_number; char character1, character2;
 float not_whole_number;
printf("enter char1:");
flushall();
scanf("%c", &character1); printf("enter the short int:");
flushall();
scanf("%hd", &whole_number); printf("Enter the char2:");
flushall();
scanf("%c", &character2); printf("Enter the float:");
flushall();  
scanf("%f", &not_whole_number);
 printf ("the values entered were\r\n");  
printf ("char1:%c, shortint:%hd, char2:%c, float:%f",character1, whole_number, character2, not_whole_number);
}

Making pretty outputs
Now, I can't help but feel that just putting data out on one line looks a little, well messy, it's nice for computers to read, but I'm not a computer.

So lets have a look at making our data outputting a little neater.

A few lessons ago we introduced the concept of displaying characters with their ASCII number rather than the data.
I put a link to the table found at http://www.asciitable.com/, we looked at how a character could be 97, which was a lower case a, and 98 was a b.

Well, now we're going to start using the characters, 185, 186, 200, 201, 202, 203, 204, 205 and 206... you'll see that these are double line corners, double horizontal lines (like =) double vertical lines, and junctions between these lines.

we'll start by deciding how wide we want our columns to be, I'm choosing 8 character places.

so we'll draw the top of our table:
printf ("the values entered were\r\n");
printf("%c", 201);  
printf("%c%c%c%c%c%c%c%c", 205,205,205,205,205,205,205,205);
printf("%c", 203);  
printf("%c%c%c%c%c%c%c%c", 205,205,205,205,205,205,205,205);
printf("%c", 203);
printf("%c%c%c%c%c%c%c%c", 205,205,205,205,205,205,205,205);
 printf("%c\r\n", 187);

(Note that if you were a real sadist, all this could be done on a single line! but I feel that'd be a bit confusing).

Then we'll write out our column headers:
printf("%c", 186);
printf("Char 1 ");
printf("%c", 186);
printf("Shortint");
printf("%c", 186);  
printf("Char 2 ");
printf("%c\r\n", 186);
notice I've used white space to pad out those titles to 8character lengths, (by white space I mean I pressed the space bar three times after writing float, (float has five characters, but to make it up to 8, I added 3 blank characters.)

Then we'll close the table cells,
printf("%c", 204);
printf("%c%c%c%c%c%c%c%c", 205,205,205,205,205,205,205,205);
printf("%c", 206);
printf("%c%c%c%c%c%c%c%c", 205,205,205,205,205,205,205,205);
printf("%c", 206);  
printf("%c%c%c%c%c%c%c%c", 205,205,205,205,205,205,205,205);
printf("%c\r\n", 185);
and now we'll enter the variables:
printf("%c", 186);
printf("%8c", character1);
printf("%c", 186);
printf("%8hd", whole_number);
printf("%c", 186);  
printf("%8c", character2);
printf("%c\r\n", 186);

Remember how we set the columns to be 8 characters wide, well, that's meant that we have to either pad out, or restrict variables.

So we've used %8c, to make the characters take up 8 spaces, we've made the short in take up 8 spaces by writing %8hd.

Then we close our table:
printf("%c", 200);  
printf("%c%c%c%c%c%c%c%c", 205,205,205,205,205,205,205,205);
printf("%c", 202);  
printf("%c%c%c%c%c%c%c%c", 205,205,205,205,205,205,205,205);  
printf("%c", 202);  
printf("%c%c%c%c%c%c%c%c", 205,205,205,205,205,205,205,205);
printf("%c\r\n", 188);

So the complete code for that bit is:

#include<stdio.h>
int main()  
{
short int whole_number; char character1, character2;
printf("enter char1:");  
flushall();  
scanf("%c", &character1);  
printf("enter the short int:");
flushall();
scanf("%hd", &whole_number);  
printf("Enter the char2:");
flushall();  
scanf("%c", &character2);
printf ("the values entered were\r\n");
printf("%c", 201);  
printf("%c%c%c%c%c%c%c%c", 205,205,205,205,205,205,205,205);
printf("%c", 203);
printf("%c%c%c%c%c%c%c%c", 205,205,205,205,205,205,205,205);
printf("%c", 203);  
printf("%c%c%c%c%c%c%c%c", 205,205,205,205,205,205,205,205);  
printf("%c\r\n", 187);  
printf("%c", 186);
 printf("Char 1 ");
printf("%c", 186);
printf("Shortint");
printf("%c", 186);  
printf("Char 2 ");  
printf("%c\r\n", 186);
printf("%c", 204);
printf("%c%c%c%c%c%c%c%c", 205,205,205,205,205,205,205,205);
printf("%c", 206);  
printf("%c%c%c%c%c%c%c%c", 205,205,205,205,205,205,205,205);
printf("%c", 206);  
printf("%c%c%c%c%c%c%c%c", 205,205,205,205,205,205,205,205);
printf("%c\r\n", 185);  
printf("%c", 186);  
printf("%8c", character1);  
printf("%c", 186);  
printf("%8hd", whole_number);
printf("%c", 186);  
printf("%8c", character2);
printf("%c\r\n", 186);  
printf("%c", 200);  
printf("%c%c%c%c%c%c%c%c", 205,205,205,205,205,205,205,205);
printf("%c", 202);  
printf("%c%c%c%c%c%c%c%c", 205,205,205,205,205,205,205,205);
printf("%c", 202);  
printf("%c%c%c%c%c%c%c%c", 205,205,205,205,205,205,205,205);
printf("%c\r\n", 188);
 }


Yes, I have deliberately taken out the float type of variable.

Compile this and run it, and you should see the following:
D:\coding\lesson5>tcc lesson5.c
D:\coding\lesson5>lesson5.exe
enter char1:1 
enter the short int:s
Enter the char2:1
the values entered were 
╔════════╦════════╦════════╗
║Char 1  ║Shortint║Char 2  ║
╠════════╬════════╬════════╣
║       1║      64║       1║
╚════════╩════════╩════════╝  

Thursday, September 01, 2011

Coding Lessons: C and inputs (Lesson 4)

To start with we're only going to deal with fixed formatted inputs.

That is to say that we'll be assigning a variable type, (an integer for example), and we expect a user to be entering an integer.

We are leaving the system open to people inputting strings or floats or characters, and just trusting that they will enter a number.

Of course, if you were writing professional software, or software for anyone but yourself you'd be allowing input of strings, and then checking that this strings were actually numbers, and then converting them into numbers before allowing them to be treated as numbers.

To start, do the same as for any lesson, go into your coding folder and create a new folder called Lesson4, and open your editor.

you will of course be including the header file that we use to get either inputs or outputs from the console
#include <stdio.h>
And you'll be starting your main routine in the program.

int main()
{
As I said, we'll deal with numbers first, so lets declare a couple of integer variables:
int x, y;
I mentioned in an earlier lesson that you could declare two variables on the same line, that you just separated them by a comma. Well, you just did it!

now you need to tell the user of your program that you're waiting for an input, if you don't tell the user, then how are they going to know to do anything?

So print a message to the screen telling them to enter a number for the variable.
printf("enter a number for X:");
And now you need to actually get the variable.

To do this you use a function called scanf, scanf works pretty much the same as printf, but instead of printing to the terminal, you're scanning from the terminal.
The format of the function looks incredibly similar to the printf function, the same place holder for the variable types are used, but, you cannot put text into the statement, and instead of just writing the variable at the end, we have to prefix the variable name with an ampersand, like this.
scanf("%d", &x);
We tell the user to intput a value, and read that value for y from the keyboard in the same way.

Then we can display our variables, just like we did in earlier lessons.
printf("x=%d, y=%d", x, y);

You can now close your main routine and compile and run your program.

D:\coding\lesson4>tcc lesson4.c

D:\coding\lesson4>lesson4.exe
enter a number for X:99
Enter a number for Y:1
x=99, y=1
D:\coding\lesson4>

Of course, just getting and displaying inputs is a little bit boring, so lets look at some simple functions that we can do with numbers.

We can add them together.

If we'd declared another variable (Z?) then we could write;
z = x+y;
Then the variable z, would have the sum of variables x and y in it.

but we learned in our last lesson that we don't necessarily have to have a variable to display data.
we can just do the maths inside the printf statement.
printf("\r\n%d + %d = %d", x, y, x+y);

I'd recommend some caution here though, anything more complicated than simple maths functions are going to get a little bit difficult to work through, what I mean is that if they are in the end of a printf statement it's going to look messy, be difficult to read, and difficult to debug.

Anyway, add that line of code at the end of your program, and re-compile. and run again.
Testing
D:\coding\lesson4>tcc lesson4.c

D:\coding\lesson4>lesson4.exe
enter a number for X:99
Enter a number for Y:1
x=99, y=1
99 + 1 = 100
D:\coding\lesson4>

The numbers are input correctly, and the sum is calculated correctly.

Lets see if we can trip this program up, and expose some limitations.
D:\coding\lesson4>lesson4.exe
enter a number for X:-8
Enter a number for Y:4
x=-8, y=4
-8 + 4 = -4
D:\coding\lesson4>
It deals perfectly well with negative numbers, remember, integers are signed by default. so lets try something else.
D:\coding\lesson4>lesson4.exe
enter a number for X:1
Enter a number for Y:a
x=1, y=1245064
1 + 1245064 = 1245065
D:\coding\lesson4>
a, is not a number. the program doesn't crash, but the results are meaningless. Imagine if you were writing a program for a financial company, a simple mistake of hitting the wrong key could be disastrous!

Overflow error
Lets be a little less obvious about how to break this program now.
D:\coding\lesson4>lesson4.exe
enter a number for X:1
Enter a number for Y:2147483647
x=1, y=2147483647
1 + 2147483647 = -2147483648
D:\coding\lesson4>
How did that happen?!

If you remember in the first lesson on variables we talked about all the variable types, signed and unsigned, and we talked about how numbers were expressed in binary.
how a signed 4 bit number could count from -8 to +7
0111 = 7
1000 - -8

Well this happens with all signed numbers,
In this case the number has 32 bits, and all that happened was the variable was:
0111 1111 1111 1111 1111 1111 1111 1111
We added 1 to that, so it became.
1000 0000 0000 0000 0000 0000 0000 0000

If that were an unsigned number 2,147,483,647 would have become 2,147,483,648.
but because it is signed, (and has that signed bit) instead it became -2,147,483,648.

We've forced the computer to deal with a number larger than a 32bit integer, with consequences that we could expect, but could not deal with inside the program, because they were too big for the program to deal with!
Consider this:
D:\coding\lesson4>lesson4.exe
enter a number for X:214748364970
Enter a number for Y:214748364970
x=170, y=170
170 + 170 = 340
D:\coding\lesson4>

The numbers are nothing like what we entered, what we've started playing with is forcing the program to deal with numbers that it's just not equipped to. This is an overflow error.
(because the bits have overflowed out of the space that this variable can deal with), sometimes this just doesn't matter, (this program that we've made doesn't complain).
Other times it does matter

The complete code is here:
#include
int main()
{
int x, y;
printf("enter a number for X:");
scanf("%d", &x);
printf("Enter a number for Y:");
scanf("%d", &y);
printf("x=%d, y=%d", x, y);
printf("\r\n%d + %d = %d", x, y, x+y);
}