So over the weekend I decided to use my Raspberry pi to do a little bit of website development.
This is an interesting task. I've been actually developing the site on a windows box, but as I plan to host on inux evenutally I thought that I should test on linux, usually this would mean spinning up a VM, but I thought since I have the Raspberry Pi, (and I want to think of a web enabled hardware project also, now would be a good time to get to installing some standard LAMP type tools
first install apache
apt-get apache2
then php
apt-get php5
then mysql
apt-get mysql-server
then the PHP and my sql tools
apt-get php5-mysql
then I want to have a live AND a test site, to you need to configure apache.
I'm putting my test site on an alternate port (I suppose I could use named hosts)
do as well as making a new site in site-available and linking it to sites enabled you have to edit ports.conf too
now, a load of people suggest installing phpmyadmin.
This is a pretty cool tool, I've used it plenty of times before when developing siets. but, I don't reall want that on this box, the reason is, that when I used it before there were pretty much no graphical tools for mysql administration, it was CLI or developing some kind of app.
since Oracle bought MySQL the've written some pretty nice GUI connect and administer tools. (which is weird because the oracle ones are pretty bloated and shite)
then I want to use the GUI tools on my windows machine to admin the mysel server
So I keep getting a connecttion failed error
can't connect to server 10060
Turn out that this means taht the server isn't listening,
but it should be, I am actually running code on it, my site is working perfect databases are being accessed.
Oh wait, turns out that the default config is to listen for connecttions to local host only.
So edit /etc/mysql/my.cnf and change the bind address from bind 127.0.0.1 to bind (your ip address) (make sure you set a static address, you don;t want this changing!!)
But wait, now the tools are saying they can see the server, but throw up the message
Host 192.168.1.11 (my computer) is not allowed to connect to this MySQL server.
You have to grant the user access from specific IP locations. (a pretty neat sucurity feature I guess)
To do this you'll need to log on to your MySQL installation as root.
(so from the command line (Via SSH if you like))
mysql -u root -p
Then you'll want to use the MySQL equivalent of the system databases,
use mysql
And finally, grant access to the machine to be able to connect to the server:
grant all on *.* to root@'[clinet IP]' identified by 'password'
(or grant select insert delete on *.* to web_site_user@'web_site_server_IP' identified by 'web_site_user password')
Showing posts with label Raspberry Pi. Show all posts
Showing posts with label Raspberry Pi. Show all posts
Monday, June 03, 2013
Monday, March 18, 2013
Breakout board for the Raspberry Pi
I've been talking a lot about my Raspberry Pi recently. That's because I've been playing with it a lot!
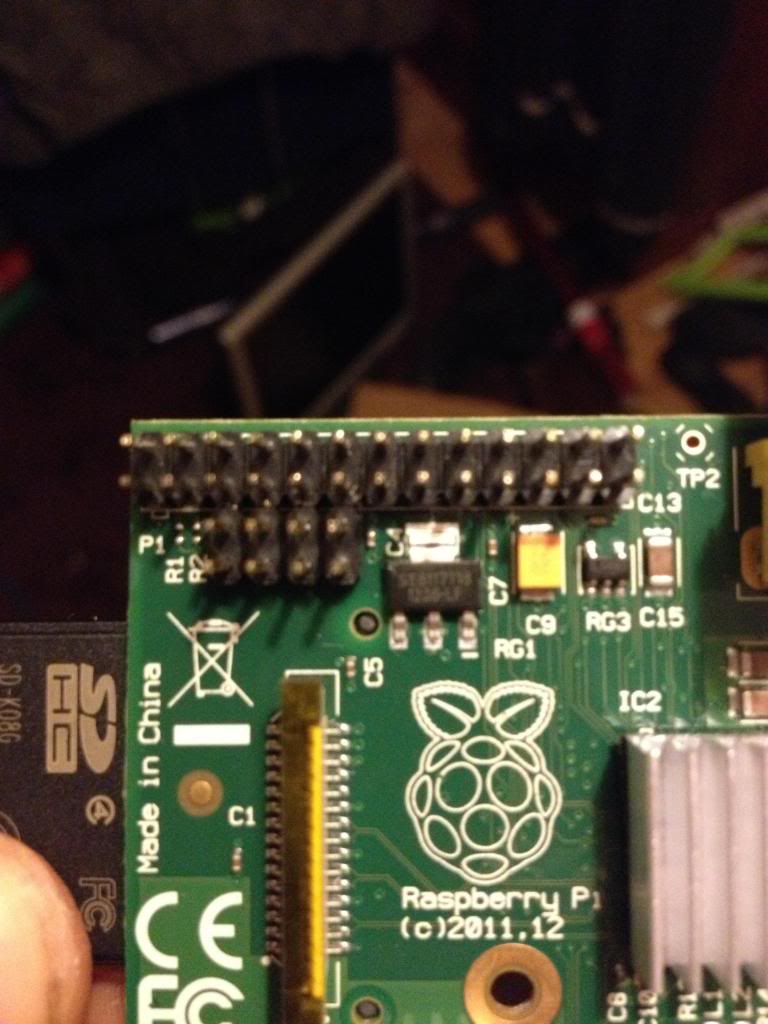
On the Raspberry Pi there is a row of pins called GPIO pins, the block of pins is called P1.
These are on most versions of the Raspberry pi the only input/output pins available.
However on later versions there is a set of 8 pins next to P1 that have no pins soldered in.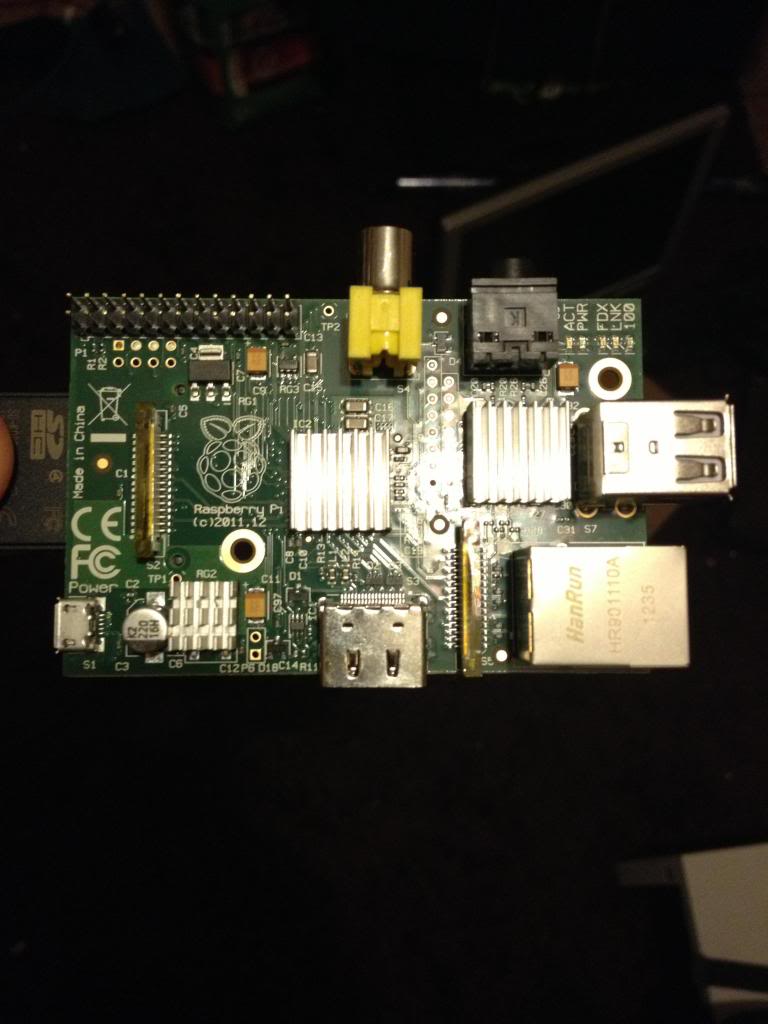

Next there is a new pin header called P6 on the board, this is a set of pins that a reset switch can be attached to.
So now I need to get a plug to attach to these pins.
I started with a 44pin IDE cable.
Start by removing the cable from the connector at one end, put that connector that you removed into connector P1. mark the first un-used set of holes, then using a utility knife cut through this set of holes.
This wastes 2 pins in the connector, but don't worry.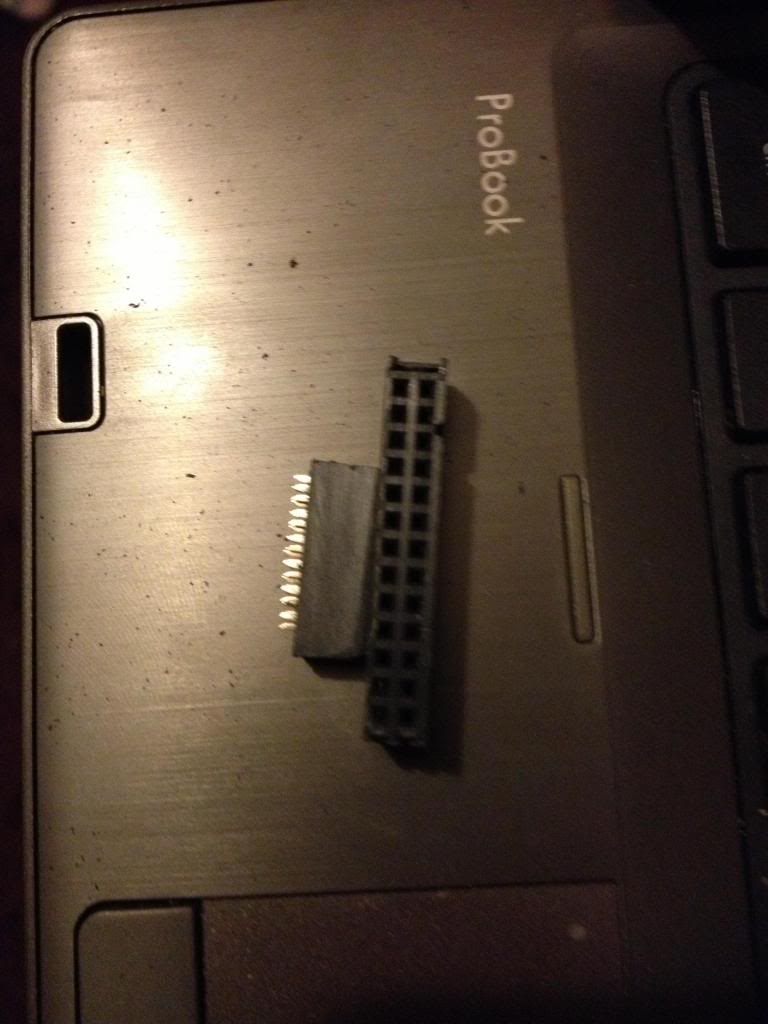
Now using a file or some sand paper you need to sand down the sides of the connector plug so that you can put these two plugs next to each other on the pins of P1 and P5 without them bending the pins.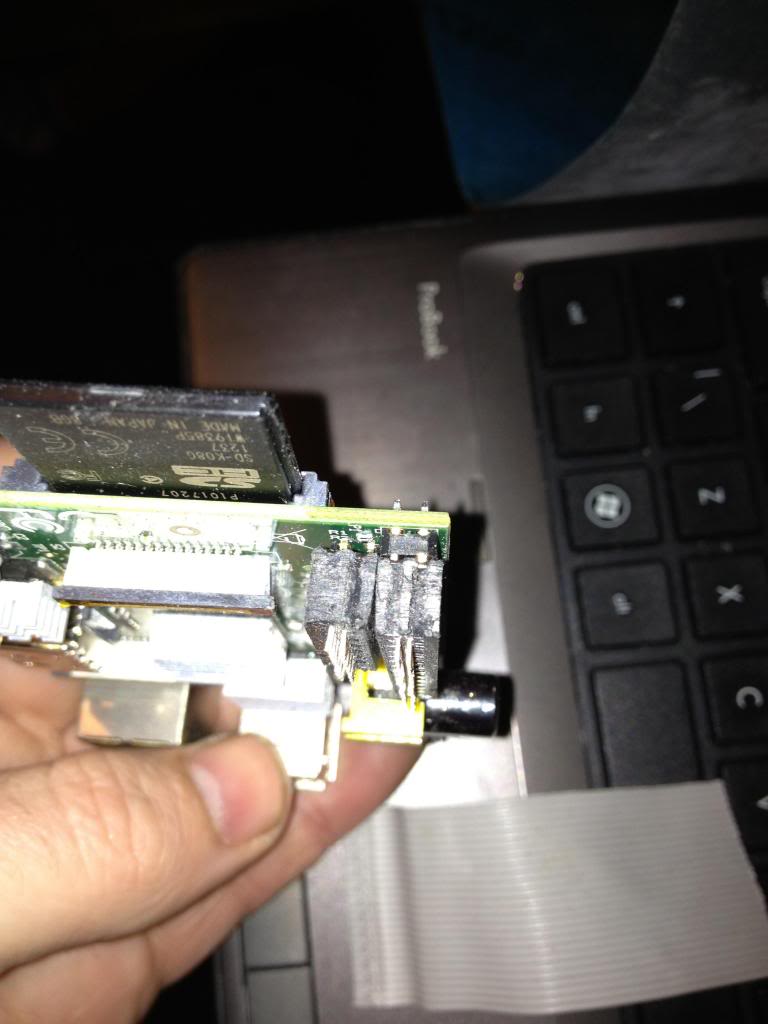
Next take the cable, and divide it to split the cable with 26 pins from end of the cable, lay this across the board and trim the first 26 conductors in the cable so that they are about 1 and a half to two board widths shorter than the rest of the cable, also split the first two conductors away from the bulk of the cable.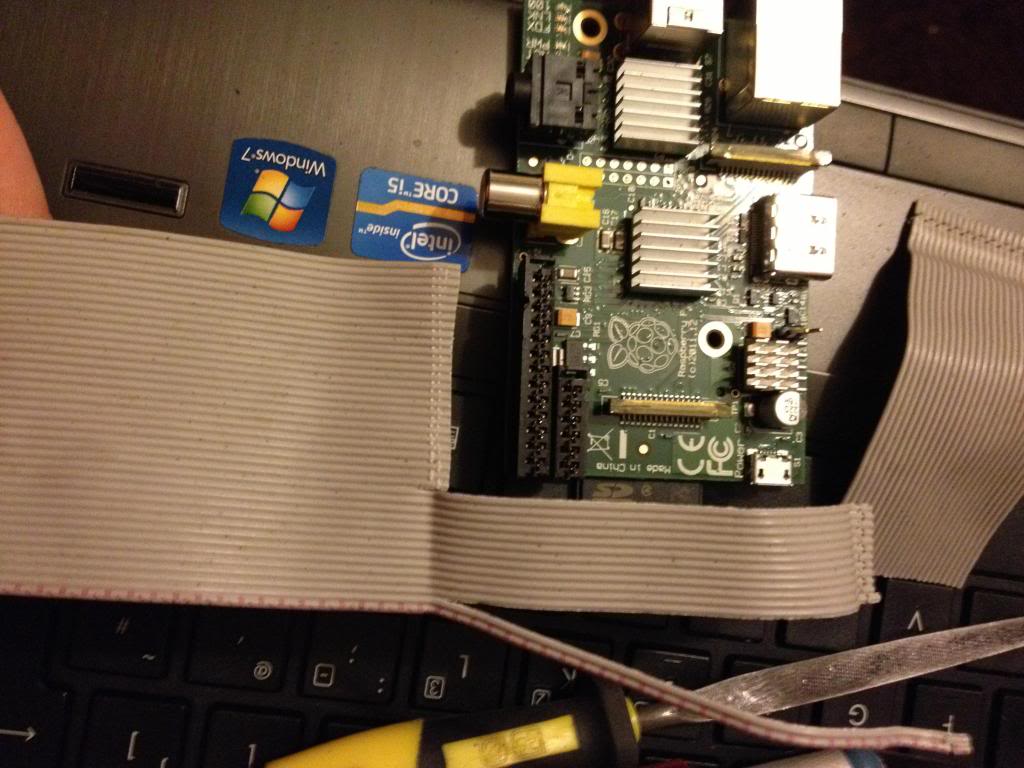
Now attach the larger half of the connector that was cut in two to the first 26 pins.
Next turn the cable over, and attach the smaller half of the connector to the remaining part of the ribbon cable, so that it sits diagonally next to the P1 connector.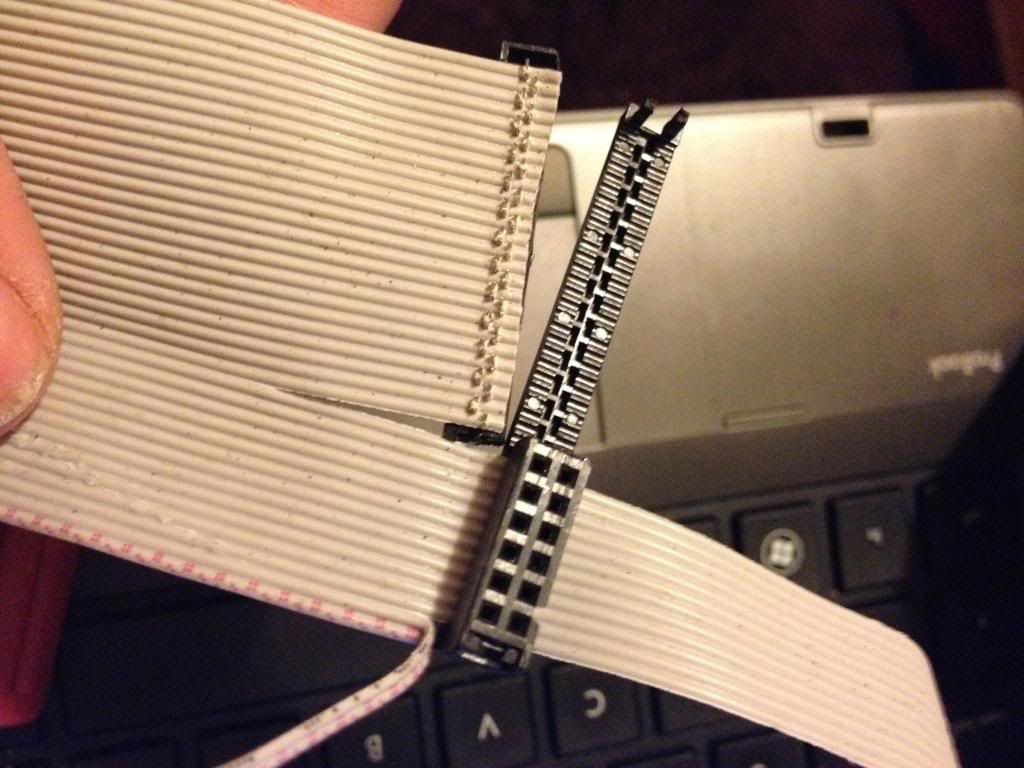
When you fold the cable over, the two plugs should sit next to each other in such a way that they will easily connect to the P1 and P5 headers, (obviously the sides of the connecttor previously sanded away to allow this fit must now face each other!)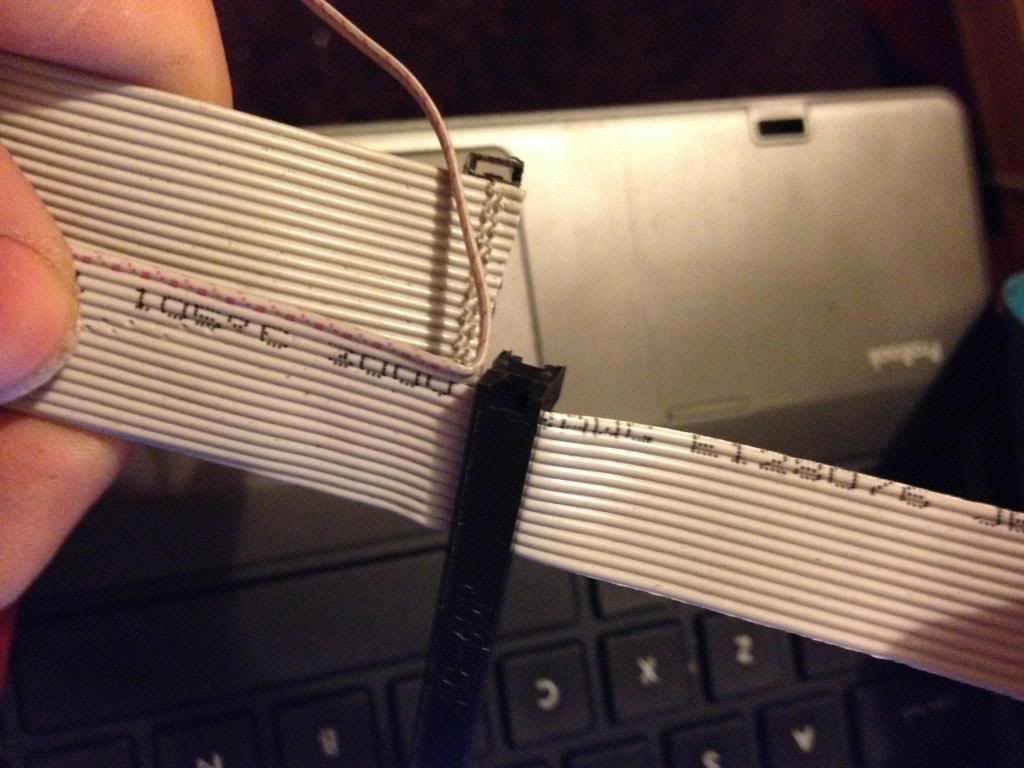
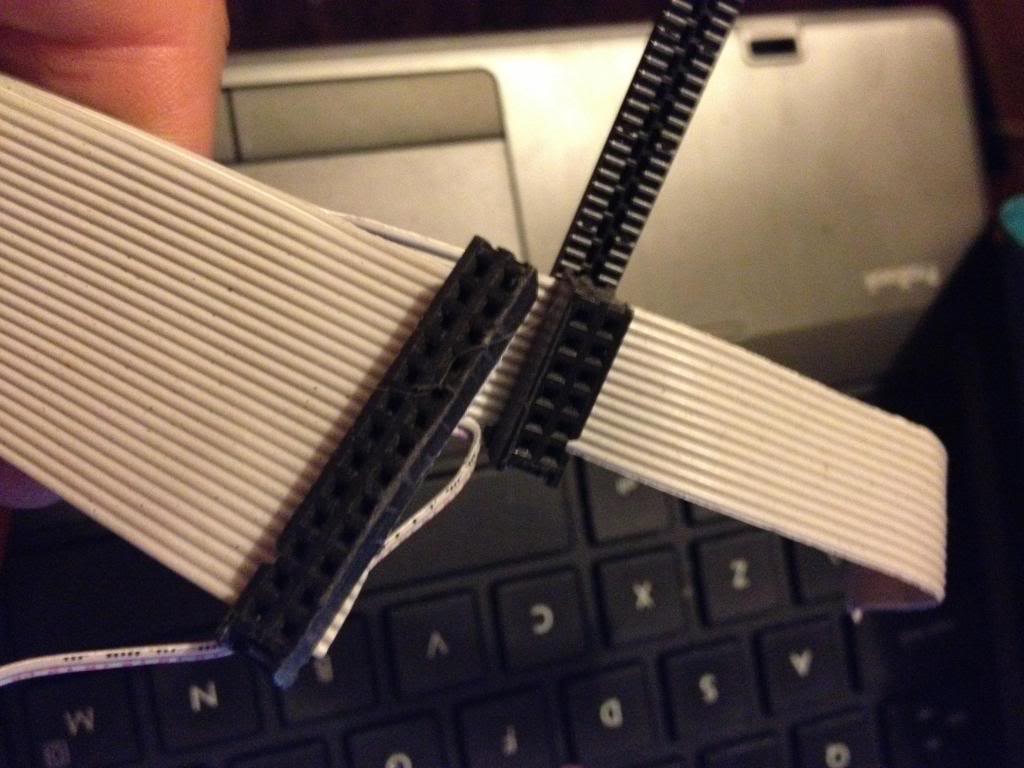
Next cut the cap for the plug and glue over the top of the cable to insulate the terminals that have cut through the insulation on the ribbon cable.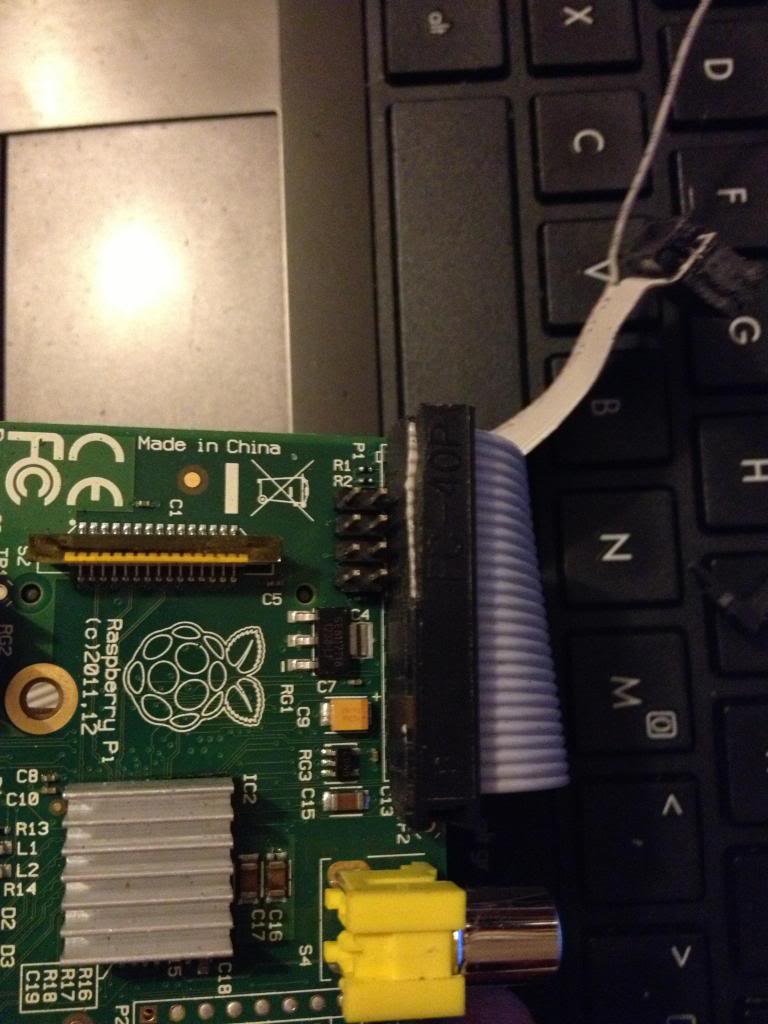
And ensure that both connectors can be attached at the same time.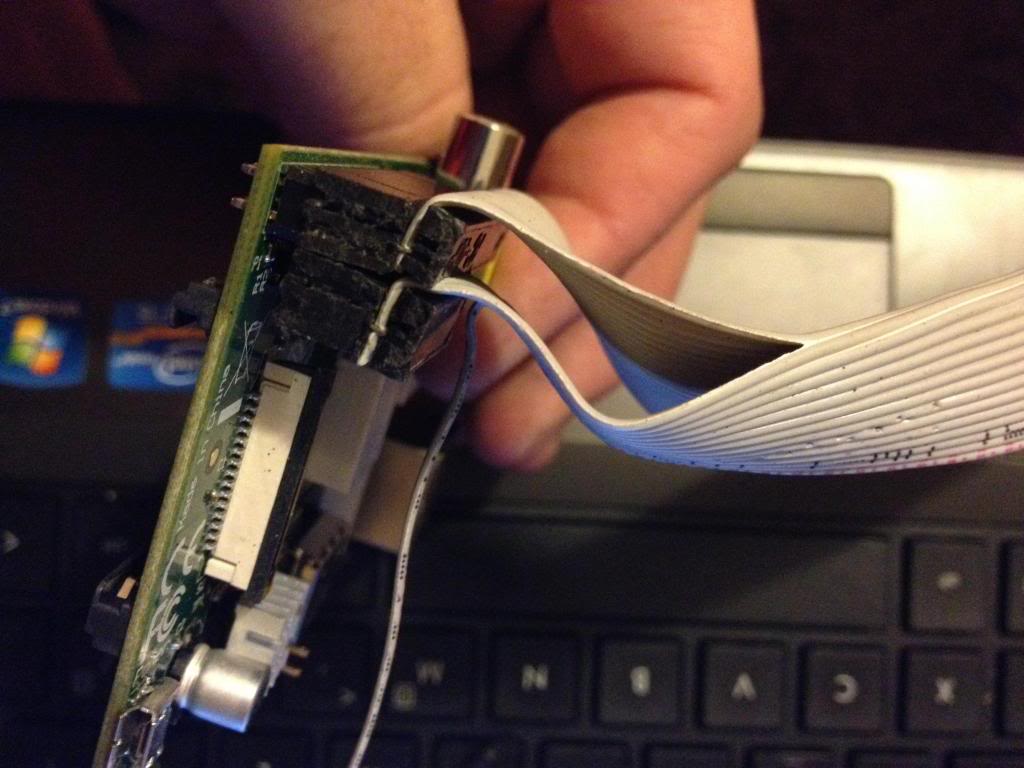
Finally attach a connector to the remaining two conductors in the cable and attach this to P6. I salvaged the connector from an old computer case to it says reset switch, shorting the pins of P6 resets the device so it is apt to use this connector.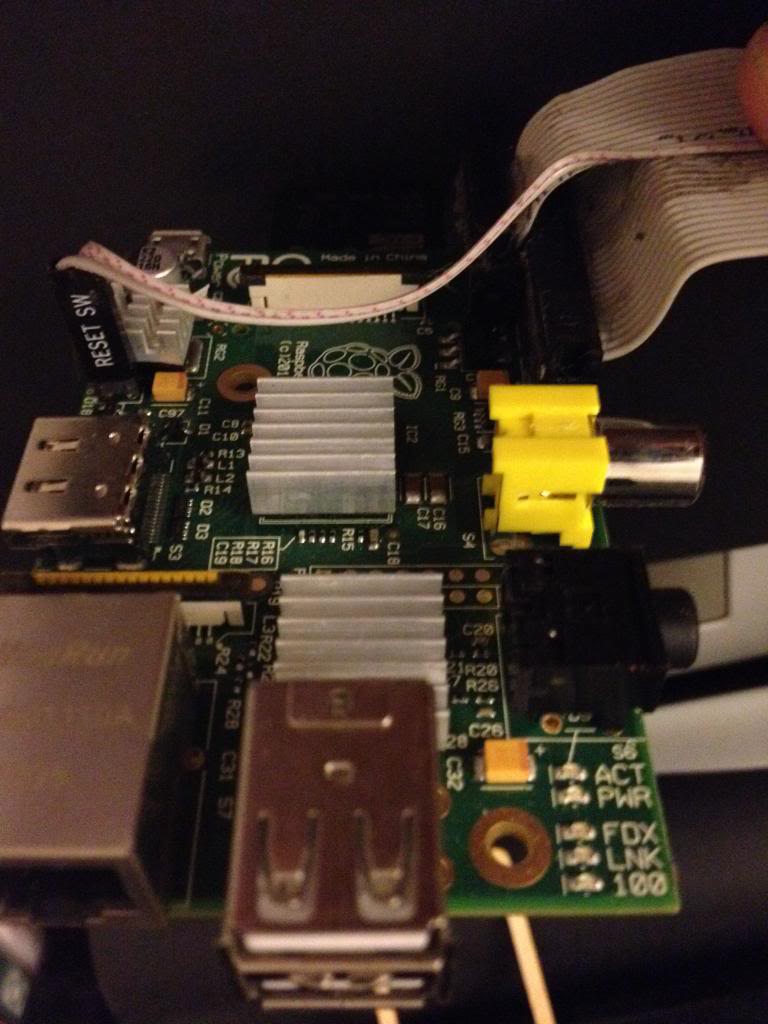
Next using some perf board cut the copper track on 22 rows ready to solder the 44 pin header.
Now solder in the header pins to the perf board.
I've used a 42 pin connector which is black, and used a 2 pin white connector to mark pin 1.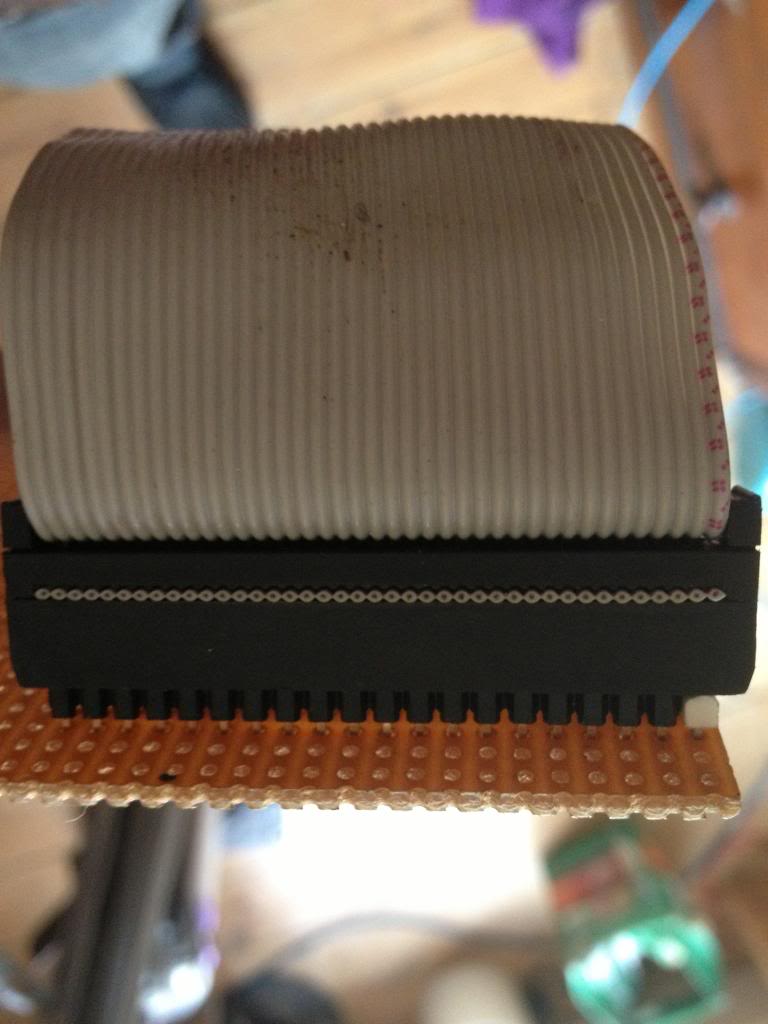
After soldering the cable header pins to the perf board you need to solder some pins that will go into the breadboard.
I used single rows of header pins next to the black connector header.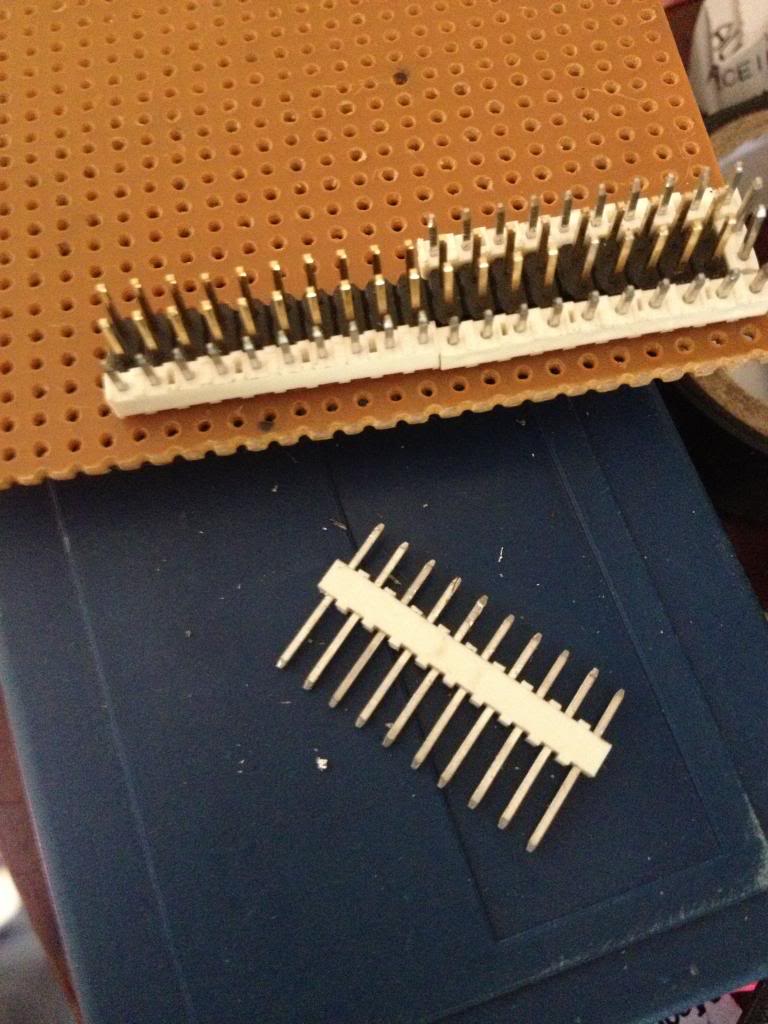
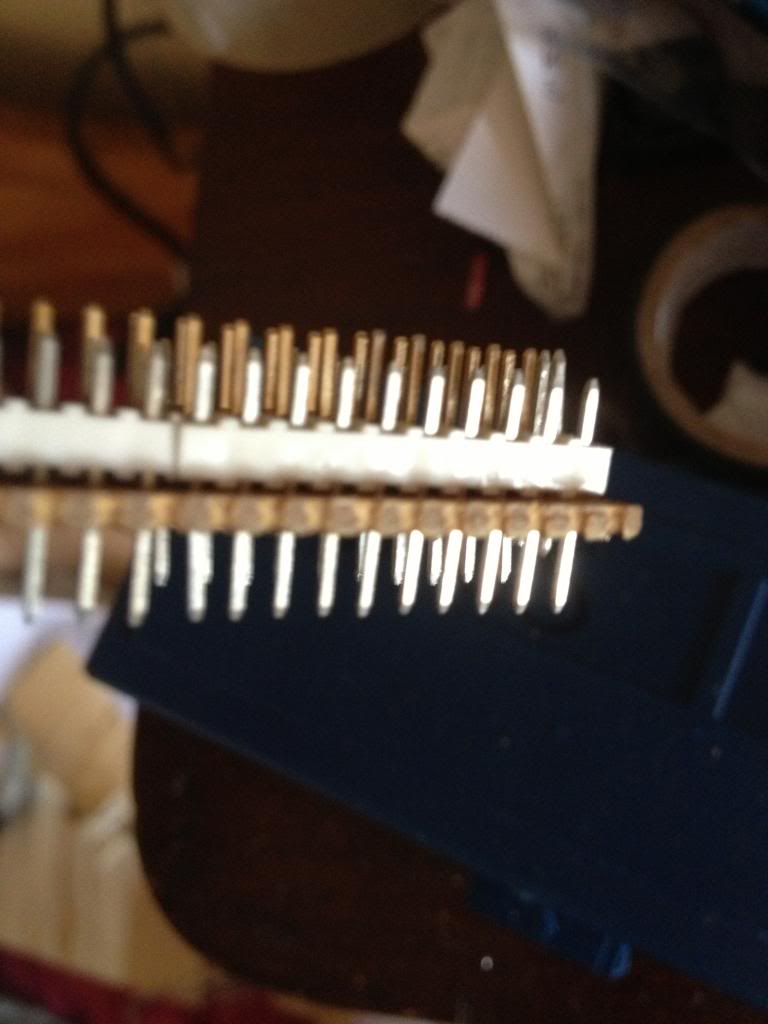
with the pins pushed down into the white block so that they protrude farther out the bottom of the perf board.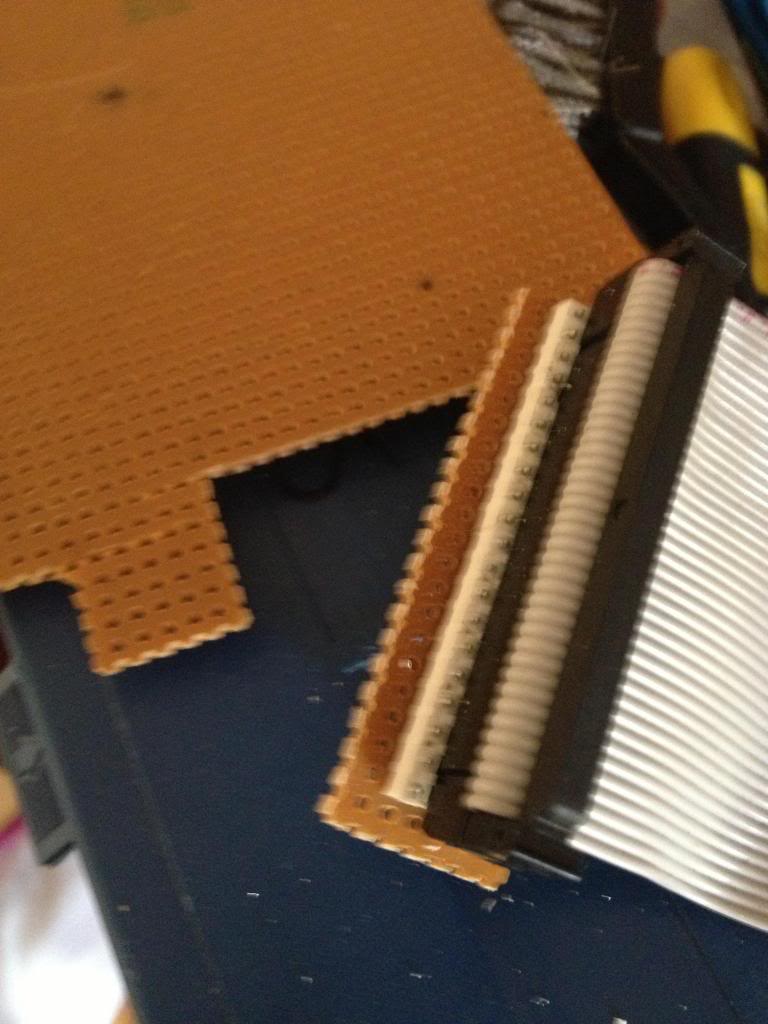
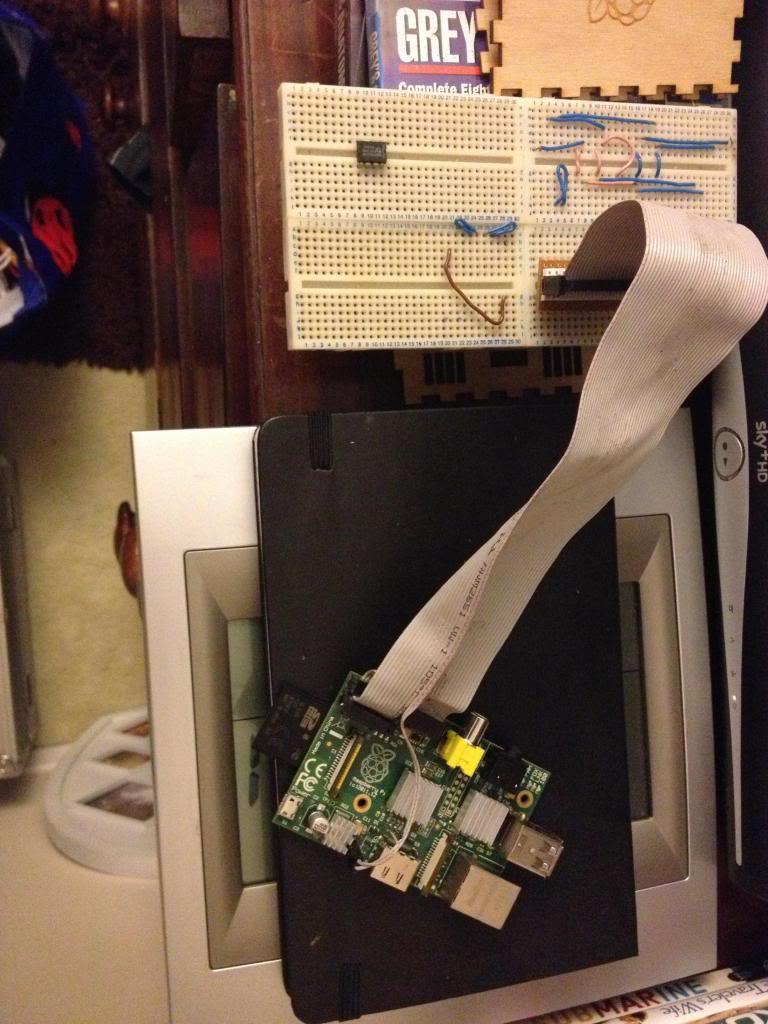
Finally the raspberry pi can be connected to my breadboard.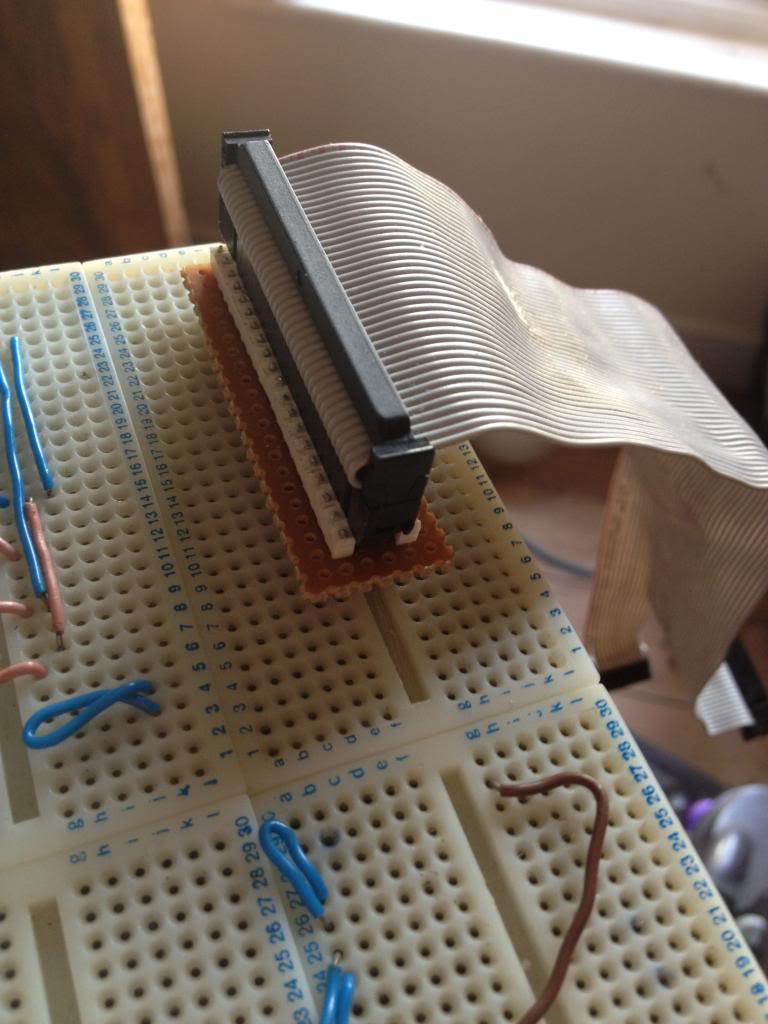
On the Raspberry Pi there is a row of pins called GPIO pins, the block of pins is called P1.
These are on most versions of the Raspberry pi the only input/output pins available.
However on later versions there is a set of 8 pins next to P1 that have no pins soldered in.
So the first thing to do is remove the solder from this header (P5).
The plug for this header is supposed to be mounted with pins facing downwards. personally I don't understand why I'd want to have cables trailing from the top and the bottom of the boards, to me this seems like a crazy idea. I'd much rather have all my pins accessible from the top. especially when I use the mounting holes in this rev 2 board to screw the board down!
After removing the solder I've added 8 new pins to P5
Next there is a new pin header called P6 on the board, this is a set of pins that a reset switch can be attached to.
So now I need to get a plug to attach to these pins.
I started with a 44pin IDE cable.
Start by removing the cable from the connector at one end, put that connector that you removed into connector P1. mark the first un-used set of holes, then using a utility knife cut through this set of holes.
This wastes 2 pins in the connector, but don't worry.
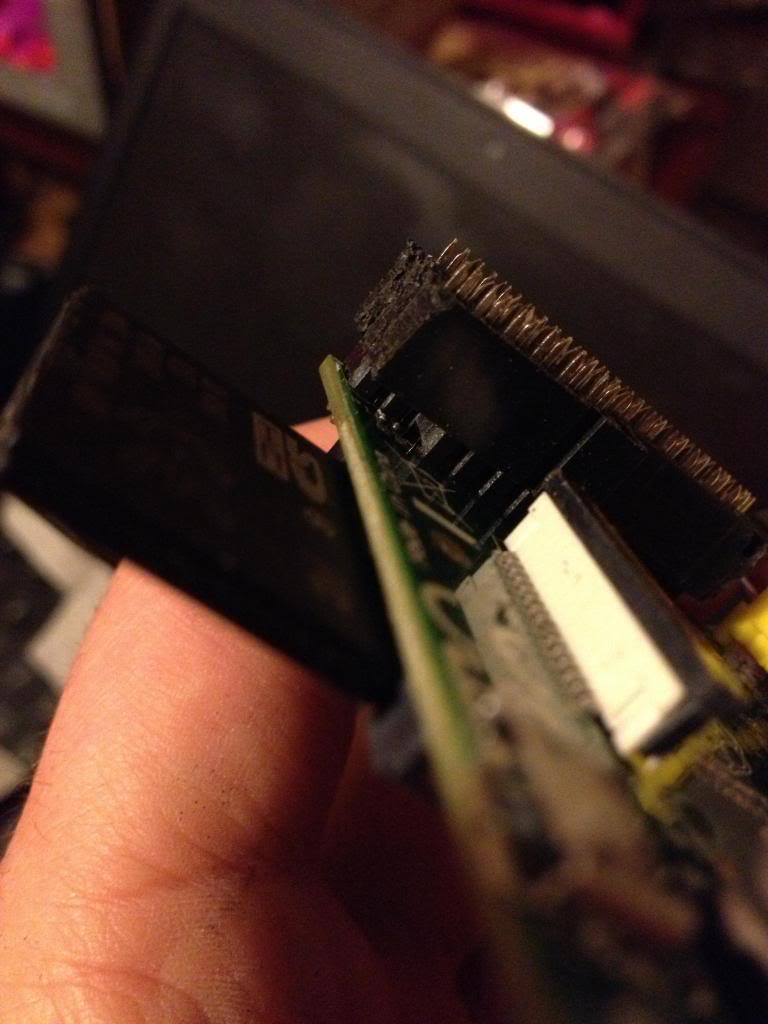
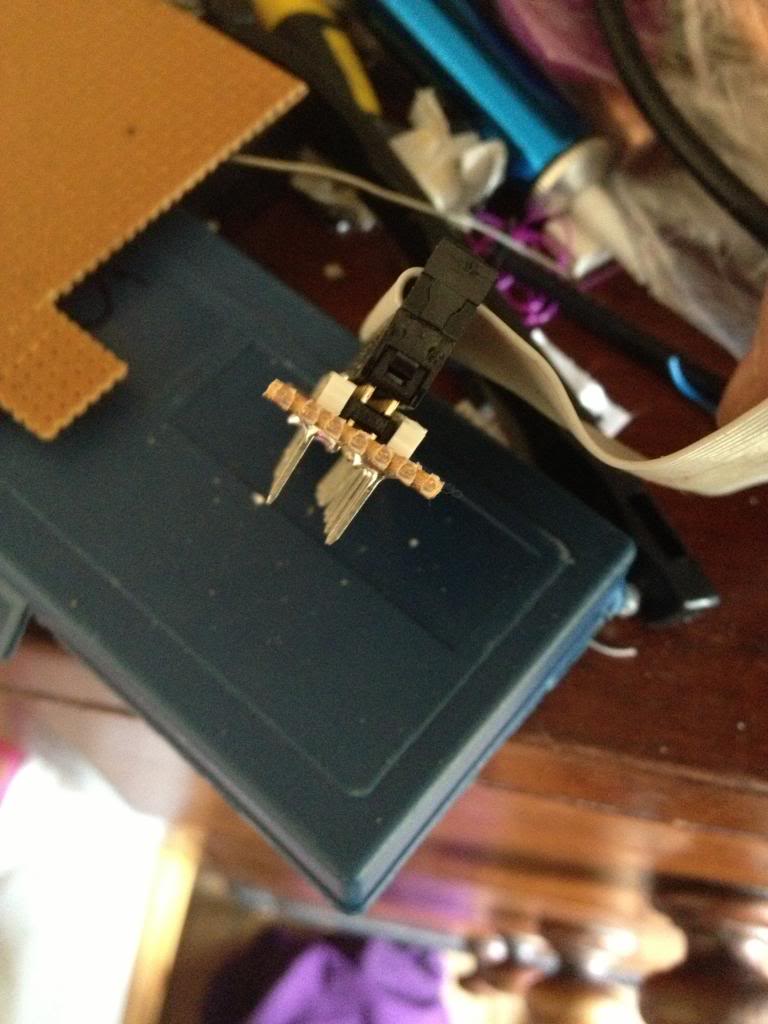
Now using a file or some sand paper you need to sand down the sides of the connector plug so that you can put these two plugs next to each other on the pins of P1 and P5 without them bending the pins.
This is halfway through,
In the end the plugs should comfortably sit next to each other.
In the end the plugs should comfortably sit next to each other.
Next take the cable, and divide it to split the cable with 26 pins from end of the cable, lay this across the board and trim the first 26 conductors in the cable so that they are about 1 and a half to two board widths shorter than the rest of the cable, also split the first two conductors away from the bulk of the cable.
Now attach the larger half of the connector that was cut in two to the first 26 pins.
Next turn the cable over, and attach the smaller half of the connector to the remaining part of the ribbon cable, so that it sits diagonally next to the P1 connector.
Next cut the cap for the plug and glue over the top of the cable to insulate the terminals that have cut through the insulation on the ribbon cable.
Next using some perf board cut the copper track on 22 rows ready to solder the 44 pin header.
I've used a 42 pin connector which is black, and used a 2 pin white connector to mark pin 1.
I used single rows of header pins next to the black connector header.
with the pins pushed down into the white block so that they protrude farther out the bottom of the perf board.
Finally the raspberry pi can be connected to my breadboard.
Monday, March 11, 2013
Setting up your Pi
So you've got a raspberry pi, and it's all on line and everything.
The next thing to do is customise the board a little more.
Hostname
The first think that you might decide is I don't want to call my machine Raspberry Pi, perhaps you have two, and they can't both be called RaspberryPi.
Well you'll need to change the host name then...
first to find out your host name type:
pi@raspberrypi ~ $ hostname
raspberrypi
now to edit this you need to edit the host name file, so type
sudo nano /etc/hostname
Delete RaspberryPi and enter the host name you wish to use and then save the file.
next you'll need to edit the hosts file:
type sudo nano /etc/hosts
find anywhere that says Raspberry pi in this file and replace it with the host name of your choice.
Now reboot your device for the changes to take effect.
DHCP vs. Static
Next you'll find that it's all very well to have your Raspberry pi having an IP address just provided by your router. and you've assigned your NAT rule to point to that address, but ,what if the router breaks, or the router restarts, or your Raspberry Pi is off for a while and another machine gets given that IP address?
What you really want to do is assign a static IP address.
To do this you need to enter your network configuration details into a configuration file.
for this example I'm going to suggest that the whole network range is
192.168.0.1 - 192.168.0.254 (The subnet for this range is /24)
and that the router has the address 192.168.0.1
and that it serves DHCP addresses from 192.168.0.2 - 192.168.0.200
So first we need to edit the file that controls the network configuration for the network interface.
sudo nano /etc/network/interfaces
by default this file will appear like this:
auto lo
iface lo inet loopback
iface eth0 inet dhcp
allow-hotplug wlan0
iface wlan0 inet manual
wpa-roam /etc/wpa_supplicant/wpa_supplicant.conf
iface default inet dhcp
you need to tell the machine to be statically assigned not DHCP, so change the line
iface default inet dhcp to iface default inet static
Then you need to say what address to use
so add the line
address 192.168.0.201
(this address is outside of the DHCP range served by the router, so there should never be an IP address conflict)
then you need to say what the subnet is by adding the line
netmask 255.255.255.0
and finally you need to put the gateway address, (which is your routers address
gateway 192.168.0.1
then save and exit this file. then restart your machine
(remember to restart use sudo reboot)
If you've changed the IP address of your Raspberry pi, don't forget to update your NAT rule on your router so that you can have external access!
Monday, March 04, 2013
Adding software to the pi.
Last time I looked at adding the no-ip client to the Raspberry pi through downloading source files and compiling software with the make command.
There are a few other ways of getting software onto your device, clearly you can program something yourself, and compile it.
Or you could use the Raspberry pi app store.
Or you could use a package manager called apt-get
Background
The Rasbian distribution of Linux is built on top of a different Linux distribution called Debian.
Debian is cool not only because the distributions, (woody, buzz wheezy etc) are named after toy story characters, but because it's incredibly stable, all software that is released to the apt-get "store" is thoroughly tested.
This means that if you use apt-get to install anything you can practically guarantee that it will work.
This doesn't mean that you can guarantee it will be exploit free however, that guaranteed work comes at a price. that price is a longer delay (whilst testing is happening) until software reaches you.
In the future I plan to build software on my Raspberry pi. so lets make sure that I have gcc installed.
to install gcc I type
sudo apt-get install gcc
and I get the following:
pi@raspberrypi ~ $ sudo apt-get install gcc
Reading package lists... Done
Building dependency tree
Reading state information... Done
The following packages were automatically installed and are no longer required:
libapr1 libaprutil1 libaprutil1-dbd-sqlite3 libaprutil1-ldap php5-cli ssl-cert
Use 'apt-get autoremove' to remove them.
The following extra packages will be installed:
cpp
Suggested packages:
cpp-doc gcc-multilib autoconf automake1.9 libtool flex bison gcc-doc
The following packages will be upgraded:
cpp gcc
2 upgraded, 0 newly installed, 0 to remove and 186 not upgraded.
Need to get 21.6 kB of archives.
After this operation, 0 B of additional disk space will be used.
Do you want to continue [Y/n]?
Obviously I already have gcc installed, but there is an upgrade available.
So I chose to install it by pressing Y
I can choose to install things by using apt-get followed the the word install then the name of the package
I can remove by typing apt-get remove
if you want to remove all traces you can use
sudo apt-get --purge remove
or, (say you've installed apache2 there are a few configuration tools that seem to want to hang around) you can type
sudo apt-get remove apache2*
That removes everything with apache2 in the name
Updating the list of packages
when you've got a lot of software installed on windows knowing if it's all up to date can be a bit of a nightmare, I suppose for the operating system there is windows update.
but what about the copy of apache running, how do I know if my, Oracle server is up to date
On the rasbian OS it's easy, you just type
sudo apt-get update
and it tell you
If you want to have just one thing upgraded then type
sudo apt-get upgrade gcc
To upgrade everything don't specify a package, just type
sudo apt-get upgrade
and wait whilst the package manager upgrades all the software on your system.
Another way that you can install software is to use dpkg
Packages in the Debian based operating system are all zipped neatly together in .deb files.
If you have downloaded a .deb file you can install it with the following command
sudo dpkg -i /my/path/to/my/file.deb
You can remove software with the same command, but using -r instead of -i
sudo dpkg -r /my/path/to/my/file.deb
What's installed
You may be wondering, what's installed, I mean how do I know to remove something if I don't even know that I have it.
For that we'll use the dpkg utility again.
type:
dpkg -l
This lists loads of installed packages, and they all wizz past too fast to read.
Try typing this instead
dpkg -l | more
Then hit enter to move down 1 line at a time, or space as a page down. (hit q to exit half way through)
Problems
one problem that I have found whilst running apt get is that the following errors have been thrown up
pi@raspberrypi ~ $ sudo apt-get update
Err http://archive.raspberrypi.org wheezy InRelease
Err http://archive.raspbian.org wheezy InRelease
Err http://archive.raspberrypi.org wheezy Release.gpg
Temporary failure resolving 'archive.raspberrypi.org'
Err http://archive.raspbian.org wheezy Release.gpg
Temporary failure resolving 'archive.raspbian.org'
Reading package lists... Done
W: Failed to fetch http://archive.raspbian.org/raspbian/dists/wheezy/InRelease
W: Failed to fetch http://archive.raspberrypi.org/debian/dists/wheezy/InRelease
W: Failed to fetch http://archive.raspberrypi.org/debian/dists/wheezy/Release.gpg Temporary failure resolving 'archive.raspberrypi.org'
W: Failed to fetch http://archive.raspbian.org/raspbian/dists/wheezy/Release.gpg Temporary failure resolving 'archive.raspbian.org'
W: Some index files failed to download. They have been ignored, or old ones used instead.
This means that the apt-get utility can't find the package sources,
either the package source is offline, (pretty unlikely)
or you can't find them for another reason.
I found that I couldn't resolve them because the DNS resolution of my home router was a little flakey,
To combat this you need to add a more robust DNS server to your list of DNS servers to try.
so type
sudo nano /etc/resolv.conf
the add the lines
nameserver 8.8.8.8
nameserver 8.8.4.4
Then exit and save.
(those belong to google, and they have opened them up for public access) -of course you could use your ISPs name servers IP addresses in place of, (or as well as) those google owner server addresses above.
Of course it might be that the server hosting the packages is offline.
the place where apt-get looks for packages is defined in a text file called sources.list, you can look at this file
pi@raspberrypi ~ $ cat /etc/apt/sources.list
deb http://mirrordirector.raspbian.org/raspbian/ wheezy main contrib non-free rpi
you can browse to http://mirrordirector.raspbian.org/raspbian/ to find out if it's still online using a regular internet browser, (such as internet explorer, or firefox.
Obviously if you can't get to this repository at all, then there is a good chance that your apt-get is failing because the place it's looking for updates just doesn't exist any more.
in which case you should edit the /etc/apt/source.list file to replace the broken repository with one that does work.
Monday, February 25, 2013
Getting to your pi from the outside
So now that you're familiar with the Pi, and clearly love playing with the Pi, and are busy programming the pi loads.
Now comes the problem of what happens when you need to leave the house. but still want to get to some stuff, (say you store some files on the device and want to get at them using SCP), or you want to run programs via SSH.
Allowing Access
The first thing that you're going to do is called Network Address Translation, Otherwise known as port forwarding.
First connect to your router, To find your routers address open up the command prompt and type
ipconfig, you'll fine a line that says gateway address, this is your internet router.
(probably on address 192.168.0.1 or 192.168.1.1 or 192.168.1.254)
Connect to this address in a web browser, and enter the username and password that's listed on the sticker on the bottom of the router, or in the instruction manual that came with the router.
Look at the internet settings, for the firewall that runs on the router. you'll need to look for a section marked NAT or Port forwarding.
In here you'll find a section that says, Outside port, inside port, and local address.
You need to put the port that you want to connect to your SSH server in the outside port box, (the default port for SSH is port 22, but you might want to put say port 66, or port 93 something that you can remember, but is not standard (so ideally people won't try to connect to it).
For the inside port you need to write 22.
In the address box you need to write the address of your raspberry pi.
you find this out by typing
ifconfig in the command prompt
Getting there
There are two ways of getting to your Raspberry pi.
Either you visit www.whatismyip.com before you leave the house all the time. and connect via IP address.
Or you sign up to a dynamic DNS provider like no-ip.com
I've signed up with no IP.com so the rest of this article will be giving instructions on how to install the client.
On a windows machine you can install the client just by running an executable.
On a Linux machine however there is no pre-made executable.
So to get this working you need to do the following.
First go to www.no-ip.com and create an account. chose either free or paid for dynamic DNS services. (depends what you want).
Now come back to your Raspberry Pi.
You need to be at a command prompt, (either not using x at all, or using the console shell within x.)
First start in your home directory, (which should be /home/pi)
You can find out where you are in the directory structure by printing the working directory.
pwd
If the output is anything other than /home/pi
Then type cd /home/pi
Now you need to create a new directory to put your download into
mkdir noip
And go into that directory
cd noip
Now you need to download the linux client files from the no-ip website.
wget http://www.no-ip.com/client/linux/noip-duc-linux.tar.gz
Then you need to extract and unzip the files from the archive that you downloaded.
To do that use the following command:
tar vzxf noip-duc-linux.tar.gz
Then you need to browse into the folder that was just created.
So type ls to see what it's called:
pi@raspberrypi ~/noip $ ls
noip-2.1.9-1 noip-duc-linux.tar.gz
Then use the change directory command to move into that directory.
cd noip-2.1.9-1
Now you need to make the software only superusers can make software so you'll need to use the sudo command.
sudo make
then you need to install so type
sudo make install
when this set up runs you'll be asked for the user name and password to login to the service.
The trouble is, at least when I ran this, the configuration wasn't saved.
so in order to generate a configuration file type:
sudo /usr/local/bin/noip2 -C
then enter the user name and password details again.
this creates a configuration file in the /usr/local/etc directory called no-ip2.conf
now you can run the client
sudo /usr/local/bin/noip2
you probably want the client to run each time the machine reboots (so that you always have an up to date assignment of address to your host-name)
so you should add the no-ip client to a start up script.
To do this:
type
sudo nano /etc/rc.local
then use the arrow keys to go to the bottom of this file
then go up a few lines so your cursor is just above the line that says exit 0
then type the path and executable name
/usr/local/bin/noip2
to exit the editor hold down control and press X it'll ask you if you want to save, so press Y, then press enter to confirm the file name
now reboot your Raspberry Pi with the command
sudo reboot
You can check that the client is running by typing
ps -ef | grep noip
Monday, February 18, 2013
Introduction to the Raspberry Pi
Last week I mentioned that I got a raspberry pi for Christmas.
Now I'm going to take a closer look at the device.
The first thing that immediately springs to notice is that it's really small.
There appears to be nothing to it.
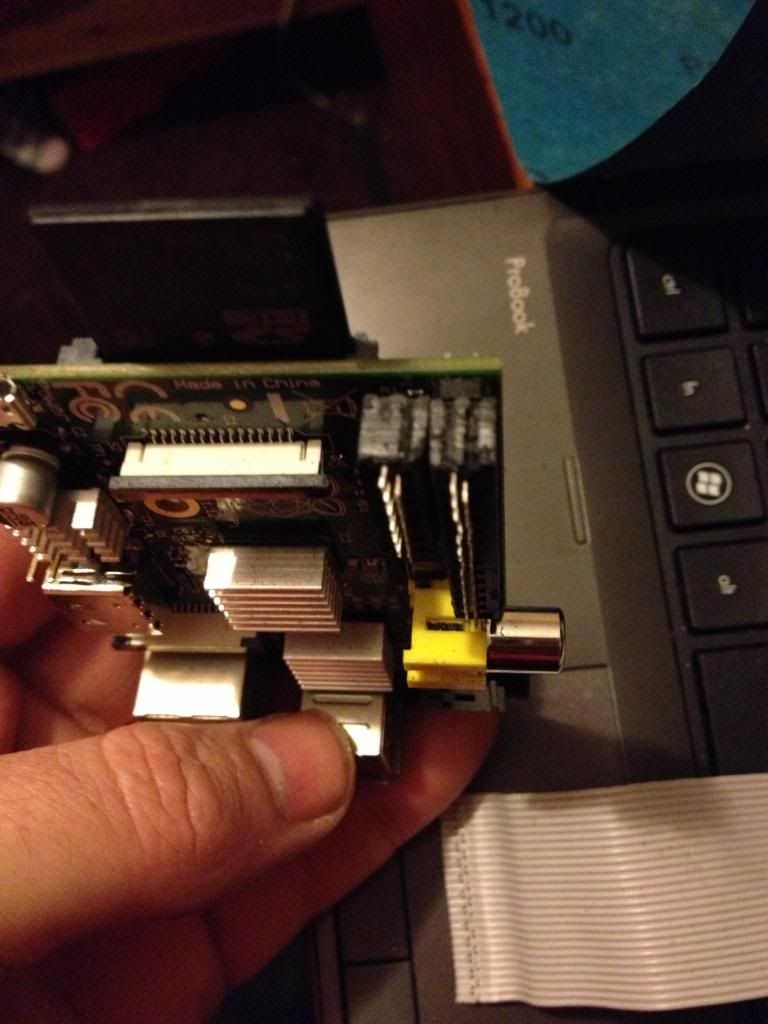
there is a series of pins sticking up labelled P1, these are the GPIO pins, There is a yellow composite video connector next to this, then a 1/8" jack socket, then you see a stack of 2 USB sockets, then a network port.
moving round another corner there is an HDMI socket, in the final corner of the board is a micro USB socket that's where the power for the device is provided.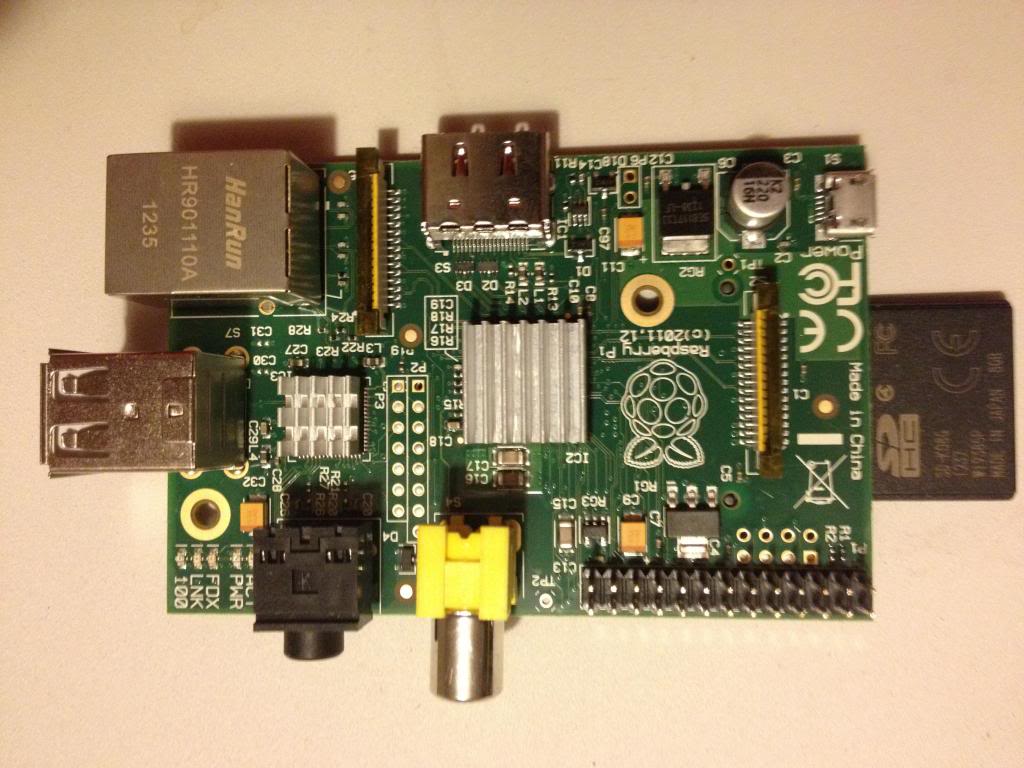
Flipping the board over and looking at the back shows you where the SD card socket is: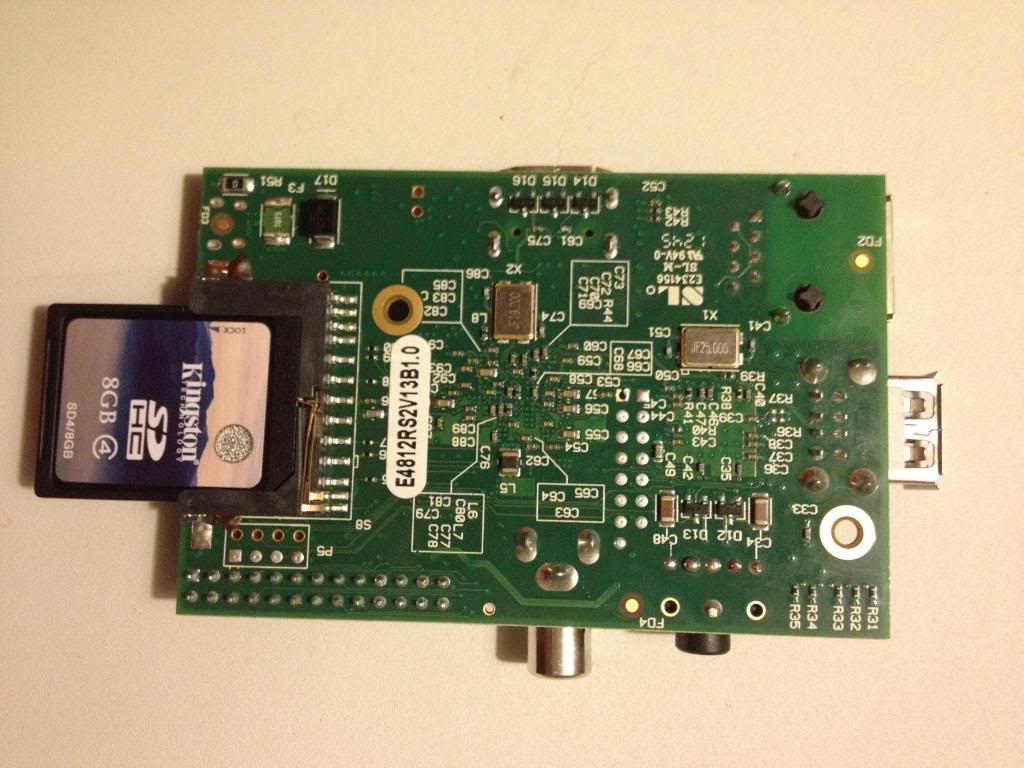
The first picture of the front of the board shows that I've already started attaching small aluminium heat sinks to the device.
So, the Raspberry pi comes literally as a board.
to actually use this you;re going to need:
A USB keyboard (at least for the first time you turn it on)
A USB mouse, (you can forget this if you never use a mouse)
A power supply (a 2A 5v supply with a USB micro socket, (perhaps an IPad supply is a good idea!)
A video lead, either HDMI or a yellow RCA lead, (and possible an RCA - Scart adapter if your TV does not have RCA inputs.
Probably a network cable, or a wireless adapter, (but only if you want to go on-line or have connectivity from any other device in your house etc.)
When you've got your Blank SD card you're going to need to figure out how to write to it.
Assuming that you're using windows, you need to down lad the win32Diskimager program.
insert the SD card into an SD reader.
download an image or the current supported distribution from the raspberry pi foundations website.
Write the image to the card, pop it into the SD slot on the Raspberry pi.
plug the Pi into the TV, switch it all on...
The first screen that you're faced with is a screen for customising the Raspberry pi, and overclock options.
I highly recommend to just quit this now.
Use the device for a bit first, and then figure out what you need to change.
When you've exited from this configuration thing you're going to be left at a text prompt.
the user name that you need to login with is pi.
the default password is raspberry.
Given that everyone now knows your password the first thing that you should do is type:
passwd
to set a new password!
Now you're going to be looking at a text screen, this is how I prefer to work with Linux, since I don't use it as a desktop OS.
There are a few commands that you can type now.
pi@raspberrypi ~ $ cat /proc/cpuinfo
Processor : ARMv6-compatible processor rev 7 (v6l)
BogoMIPS : 697.95
Features : swp half thumb fastmult vfp edsp java tls
CPU implementer : 0x41
CPU architecture: 7
CPU variant : 0x0
CPU part : 0xb76
CPU revision : 7
Hardware : BCM2708
Revision : 000f
Serial : 00000000e80c5a57
The first thing that you should take a look at is what board you have. (and where it was made)
the revision describes what model of Raspberry pi you have:
'0002' => 'Model B Revision 1.0',
'0003' => 'Model B Revision 1.0 + Fuses mod and D14 removed',
'0004' => 'Model B Revision 2.0 256MB', (Sony)
'0005' => 'Model B Revision 2.0 256MB', (Qisda)
'0006' => 'Model B Revision 2.0 256MB', (Egoman)
'0007' => 'Model A Revision 2.0 256MB', (Egoman)
'0008' => 'Model A Revision 2.0 256MB', (Sony)
'0009' => 'Model A Revision 2.0 256MB', (Qisda)
'000d' => 'Model B Revision 2.0 512MB', (Egoman)
'000e' => 'Model B Revision 2.0 512MB', (Sony)
'000f' => 'Model B Revision 2.0 512MB', (Qisda)
Mine was made by Qisda, in china, exactly like the Made in china label says.
you can also have a look at the firmware version by using the vcgencmd utility
vcgencmd version
Oct 25 2012 16:37:21
Copyright (c) 2012 Broadcom
version 346337 (release)
or we can use the uname command:
uname -a
Linux raspberrypi 3.2.27+ #250 PREEMPT Thu Oct 18 19:03:02 BST 2012 armv6l GNU/Linux
Next we want to be able to know a few more things about the Raspberry pi.
By default this thing comes without any heat sink. just bare chips soldered to a board.
we can see the temperature of the main processor by using another vcgencmd command
vcgencmd measure_temp
temp=44.4'C
There are a few other commands that can be used with this utility, have a look here
http://www.elinux.org/RPI_vcgencmd_usage
Having gotten our firmware version (346337)
we might want to upgrade our firmware,
To do this I assume that you have a working internet connection.
(when I say working I found that the name resolution was a bit buggy so had to add DNS servers to /etc/resolve.conf (I added nameserver 8.8.8.8 and 8.8.4.4)
so we want to use the command:
That's 3 commands really, the first is :
sudo That means do a super user command, (regular users can't run stuff that can break things)
then you say apt-get (which launches a program that can go find and install software for you).
then we say update this means update the list of stuff that can be installed.
then we are telling the program manager to install some stuff.
(I'll come back to this command in a later tutorial I'm sure, or you can go search for it's usage!)
This command updates the firmware.
after it's finished you'll be returned to the login prompt and should type
sudo reboot
(that restarts the device)
Now when you type
vcgencmd version you find that it returns
Feb 7 2013 16:46:17
Copyright (c) 2012 Broadcom
version 367974 (release)
Lastly the command you want to use to upgrade the kernel is
sudo apt-get dist-upgrade
now when I type
uname -a I get a different software version
Linux raspberrypi 3.6.11+ #371 PREEMPT Thu Feb 7 16:31:35 GMT 2013 armv6l GNU/Linux
Now I'm going to take a closer look at the device.
The first thing that immediately springs to notice is that it's really small.
There appears to be nothing to it.
there is a series of pins sticking up labelled P1, these are the GPIO pins, There is a yellow composite video connector next to this, then a 1/8" jack socket, then you see a stack of 2 USB sockets, then a network port.
moving round another corner there is an HDMI socket, in the final corner of the board is a micro USB socket that's where the power for the device is provided.
So, the Raspberry pi comes literally as a board.
to actually use this you;re going to need:
A USB keyboard (at least for the first time you turn it on)
A USB mouse, (you can forget this if you never use a mouse)
A power supply (a 2A 5v supply with a USB micro socket, (perhaps an IPad supply is a good idea!)
A video lead, either HDMI or a yellow RCA lead, (and possible an RCA - Scart adapter if your TV does not have RCA inputs.
Probably a network cable, or a wireless adapter, (but only if you want to go on-line or have connectivity from any other device in your house etc.)
When you've got your Blank SD card you're going to need to figure out how to write to it.
Assuming that you're using windows, you need to down lad the win32Diskimager program.
insert the SD card into an SD reader.
download an image or the current supported distribution from the raspberry pi foundations website.
Write the image to the card, pop it into the SD slot on the Raspberry pi.
plug the Pi into the TV, switch it all on...
The first screen that you're faced with is a screen for customising the Raspberry pi, and overclock options.
I highly recommend to just quit this now.
Use the device for a bit first, and then figure out what you need to change.
When you've exited from this configuration thing you're going to be left at a text prompt.
the user name that you need to login with is pi.
the default password is raspberry.
Given that everyone now knows your password the first thing that you should do is type:
passwd
to set a new password!
Now you're going to be looking at a text screen, this is how I prefer to work with Linux, since I don't use it as a desktop OS.
There are a few commands that you can type now.
pi@raspberrypi ~ $ cat /proc/cpuinfo
Processor : ARMv6-compatible processor rev 7 (v6l)
BogoMIPS : 697.95
Features : swp half thumb fastmult vfp edsp java tls
CPU implementer : 0x41
CPU architecture: 7
CPU variant : 0x0
CPU part : 0xb76
CPU revision : 7
Hardware : BCM2708
Revision : 000f
Serial : 00000000e80c5a57
The first thing that you should take a look at is what board you have. (and where it was made)
the revision describes what model of Raspberry pi you have:
'0002' => 'Model B Revision 1.0',
'0003' => 'Model B Revision 1.0 + Fuses mod and D14 removed',
'0004' => 'Model B Revision 2.0 256MB', (Sony)
'0005' => 'Model B Revision 2.0 256MB', (Qisda)
'0006' => 'Model B Revision 2.0 256MB', (Egoman)
'0007' => 'Model A Revision 2.0 256MB', (Egoman)
'0008' => 'Model A Revision 2.0 256MB', (Sony)
'0009' => 'Model A Revision 2.0 256MB', (Qisda)
'000d' => 'Model B Revision 2.0 512MB', (Egoman)
'000e' => 'Model B Revision 2.0 512MB', (Sony)
'000f' => 'Model B Revision 2.0 512MB', (Qisda)
Mine was made by Qisda, in china, exactly like the Made in china label says.
you can also have a look at the firmware version by using the vcgencmd utility
vcgencmd version
Oct 25 2012 16:37:21
Copyright (c) 2012 Broadcom
version 346337 (release)
or we can use the uname command:
uname -a
Linux raspberrypi 3.2.27+ #250 PREEMPT Thu Oct 18 19:03:02 BST 2012 armv6l GNU/Linux
Next we want to be able to know a few more things about the Raspberry pi.
By default this thing comes without any heat sink. just bare chips soldered to a board.
we can see the temperature of the main processor by using another vcgencmd command
vcgencmd measure_temp
temp=44.4'C
There are a few other commands that can be used with this utility, have a look here
http://www.elinux.org/RPI_vcgencmd_usage
Having gotten our firmware version (346337)
we might want to upgrade our firmware,
To do this I assume that you have a working internet connection.
(when I say working I found that the name resolution was a bit buggy so had to add DNS servers to /etc/resolve.conf (I added nameserver 8.8.8.8 and 8.8.4.4)
so we want to use the command:
sudo apt-get update && sudo apt-get install raspi-config libraspberrypi* That's 3 commands really, the first is :
sudo That means do a super user command, (regular users can't run stuff that can break things)
then you say apt-get (which launches a program that can go find and install software for you).
then we say update this means update the list of stuff that can be installed.
then we are telling the program manager to install some stuff.
(I'll come back to this command in a later tutorial I'm sure, or you can go search for it's usage!)
This command updates the firmware.
after it's finished you'll be returned to the login prompt and should type
sudo reboot
(that restarts the device)
Now when you type
vcgencmd version you find that it returns
Feb 7 2013 16:46:17
Copyright (c) 2012 Broadcom
version 367974 (release)
Lastly the command you want to use to upgrade the kernel is
sudo apt-get dist-upgrade
now when I type
uname -a I get a different software version
Linux raspberrypi 3.6.11+ #371 PREEMPT Thu Feb 7 16:31:35 GMT 2013 armv6l GNU/Linux
Monday, January 14, 2013
Working with different Architectures and operating systems.
One thing that I mentioned in the index post I did at new years was that I had a raspberry pi, cool.
something I said a long time ago was that I had a small box called an Emprex ME1 media centre, again cool
I also have a laptop, Cool...
Except, working with all of these can be problematic.
At the end of last year I started talking about client/server software and noted that if you want to program network enabled programs that Linux is a good place to start building programs for.
This is not because I'm some kind of evangelical free software nut case who thinks that bill gates should die.
Because I'm not, I make my living working with and supporting Microsoft software.
The reason that I think that you should learn to program for sockets on Linux is because it's easier. it's how most systems do it. it's how embedded libraries work. Microsoft are really on their own on this one.
Anyway... -not the point I'm making here.
the point is that my media centre,
runs Venus Linux, on a 200MHz MIPS processor.
My raspberry pi runs raspbian on a 700MHz ARM processor. (though I might try RISCOS or plan 9 eventually).
My laptop runs windows 7 64 bit.
and that's where the problem is...
My laptop is a 64bit big endian machine running Microsoft software.
My boxes I want to create projects on are 32 bit little endian machines.
The operating system of the machines is different, the byte order for storage on the machines is different.
This means that I can't compile software on my laptop, and expect it to run on the machines.
even if I run Linux inside of VMWare player, I can create a binary that would run on Linux systems on x86 processors. but not my Raspberry pi on ARM, or my media centre on MIPS.
These machines couldn't be more different if they tried.
and that is why making them all work together is going to be such a joy!
I'm going to spend some lessons in this new year investigating ways to code across platforms, and how to set-up Linux machines, so that I can make these boxes a little bit more than expensive toys.
Subscribe to:
Comments (Atom)