Wednesday, July 27, 2011

Craft Lessons: Wood finishes -French Polishing

There have been a flurry of electronics lessons recently, and I thought that it'd be nice to cover a craft subject again.

So, in this lesson I'm going to cover French polishing.
The reason that I'm writing this lesson now is that I've done a big project that involved French polishing, when I write that up I just want to be able to say, I French polished, and link to this lesson rather than write the whole method in the project write up.

Equipment
For this you're going to need;
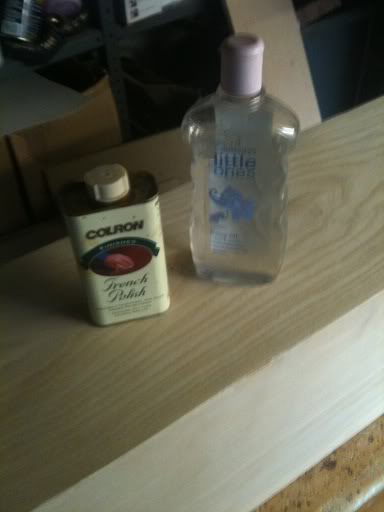
>A lint free (preferably cotton) cloth, -lint free just means a cloth that doesn't have bits that come off.
>Some mineral based oil, (I used baby oil)
>Something to polish.
and last, but by no means least, Some French polish!

French Polish
There are two ways to get French polish.
Either, you need to buy shellac flakes, and some alcohol, then you need to dissolve the shellac flakes in alcohol, then store it in an air tight bottle, (so that the alcohol doesn't evaporate), you'll need to have some practise to find what quantities of shellac to dissolve in what quantity of alcohol.

The alcohol you need to use is either de-natured alcohol, or methylated spirit.
you use around a half gallon of spirit for 1 - 2 pounds of shellac.

What you need to do is measure out your shellac into a large pot, then add your spirit. Leave the mixture to sit, stirring occasionally until all the flakes have dissolved, you then need to filter the mixture to remove any stuff that's not shellac.

Or, option 2, buy a can marked French polish, that's already been mixed and filtered etc.

Which is what I do.


When I say that you want something to polish, make it something nice, because this polishing does take a lot of work!
also it only really works on natural woods, plywood at a push, but will not work on MDF, hardboard or chipboard or any other kind of particle board.

Making a rubber
Before you can start applying the polish, you need something to apply it with, you need something to rub the polish on with, and this is called a rubber.

Basically, a rubber is a lint free cotton cloth, folded and twisted into a shape that gives a flat edge (called the sole), and inside of this there is a wad of material, (either more cotton, or cotton wool) that you apply your polish to to act as a reservoir for the polish.

Here is how to make one:

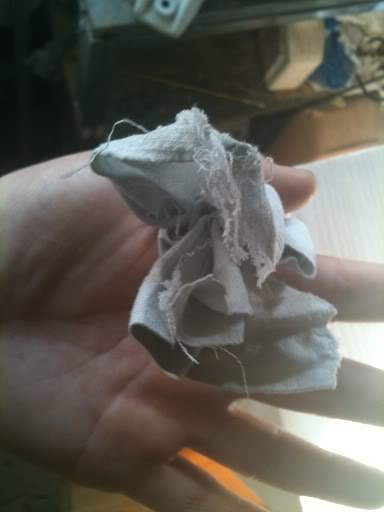
Take two squares of cotton, both about 12" square.


Lay one piece flat, and ball the other one up, and put it in the middle.


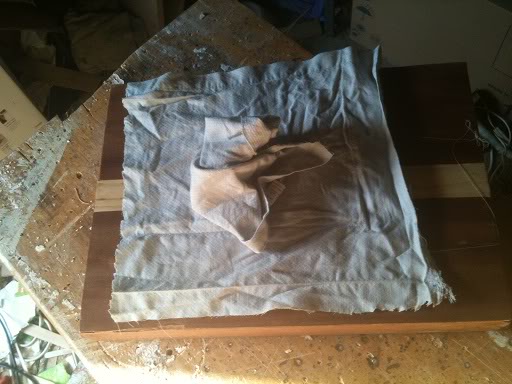
Now, loosely fold in the edges.


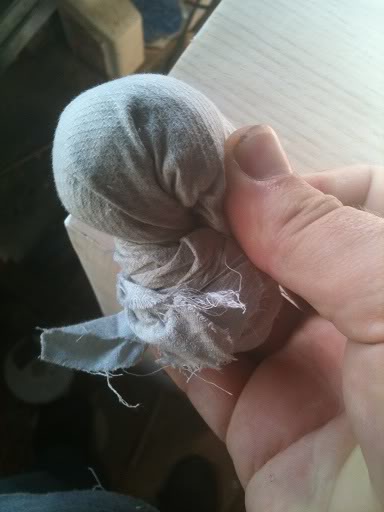
When all the edges are folded in, twist the corners together, pulling tight on the ball of material in the middle to make a firm yet spongy surface that is flat (ish), it should be spongy like a medium rare steak is spongy (when you press it, not eat it).


Charging your Rubber
Now you want to unfold it, and apply polish to your reservoir then bundle it all back up again.

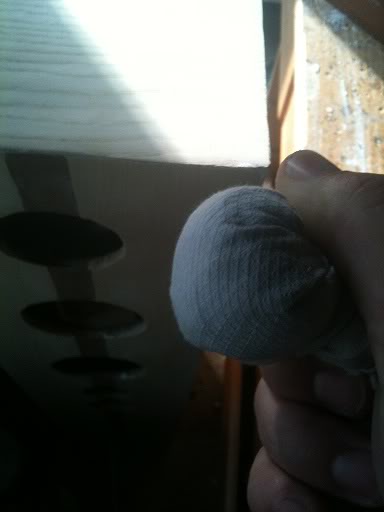
You want polish to be available in the sole of the rubber, but you don't want to pour in too much polish that the whole thing leaks uncontrollably, so pour a little polish into the wadding in the middle then press the rubber onto a surface to start to squeeze the polish through the material down to the sole of your rubber, if you find that there is not enough polish inside your pad, you can always add more. -easier to add more than take any way.

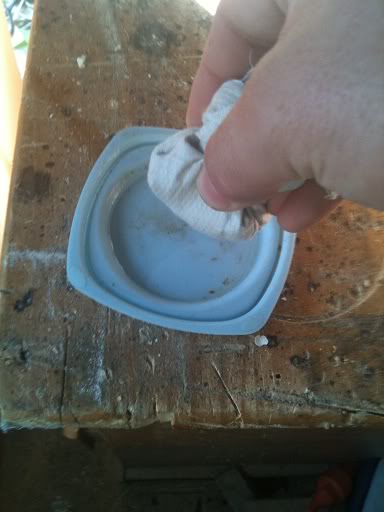
Shellac is quite sticky, and you'll find that as you apply the polish that the rubber doesn't exactly snag, but does become difficult to move across the surface of your work piece, this is where the mineral oil comes in. you should smear some oil onto the sole of the rubber, to do this I just put a few drops onto the lid of the container that I keep all the polishing cloths in and then just dip the rubber into the drops that are on the lid.

Polishing
At this point you have your rubber, you have it charged up with polish, and a little oil to help it glide, now you need to start polishing.

To start polishing you need your work piece to be held steady, if you're working on something that's flat, then just put it on a table, you don't need to clamp it down, if you're doing something more complex, then you might need to hold the work in one hand, whilst polishing with the other.

Now, I learned to polish by readying guides on-line and watching videos, so it is possible to learn that way. But it's sometimes confusing when getting started as to know what to do.
Some guides will tell you to start with a skimming motion, others suggest a circular motion to start and call this grain filling.

You can do what works for you, either applying polish and moving in small circles, to fill the grain, or using long straight swishing motions. I prefer the latter, it takes more time to start, but I find the finish to be superior, and find that I don't need to sand the surface between coats to remove blotches as there just are no blotches.

So, this is what works for me, If you find a different method works for you better write it down in your own blog/site, feel free to leave a link to it in the comments.

Starting to polish
First you need to have prepared your wood, by that I mean it's clean, it's been sanded, it's smooth it's been dusted to remove any saw dust.

Now you need to imagine an old grandfather clock with a pendulum,
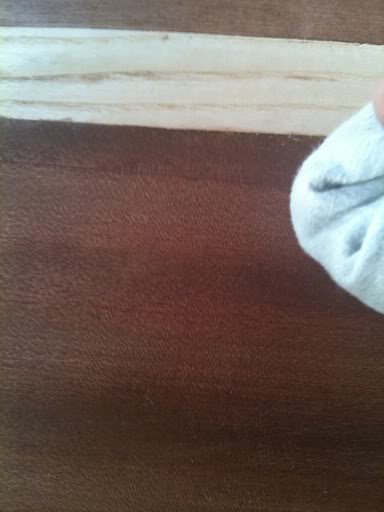
you are going to swing the rubber at the work piece, with about the same pace as a clock pendulum swings, start from slightly above one side of the work piece, swing down and across the wood following the grain of the wood, then come smoothly off the end.
You should see a smear of the French polish on the wood. but this wet looking smear is mostly spirit, and it will evaporate, leaving just the tiniest coating of shellac.

The strip of white wood is about 1 1/4" to give you an idea of the scale of things here, the trail of polish is about 4 - 6" long and the total arc (from where my hand started to where it ended up must have been about a foot,) as I said, go at the same pace as a clock, so that sweep takes about a second, (you can apply polish in both directions too.)

Proceed to do this all over the wood, so that there is a really thin coating on the wood, then go over it again. Do not try to build up too much coating at this stage.

Drying and hardening
At this point the hard shellac finish is on your work drying, but as the spirit/solvent is still evaporating out of the polish it's still quite soft, if you try to build up the coat too much and too soon you actually pretty much end up wiping off the polish that you've just put on.

So at this point put the rubber into a plastic pot, that seals (to stop it drying out), and go have a cup of tea or coffee, come back in 30 minutes and repeat the polishing in the same long streak pendulum motion.

More drying and hardening
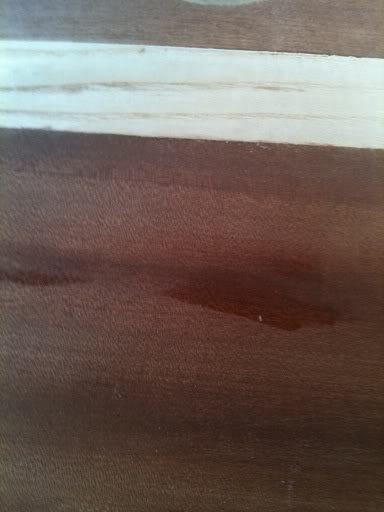
After you've applied this second round of the step one steps you should have about 4 microscopically thin coats of shellac on your work piece, at this point it should have a dull sheen, but won't have a high gloss shine like a piece of fine antique furniture.

At this point you should leave the polish to dry overnight.
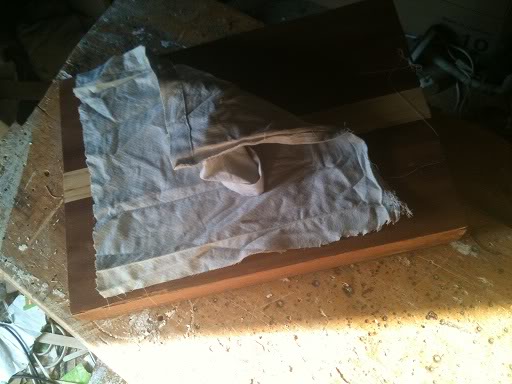
Grain filled
That first stage of polishing was filling the grain of the wood, now that should have been done you can move onto a more random polishing technique, moving the rubber in small circles, and figures of 8 across the work piece, again, building up the polish little by little, allowing it to dry, coming back and applying another coat, then leaving it to dry.

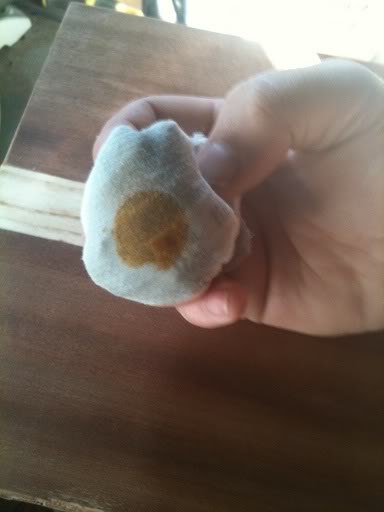
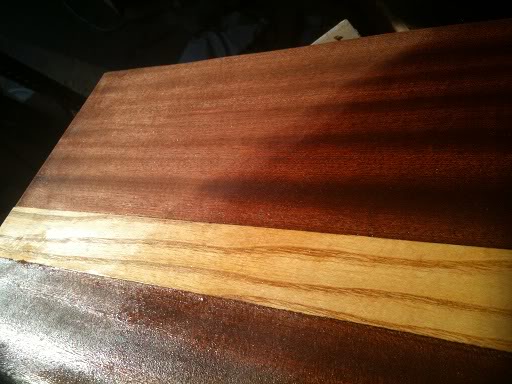
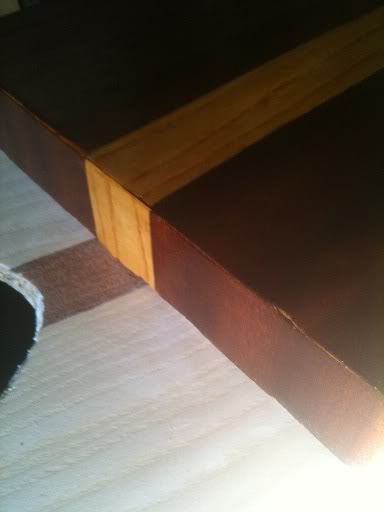
If you start on a Monday and apply a couple of coats of polish each evening, allowing those coats to dry to the next day, by about Thursday this is what you should have accomplished.

(I didn't polish the corner at all so that you could see the difference between polished and unpolished wood).

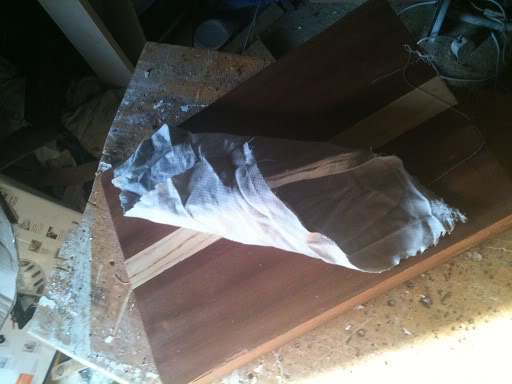
And by the following Monday
you should see this:

Again the top corner isn't polished at all, the other half from the picture taken on Thursday received no more polish, the bottom half (that's so shiny it's difficult to photograph, has a full week of polish.

It sounds like a lot of hassle, but remember this is a small piece so it's actually just half an hour a day really. (actually this small piece was a part of a much larger project, so it did take quite a lot of time, I didn't polish everyday, so some coats cured for longer than others).

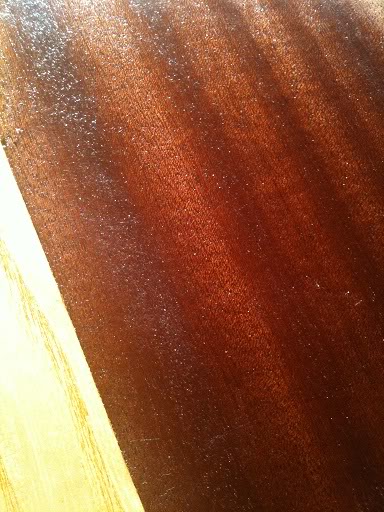
Comparing the polished wood to unpolished wood is below, (I stood in the way of the light so that it didn't reflect so much.

The finish
Your work should now have a shine a sheen and a deep lustre to it.

French polishing gives a durable finish, it's water proof and quite tough (after all the original spirit is properly evaporated), however it is still solvent in alcohol, so if you're thinking of making a bar, French polish probably isn't the most appropriate finish!

The polish that I used was an Amber polish, this means that the shellac flakes that made it were amber in colour, and as you can see, it has stained the wood. Shellac comes in a variety of hues, to if you're mixing your own, be sure to mix enough to do the job in one batch, don't assume that you'll be able to get the exact same mix again later.

If you're buying from a shop, be sure to make sure that if you have to buy more than one can, that you buy the same colour polish!

Monday, July 25, 2011

The Workbench/shop stock lists. Woodworking (Beginners list)

Just as with the Beginers Electronics Bench I'm writing a list of essential tools for a beginner woodworker.

Just the same as electronics, this is the list of stuff that you'll need to get you started. I'm assuming that you're looking to build small things, by small things I mean enclosures for your projects, hifi speakers, pictures frames or small boxes etc. This list of tools will enable you to build a huge project like a tree house, or a wooden bike, but before you embark on any project like that you need to not only have the basic tools, but also the ability and practice to use them. (there's that word practice again, yes, working with anything and creating anything is a skill, to develop skills you have to work at them. that's the difference between first year/grade and final year projects, you've spent years practising by the time you get to your final year so you've got more knowledge and more skills.)

Anyway, this list should get you started.

A clamp
There are many different kinds of clamps, G clamps, C clamps, sash clamps. clamping devices come in all different shapes and sizes.

The reason that I put a clamp at the top of the list is because I believe that this is the most important thing that you want.
Your project might only be gluing two bits of wood together, unless you want to sit all night holding the bits together by hand, a clamp is essential.

You can also use a clamp to hold a piece of material to a surface as you cut material off of it.
(it's much easier to cut through something when it's held steady!)

You can get an idea of the variety and kinds of clamps available by looking here;
http://search.diy.com/search#w=clamp

As a starter set I'd say that you couldn't go wrong with buying a cheap set of three C clamps. they come in different sizes enabling you to work on a variety of projects sizes.

Cost £5 (total cost £5)

A Saw
You've got a way to put things together, now how about a way to take things apart?

Saws come in all variety of shapes and sizes, and are used for different things.
your average hand saw costs less than £10 and has a blade that can do cross cut (cutting through the grain of the wood), or rip cuts (cutting along the grain of the wood.)

If you plan on making only big things, then a large 9ppi saw is probably all you need that'll rip through wood quite fast, if you're planning on making much finer stuff (furniture for example) you might want a saw with finer teeth, perhaps 14ppi.

What's PPI? PPI means points per inch, it's the amount of teeth on a saw inside of one inch measured along the blade. it's as easy as that.

Saw teeth rip through things by wearing them away, the more saw teeth that there are in a given inch, the finer the teeth will be, and the cleaner the cut that they make will be, though the longer it'll take to get through the material you're cutting, as it'll rip away less material on each pass.

the picture on top represents a 7ppi blade, the one on the bottom a 14ppi blade, the 14ppi blade is clearly much finer.

As a starter, I'd recommend that you get an all purpose hand saw like this
http://www.diy.com/diy/jsp/bq/nav.jsp?action=detail&fh_secondid=9676731&fh_location=//catalog01/en_GB/categories%3C{9372015}/categories%3C{9372043}/categories%3C{9372176}/categories%3C{9392049}/specificationsProductType=hardpoint_saws

Cost £3.50 (total cost £8.50)

There are of course different saws for different jobs, a fret saw is used for cutting shapes as the blade is very thin and can turn corners.
A coping saw has a round blade and can cut up, down and side to side.
A tenon saw has a metal bar that re-enforces the top of the blade to make sure that it doesn't move of flex. As with most tools, different saws are suited to different jobs. I don't recommend buying them all at once, but certainly if you have a specific job that requires a specific tool then you should buy that tool.

Tape measure
Ok, so you can hold your work piece still now (clamped to the kitchen table), and you can cut through it, but how will you need to know where to cut?

Get a tape measure.
Cheap tape measures might lack a cool feature like being able to lock the tape out, but they work just as well at measuring stuff. So just grab a cheap one.

Cost £5 (total cost £13.50)

Square
So now you know where to cut, you'll want to draw a line on the wood that you're cutting, of course you want to make sure that your line is perpendicular to the edge, not going off at an angle, so you'll want to use a square.

http://www.diy.com/diy/jsp/bq/nav.jsp?action=detail&fh_secondid=11247668&fh_location=//catalog01/en_GB/categories%3C{9372015}/categories%3C{9372043}/categories%3C{9372176}/categories%3C{9392047}/specificationsProductType=measures/specificationsSpecificProductType=squares

That set I've linked to has a L shaped piece of metal that you can put on top of a piece of work (where you can't get to the edge) and line up the work with the square, and a thing that is like a ruler, with an adjustable piece of metal on it, the adjustable piece of metal slides in and out allowing you to set it a distance from the end, it also has 90 degree and 45 degree edges.

Cost £10 (total cost £23.50)

Marking
I have of course assumed that you already have a pencil, or a pen to mark your surface with.
this is your choice, you can buy those big square carpenters pencils (and get to feel really manly as you sharpen them with a knife!). You you can go to a pound shop and buy a pack of regular pencils, and a pack of chunky markers, and a pack of fine markers. (for a pound per pack.)

Cost £3 (total cost £26.50).

Hammer
Used the world over for making noise.

There are many many different types of hammer. I've got more than 1 hammer, (cross pein, ball pein, claw, club, rubber).

I'd recommend that you get a few different types of hammer too.
I'd really recommend a 12oz ball pein hammer (the one that looks like it has half a ball on the opposite side to the flat side.)
a 4oz cross pein hammer, sometimes called a pin hammer (the really light weigh one that has a flat chisel like looking part opposite the hammer surface.)
and a 16oz Claw hammer, (the one with a curved surface opposite the hammer face for pulling out nails.)
These hammers will cost £5 - £10 each they all have different uses.
The smallest cross pein hammer is used for fine work, like hammering in veneer pins into some work.
The ball pein is actually more of a metal work type hammer, but I tend to find that I use this the most as the weight of it feels right to me.
The claw hammer is the heaviest and can be used for much heavier work, (driving in big nails). Personally I find that, even though there is only a 4oz difference between the ball pein and the claw hammer, that added weight makes the hammer more unwieldy, and less suitable for fine work. If the hammer is unwieldy then it's harder to control, and you;re more likely to hit your fingers.

Cost £30 (total cost £56.50)

Punch
No, not the drink, the tool, it's basically just a metal rod that you use for pushing nails below the surface, or driving nails to the surface in places where you don't want the hammer face to have any chance in coming into contact with or marking the work that you're doing.
You can just use a really big nail, but since a set of five of these (in different sizes) is only £6 (on DIY.com,) you may as well get the right tool for the job.

Chisel
This is one of those things where you'll really get what you pay for, but also one of those things where good tools cost good money.

For a start I'd recommend (from diy.com) the B&Q value set of three chisels, there are three different sizes, and they are sharp when you buy them at least.
Basically these are good enough. Chisels do get blunt, so you may want to consider a sharpening stone too.

When I first started out I bought the B&Q value set, and used these until they were pretty blunt, you'll know when they get blunt because they become difficult to work with, they don't cut well, require more force, slip more (read between the lines here, blunt tools are difficult to work with, and will slip around on your work piece, i.e blunt tools are more dangerous than sharp tools.) Anyway, later on, when the chisels needed sharpening, I bought a different (better) set, that came with a sharpening stone, That set was more expensive.
I sharpened my value chisels, (which was good), and now I have a set of cheap chisels that I'll happily use for rough work, or work that might hit a nail or something, and a set of nice chisels that I'll use then I know that the wood I'm dealing with it good.

Cost £7 (total cost £63.50)

Drill
I covered drill in my how and where to buy tools and materials post before, the drill you want will really depend on the work that you want to do.
If you're only ever drilling softwood in a garden shed with no power, then a battery drill is ideal.
If you want to drill into hardwood for long times, then you really want a mains powered drill. If you plan on drilling into walls, you really want a hammer drill.
The type you need depends on what you need to do. and the brand you get also depends on what you need to do.
As I've said before, professionals buy DeWalt drills because they are dependable, that tool will likely outlive the person who buys it. They cost a lot, but to a professional they don't cost as much as numerous trips to the hardware store to buy a new drill (because time spent in the store is not time spent on the job.)
If you can afford professional tools, (like DeWalt, or Makita) then by all means go buy those tools. If you find them on sale then you might want to buy them (but even at half price they are often four to five times more expensive than the drill that I normally use).

For most, all you need is a choice between normal drilling and hammer action, and variable speed (so if you only pull the trigger a little it goes slowly, pull it all the way in then it goes fast).

I bought my drill from Aldi, for about £15, but to be fair, they aren't sold there all the time.
so I'll say:

Cost £30 (total cost £93.50).

Drill bits
Once you've bought a drill you'll want a set of drill bits.
there is a difference between wood, metal and brick drill bits, but you should be able to find a set with an assortment of sizes (3mm = 10mm) and functions for around £20

http://www.diy.com/diy/jsp/bq/nav.jsp?action=detail&fh_secondid=11407674&fh_location=//catalog01/en_GB/categories%3C{9372015}/categories%3C{9372047}/categories%3C{9372200}/categories%3C{9392077}/specificationsProductType=accessory_sets/specificationsSpecificProductType=mixed_sets
that's a link for some wood, brick and metal bits for £10.

http://www.diy.com/diy/jsp/bq/nav.jsp?action=detail&fh_secondid=11537590&fh_location=//catalog01/en_GB/categories%3C{9372015}/categories%3C{9372047}/categories%3C{9372200}/categories%3C{9392077}/specificationsProductType=multi_purpose_drill_bits
that's a much bigger set for £35, and includes hole saws that let you cut out big holes in wood, you'll never find a 2" drill bit., but a 2" hole saw lets you cut a 2" hole which is useful of you're making a set of PC speakers or similar.

Cost £20 (total cost 113.50)

Screw Drivers
For electronics, you probably want a specialist miniature tool kit, (the screws on an iphone for example are PH00 whilst most mini screwdriver sets only go down to PH0.)
For wood working you'll want just a normal set of screw drivers, probably in the range on 3mm flat blade to 10mm flat blades, and the same with Philips head screw drivers too.

I'd recommend either buying a set of screw drivers, I got a set of 30 brand new from a carboot sale for £5 in a range of sizes and blade types (Flat, Philips, Torx), or you could go with a screw driver with changeable bits (so the same screw driver body is used).
You can get ratchet screw drivers (these can save a lot of wrist ache having to take the screw driver out of the screw head, line it up, insert the driver into the screw head turn and repeat.)

A ratchet screw driver with changeable heads costs around £12
http://www.diy.com/diy/jsp/bq/nav.jsp?action=detail&fh_secondid=9285164&fh_location=//catalog01/en_GB/categories%3C{9372015}/categories%3C{9372043}/categories%3C{9372176}/categories%3C{9392042}/specificationsProductType=sets

Cost £12 (total cost £125.50).

That's pretty much a basic tool kit right there, it'll let you tackle a variety of tasks from the big to the small, and can all be kept in a reasonably small tool box in a corner, or under the stairs.

I'd hoped to keep the costs as low as possible, and certainly buying tools second hand for yard sales or car boot sales can save a fortune. I do not recommend buying second hand chisels, or saws, or drill bits. They will already be blunt. and as I said earlier blunt tools are more dangerous than sharp tools, they also make a mess of your work.

On the subject of dangerous.
You can't do wrong with buying a set of "rigger" gloves (thick material gloves) to protect your hands, (from both your tools and splinters).
There are no loud tools listed here, but if you are using loud tools ear defenders are dirt cheap and you should use them, if you'll be creating dust, or working in a dusty environment a dust mask is a great idea, if you've got long hair then buy a hair band.

When using a chisel, you should only push the chisel away from you, never towards your body or towards your legs. Never balance work on your lap whilst trying to put screws into it (a screw driver to the groin is going to hurt!)
When planing wood (a plane wasn't listed) always plane away from yourself, Basically, the sharp end of the tool should always travel away from your body! the only exception to this is when using a spokeshave or draw knife, these are meant to be drawn towards you. (carefully!)

Probably the most important thing I can say is take your time.
If you rush things then you either ruin your work or ruin yourself, when I was younger, I thought I could cut through a piece of metal faster by just moving the saw faster, all that really happened is I ended up slipping and performing my own surgery on myself with a hack saw, exposing your bones isn't fun.

Friday, July 22, 2011

Electronics Lessons: The Resistor Simple Circuits

Ok, so it's time to crack out the components and do some simple experiments.

Lessons are boring, I don't need to tell you that though. If you've read through the resistors lesson you may have switched off half way through, you may have just clicked away.

Endless theory is boring. So... lets crack out a few components and start making something nice and simple to illustrate some of this theory.

Equipment
For this lesson, you'll need
>a 9v battery
>a battery clip to attach wires to the battery.
>a small light bulb (and possibly bulb holder).
>and about 3 100ohm resistors, (brown black black).

If you have one then a multimeter that measures voltage would be good.

You should be able to nip into your local radio shack/Maplin/electronics hobby store and get all of these things for less than £5.

Method
The first thing that you want to do is join the three resistors in series, and attach them to the battery, whether you practice your soldering skills, use a breadboard (as in the little plastic thing), just twist the legs together to form a connection or even use a breadboard with screws and screw cups to hold the components, if doesn't matter, all you need to do is connect the resistors in series and attached then to the battery.

I'm going to illustrate this with a series of pictures, that should show you what you're looking at, and the schematic diagrams that represent what the circuit is.


Next attach one side of your light bulb also to the negative side of the battery.


Now you want to attach the other side of your light bulb to the positive side of the battery.
you should see if lights up very bright.


Now remove the connection from the light bulb to the positive side of the battery, and connect the battery to the second leg of the first resistor, you should see that the bulb still lights, just not as bright.


Now remove that connection and connect it to the second leg of the second resistor. the bulb should light a little bit, but it won't be very bright at all.

Extra Activities
If you don't have a multimeter then you should just skip over this bit to the results section.
Now take the light bulb out completely, switch your multimeter onto measure volts in the 20volts range, (or as close to 9volts without being under 9volts depending on your meter).

Touch the (usually black) Comm probe to the negative terminal on the battery and the other (usually Red) lead onto the positive terminal of the battery.

The display should read 9Volts,

Now touch the red lead onto the second leg of the first resistor, it should now read 6Volts.

And if you touch the second leg of the second resistor it should now read 3Volts.


Results
What you have created is a potential divider.
In an earlier lesson we talked about electricity as being a potential energy, (though not in the strict physics sense) this little collection of resistors is dividing up that potential so it reduced as you go down the ladder.

We talked about how power and voltage were linked earlier, the reason that the bulb shines less brightly when a lower voltage is applied to it is because there is less power going to the bulb to make it shine.

There is an equation to work out what the voltage at the given points of a potential divider will be.

That equation is

Vout = (Z2/(Z1+Z2)) x Vin

This formula is using Z in place of R, it may be a little confusing at first, but go with it!

I've made it a little more complicated using three resistors in the example, but that's ok, we learned earlier about how to deal with resistors in series, you just add them together.

Lets look the voltage on the second leg of resistor 1

We know that the input voltage Vin is 9v
The resistor R1 is 100Ohm, so Z1 = 100Ohm
but what's Z2, (yes if you look at the schematic R2 is 100Ohm, and R3 is also 100Ohm).

For this equation, since we're measuring at the second leg of R1, Z2 is the total resistance of R2 and R3 which are in series, (so we just add them together.)


So lets fill in that equation now.

Vout = (Z2/(Z1 + Z2)) x Vin

Vout = (200/(100 + 200)) x 9
Vout = (200/300) x 9
Vout = 0.666666666 x 9
Vout = 6

That's what we measured!

Now let's look at the voltage at the second leg of resistor 2,

This time Z1 is the top two resistors (R1 + R2) and it's 200Ohm
The voltage is still 9v
and Z2 is R3, which is 100Ohm

Vout = (Z2/(Z1 + Z2)) x Vin
Vout = (100/(200 + 100)) x9
Vout = (100/300)x9
Vout = 0.333333333 x9
Vout = 3v

Which again is what we measured! so everything is looking good.

Wednesday, July 20, 2011

Electronics Lessons: Output Devices

Output devices come literally in all manner of shapes sizes ad functions.
Whatever produces an output is an output device really.
That's a huge definition, I mean when you think about it, an electric chair is an output device, but honestly, I'm going to try an narrow down my range of output devices to ones that you're likely to want to be using.

Light emitting devices
Light emitting devices, can really be broken down into a few different sorts,
Fluorescent light bulbs, (tube lights like in offices, CFL lights [energy saving bulbs in your home], I'll also include neon bulbs in this definition.)
Fluorescent bulbs are in general high voltage, low current devices, even the CFL bulbs that go into your house are high voltage (there is circuitry inside there that generates the high voltage). neon tubes are high voltage, and the tube lights actually work the same as CFL lights, except they are long and straight, instead of having been coiled up into a compact shape.

Florescent lights have just two states, on or off, you cannot alter the brightness of a tube.

Next in light emitting devices is the incandescent light bulb,
The incandescent light bulb, light bulb was invented by a man named Joseph Swan, a long time ago. The basic principal is that voltage is passed through a very high resistive and very thin wire, the wire heats up to be white hot, and it's so hot that it generates light. incandescent lights come in a variety of shapes and sizes, from the ones that go in your house, right down to the ones that fit inside pocket torches.

Incandescent light bulbs have a variable output, if you've ever used a light dimmer or seen a torch with mostly run down battteries, you already knew that though, incandescent light bulbs are a resistive load, that it more or less fixed (though does change as it heats and cools).

If you look at the resistors lesson, I covered ohms law, V/R = I
and the power laws V * I = P

So if you reduce the voltage, and the resistive load stays the same, then less current flows, if there is less voltage and less current, then there is less power in the bulb, less power in the bulb means that the filament (tiny coil of restive wire inside), doesn't heat up as much, and therefore glows less brightly.

and finally LEDs, Light emitting diodes are the last type of light emitting output device that we'll consider.
the fact that they are called diodes should make you realise that they have a positive and negative leg, an anode and a cathode, or a polarity (however you want to say it).
They won't conduct at all when put into a circuit one way, but will not only conduct, but conduct and produce light when connected in a forward bias.
LEDs are available in a vast array of voltages, shapes, sizes and outputs, some LEDs, don't even emit visible light, they emit infra-red light instead (like in our TV controller).

You can vary their brightness either by turning down the voltage a little or using a clever trick called pulse width modulation.
Basically, what you're doing here is turning the LED fully on, then turning it fully off, then back on again, then off again.
But you do this so fast that your brain can't actually see if turning on or off, it just see a light at half power.
By varying the ratio of on and off time you can vary the brightness.

This little trick relies on a phenomenon called persistence of vision. which is the same trick that TV's use and film cinemas (reel to reel) etc use to show a smooth moving pictures, when what we're actually seeing is a series of still shots.

Heaters
Having looked at light bulbs, and included incandescent light bulbs (that get so hot they glow brightly) it seems to make sense to include heaters.
Heaters produce heat, just like incandescent light bulbs they are actually just restive loads, and the voltage and current in them generate heat, unlike light bulbs, they don't get so hot as to glow incandescently.

Motors
And so we move on to our last basic output device type, motors.
Now you might think of a motor as just something that turns, and you'd be right, there are motors that turn, but a motor is basically just something that moves something.

For that reason yes, Axial motors are included.
If you want something to Turn, you connect it to a motor, and you switch it on. I'm not going to go into motors, and how they are constructed in detail, but the basic principal is that there is a magnet, and a coil of wire, when electricity is applied to a coil of wire it becomes a magnet, and is attracted to that magnet inside. so the shaft spins to that the north field of the coil of wire magnet spins to face the south face of the permanent magnet. as it spins the electrical connection is broken, and the coil is connected backwards, so that north face appears somewhere else and spins round as it's attracted to that south face.

If you want the motor to spin the other way, you simply reverse the terminals.
I'm not going to draw pictures, if you want to see the inside of a motor, do a Google image search.

Stepper motors work in the same way, except there are more magnets and more coils of wire, which allows for many more coils to be activated to turn the motor, then the one next to it can be actuated. allowing for fine steps of motion, (most stepper motors I believe are further geared down, until there is a standard 1.8degrees of movement for each coil energisation.
stepper motors tend to have at least 4, or 6 wires for controlling the different groups of magnets inside them, and really need to be controlled with a micro controller, (you can't just hook them up to a battery.

Servos are the third type of mechanical "turny"type motor I'm going to talk about, inside a servo is a little controller board, and a motor, the motor is geared down and connected to a shaft that has a little arm mounted on top (usually), but also connected to this arm is a variable resistor (rotary potentiometer) that the device uses to know where the arm is pointed to.

Servos generally have three wires, a red and black wire to connect them to a power supply, then either a white or yellow wire to connect them to a controller. Servos are controlled using pulse width modulation.

The next group of motors that I'll be considering, most people don't even count as motors, because they make a sound, so they call them sounders.

Well to me, a motor is something that moves.
Sound is created by the movement of air molecules, so sounders, are moving air molecules, they, well, move. Fair enough it's not round and round movement, but they are still motors.

Buzzers are surely the most annoying component by far, that buzzing sound is horrible.
buzzers are basically tiny electromagnets that raise a small piece of metal inside, then let go of it, where a spring returns it to where it ones was, it slaps against the iron core of the coil that raises it, and against the bottom of the buzzer creating that horrible sound.

Piezo electric sounders are a little different from buzzers, they work by having a tiny piece of crystal at the centre of a large coin sized metal disc, when electricity flows through the crystal it vibrates (with a known frequency for a given voltage)
The metal disc is glued tightly to the small crystal, and the crystal shakes the whole disk, enabling it to move lots of air and produce lots of sound. (well relatively at least).

And finally Speakers, these are large basket shaped objects, a cone is attached to a coil of wire. As a signal is attached to that wire, the magnet that the coil of wire is entrapped in reacts with the magnetism induced in the coil of wire, causing the coil of wire to move either into or out of the magnet. as the coil is attached to the cone (made of paper/kevlar/plastic/Mylar/carbon fibre/aluminium) the coile moving causes the cone move to, the cone moving enables lots and lots of air to be moved by the speaker.

Whatever your circuits that you want to build does, you'll want to make some sort of output. those were the outputs that you could see, or feel, or hear.

There are two further type of output,
Data
You can't see it, (at least not without measuring tools, but it's definitely an output, a digital output, might be logging data from a simple analogy circuit. you might be transmitting data over the internet, or indeed you may be creating a web page as your output. perhaps you're output is wifi, or bluetooth. USB, or a simple serial connection.

Radio
I just mentioned Wifi and bluetooth, perhaps they should have gone into this section.
Another type of output that you can't see is radio, like you listen to in your car.

Your project may output electromagnetic waves that enable you to be broadcast and heard either in your local area, or all over the world! Though you may need to check what kind of restrictions exist where you are as to what you can broadcast, how powerfully and on what frequency.