Wednesday, July 06, 2011

Electronics Lessons: The resistor and Ohms law

I started to write a post on what is electricity, but soon realised that subject was far too broad, far to detailed, far to simple and far to complicated all at once...

Suffice to say, what electricity is doesn't matter so much as what you can do with it.

I'm going to create a series of blog posts as a kind of electronics 101, the idea being that anyone can start at the beginning, learn about components, and learn how to build up circuits.

Throughout these lessons I'll be making a series of good analogies, and bad analogies.

Resistors


Theory
In Physics things have potential energy when they are sat still, a weight sitting on top of a book shelf has potential energy, if you nudge the weight to the edge it'll fall off, that potential energy has been converted into kinetic energy.

For the purpose of a resistor, think of electricity as like a tank of water, sat on top of a hill, the electricity, like anything is itching to get to the ground, and will take the path of least resistance.

A resistor adds resistance to the flow of electricity.


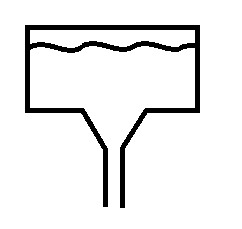
Look at the two pictures, the first shows a tank of water with a small opening, when you think about it you'll see that in this case the water will run down slowly, the narrow channel adds resistance and stops the water just gushing out.

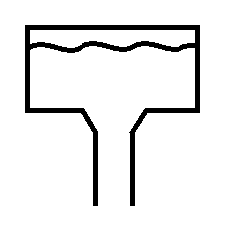
The second picture has a bigger opening, in this case the water just gushes out, you can't stop it because the channel is too wide, the water gushes out with such force that you couldn't just put your hand over it.

There are calculations that you could do, knowing the size of the header tank and the size of the outlet to know with what force the water is pouring through the hole.

In electricity, the size of the header tank is measured in Volts, the size of the pipe or opening is measured in Ohms, and the force that the water pushes is not measured in PSI but is measured in Amps.

Resistance, Voltage and Current
The equation is simple.

The voltage, divided by the resistance is equal to the current.
V/R = I
so say you have a 9v battery, and a 100Ohm Resistor.
9/10 - 0.09A (or 90mA)

Next you might be thinking about about how much power that actually is. (if your resistor can't handle the power it's get hot and fail, sometimes quite spectacularly.)

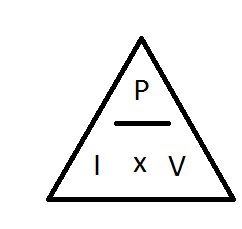
Voltage, Current and Power
Another electronics law tells us that Power = Voltage multiplied by Current
In the example above the voltage was 9V, and the current dissipated was 0.09A

9 x 0.09 = 0.81W

Now less than 1 Watt doesn't sound like a lot, but consider that resistors generally come in 1/8th Watt, 1/4 Watt, 1/2 Watt, you're going to need at least a 1Watt resistor, so it's going to be reasonably large.

Resistor values

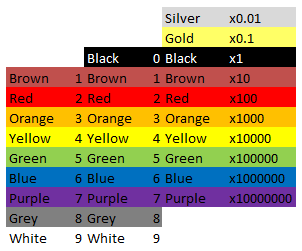
Resistor values are quite easy to remember, once you've been told what the values equate to.
black is zero and brown is one, after that the colours follow the colour spectrum, Red, Orange, Yellow, Green, Blue, Purple, then Grey and white are tagged onto the end. quite why it was done like this with black and brown first, and not just the spectrum colours first then extra ones I don't know...

Anyway,

Black = 0
Brown = 1
Red = 2
Orange = 3
Yellow = 4
Green = 5
Blue = 6
Purple = 7
Grey = 8
White = 9

The last band on the resistor is always Silver, Gold, Brown, Red, Green, Blue, Purple or Grey, these colours relate to the tolerances. (how far off of the stated values the component might be).
Silver = 10%
Gold = 5%
Brown = 1%
Red = 2%
Green = 0.5%
Blue = 0.25%
Purple = 0.1%
Grey = 0.05%

So, if you have a resistor that has colour codes

Red, Red, Brown, Silver
the values are
2 2 * 10 = 220Ohm, +/- 10% -i.e the value is somewhere in the region of 220 Ohm, 198 Ohm - 242 Ohm range (quite a range.)

You might notice that black is missing from the first column, and be thinking how do you write 1Ohm, this should be Black, Brown, Black right? (01 x 1)

Wrong, the correct way to write 1 ohm, is Brown, Black, Gold (10 x 0.1)

Symbols
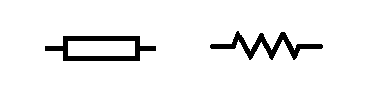
Resistors, like all components have a symbol user to indicate them on electronics schematics.
the symbol for a resistor looks like a box (the box does not have a line through it) however you may sometimes find the symbol written as a zig zagged line.

So that about wraps up the humble resistor. There is of course more to learn, there is indeed always more to learn. I'll cover some more advanced stuff with resistors, and the different type of resistors later.

Calculations
As with everything electronics related, sooner or later you run into something maths related.

Even with the simplest of components, maths somehow finds it's way in.
Not to worry though, the calculations concerning resistors are really simple.

Resistors in series
This is as easy as one add one.

When resistors are in series (one linked to the other like a train) you just add all the values together.

R1 + R2 + R3 + ... + Rn = Rtotal

In the circuit above there are 4 x 8Ohm resistors.

8 + 8 + 8 + 8 = 32Ohms.

Resistors in parallel
When you connect resistors in parallel, things get a little more complicated, a mathematician would tell you that it's the sum of the reciprocal of the values of the resistors that makes the reciprocal of the total resistance.

And they would be right, but they'd also likely confuse the hell out of you.

In laymans terms, it's the sum of one over the value of all the components, that makes one over the final value, 1 over this value gives you the total resistance.
(1/R1) + (1/R2) + (1/R3) + ...+ (1/Rn) = 1/Rtotal

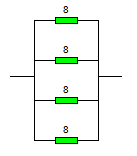
In this circuit the resistors are all arranged parallel to each other and connected differently from the original circuit.

The sum for creating this circuit is

(1/8) + (1/8) + (1/8) + (1/8) = (1/total)
1/8 = 0.125

So writing this out a bit more long hand we have...
0.125 + 0.125 + 0.125 + 0.125 =(1/total)

If you add all of those together you get 0.5
And 1/0.5 = 2

The total resistance of 4 x 8ohm resistors in parallel is 2 Ohms.


Series and parallel connections
Sometimes you're going to want to connect things in a mixture of series and parallel.

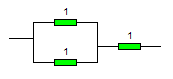
You might do this because you want a 1.5ohm resistor, they don't make these but you could connect 2 x 1ohm resistors in parallel

1/1 + 1/1 = 2
1/2 = 0.5

Then add a third 1 ohm resistor in afterwards in series and you get 1.5Ohm.

You might want to do this for a completely different reason than getting values that you can't get...

look at this example:

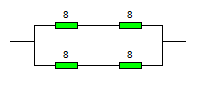
To start with break it down into two halves.
there's clearly a top half (2x 8ohm resistors) and a bottom half that's the same.

So work out the values of those first.

Top half = 8 + 8 = 16 Ohms.
The bottom half also is 16Ohms.

Now they are in parallel to each other
( 1/16) + ( 1/16) = 0.125
1/0.125 = 8

Now you may be wondering why anyone would be such a sadist as to use four components, have to go through that maths when they end up with the same value as just one of those components.

And the answer is power, as in power handling.
If you have a wire that can conduct a certain amount of power (voltage and current), and if you exceed that it'll heat up and melt, then you want to get a bigger gauge wire, you're adding more strands of wire, more paths to go down.

In the example above imagine that they were 10W resistors, but you needed to be able to handle 20W of load, buy arranging two side by side you've doubled that power handling capability to the 20W that you want.

but you've also halved the resistance, so then you add a couple more resistors in series to increase the resistance again.


Monday, July 04, 2011

The Workbench/shop stock lists. Electronics (Beginners list)

I'm going to make a list of what I think the best starter work bench for electronics should contain. This list will be costed, -there's nothing worse than seeing a list of really useful tools then realising that you need to be a millionaire, (or be ninety and have been collecting tools your whole life) to have these things.

My "ethos" when making stuff is to make good stuff made well made cheaply.
by cheaply I don't necessarily mean that everything will cost pennies to make, indeed some things are very expensive to make -yet still cheaper than buying off the shelf. this applies to products and tools/equipment.

However, if I can buy off the shelf, and get a cheaper and better product than what I can make, then I'll probably buy off the shelf.


I'll be producing a few of these lists, because I don't think woodworking tools fit into the electronics tools list, nor do metal working tools, but if you are interested in making finished products, not just testing stuff out on a dev board, then you're going to need some tools and some skills to make a final project.

In accordance with an old hack a day post http://hackaday.com/2008/01/20/hackit-your-ultimate-hacking-workbench/ asking people to build up a work bench for $600 or less...

Well being as I'm from the UK, and that was from 2008. I'm going to say £600, (that allows me to not have to convert all the values, and allows for inflation). but I won't be spending all of that in this post. that's the complete bench costs, my bench needs tools for creating finished products. so I'll going to try and build the whole workshop for that price.

I'm also going to try to order the list in a getting your feet wet type arrangement, -so this will be the stuff that you might want to just pick up to be able to see if you even like making stuff for yourself.
so.... Here goes.

Electronics (Beginners list)
Multi-meter, -I don't recommend getting the cheapest, on the other hand I don't recommend getting the most expensive. (in the same way as my view on power tools went, professionals buy De Walt drills because the absolutely need them day in, day out), professionals by Fluke because they need them, day in, day out they are built to work in the shittiest of shit conditions, day in day out, they are drop proof, shock proof waterproof, dust proof and humidity proof.... my opinion is: "if you're a hobbyist, buy hobbyist tools".

For an absolute beginner, look for one that measures voltage, current and resistance. lots of meters will also have a transistor tester, and a continuity meter. More modern meters I've noticed recently, are including inductance, capacitance, temperature and even humidity and light meters as well as the standard volts/amps/resistance meters.

For the absolute beginner, ignore the fancy toys. buy basic, spend £10 - £20. if you need more functionality later then buy a bigger fancier meter later, you can keep your beginner meter laying around for emergencies, or when you want to work on the car and don't want your £200 meter getting dirty.

We'll call the price £20. (total so far £20).

Soldering Iron
I have a huge problem with people telling newcomers that they must get the latest greatest soldering station, with solder pots, and temperature control, and hot air reworking and all the other fancy gadgets. soldering stations of that calibre fall well into the professional end of the spectrum, and cost like they do as well.
http://www.rapidonline.com/Tools-Fasteners-Production-Equipment/Soldering-Equipment/Soldering-Stations/Weller-WSD81-80W-digital-temperature-controlled-soldering-station/300591 isn't that a lovely little soldering station? it's also £239.

Now how about this one? http://www.rapidonline.com/Tools-Fasteners-Production-Equipment/Soldering-Equipment/Soldering-Irons/Soldering-Iron-40W-230V/303066
40W iron, it's powerful enough to do pretty much all the work you'll want to do, and a mere £8.55
As a beginner, you need a around a 30w iron, (if you get a smaller one you spend too long trying to heat up the parts and just damage them, or don't get enough heat into them and end up with dry joints).
So 25w iron minimum, the rough price of this is £10 (total spend so far £30).
The 15W irons that get sold in some places are useless. In fact they are worse than useless.
The final thing to say it that as you;re doing electronics, not plumbing, get one with a fine tip.

Iron Stand
If you can, get a stand too, that stops you dropping your soldering iron on the kitchen counter.
http://www.rapidonline.com/Tools-Fasteners-Production-Equipment/Soldering-Equipment/Soldering-Irons/Draper-Soldering-Iron-Stand/311816

That stand holds the iron when you're not using it, and has a sponge for cleaning the tip of the iron, (a nice shiny tip to your soldering iron helps it transfer heat efficiently, and means that you don't have to hold the iron on the work longer than is necessary.
Cost £5 (total spend £35)

Bread board
Now, anyone familiar with electronics at all is probably thinking of the little boards with holes in, copper below that used for prototyping, but no, I'm still thinking about the solder stand and protecting tables, get a wooden breadboard. (your parents/significant other/house mates will thank you for the consideration). Any size will do, really, but somewhere between the paper sizes of A4 and A3 is probably ideal. and it doesn't have to be a breadboard, it could just be a bit of old counter top, or a piece of plywood bought new.

Cost £5 - 10 (total spend £45)


Solder sucker
http://www.rapidonline.com/Tools-Fasteners-Production-Equipment/Soldering-Equipment/Soldering-Irons/Draper-Solder-Sucker/311815

I prefer this to solder braid, but each to their own, the principal is simple, you're soldered something in the wrong place, so heat the solder so that it goes runny, then suck it up out the way.

Cost £5 (total spend £50).

That is, in theory enough to get you started.
You should be able to follow some simple schematics and make simple circuits.

though if you've just gotten £50 for your birthday, you may want to not spend all of that on equipment, as you'll want some money for components to get you started!

Though there are a few more things that you'll want to consider getting.

Breadboard

Breadboards are prototyping tools, they have standard spaced holes that are connected inside the board by wires that you can't see, they enable you to build simple circuits by poking the legs of components into holes on a board. these have a range of prices. starting at around £2 rising to around £10
http://www.rapidonline.com/Tools-Fasteners-Production-Equipment/PCB-Equipment/Prototyping-Boards/Protobloc-2-protyping-breadboard/29459/kw/breadboard
that one is a good beginner board (and when you buy multiple boards then can be joined).
it costs £5 (total cost £55).

Power supply
Aside from some little hand tools like screw drivers and a few components to get started, that is about it.
there is one very big thing missing however, a power supply.

Now I have to admit that I've gone a little all out on a power supply in the past and have one of these:
http://www.rapidonline.com/Electrical-Power/Power-Supplies/Bench-PSUs/Single-and-dual-power-supplies/65051
(the single supply one). 0-32v 2amp supply, digital readouts, super accurate, professional quality, but again a £250 professional price.

What's worse is that I hardly use the thing at all. Instead using my ATX conversion supply. A supply I converted myself from an ATX computer power supply. It has less range, but more usability due to it having split rails at common voltages.
Perhaps I should have gone for the bigger brother of the supply I did get and spent £320? but then I'd still only have two voltage rails.
Perhaps I should have just used my "free" (salvaged from an old PC) power supply, and not bought the supply I did at all.
Perhaps I should have just gone with a "wall wart" type supply. 3v - 15v, enough current for small circuits, cheap and available everywhere.

You decide what power supply you want. The general idea is...
digital circuits will tolerate some noise, as there are thresholds on the signals used. analogue circuits are more susceptible to noise. (hence you sometimes hear a hum on audio equipment) -that's mains hum, it's an AC waveform that's introduced on either the power signal or ground planes, and the fact that you can hear it means that it matters.

I'll post up some instructions on converting an ATX supply in the near future.

I'm therefore going to take an average power supply (wall wart) say that you'd cut the plug off and have a variable power supply for building/testing circuits.

If you look at this supply http://www.rapidonline.com/Electrical-Power/Power-Supplies/Bench-PSUs/3A-Switched-output-switch-mode-power-supply/65050 it's basically just a wall wart in a prettier case anyway.

cost £5 - 10 (depending on the current capabilities). (total cost £65)

So you've spent a little over half a ton so far, and you haven't really got a whole hill of beans to show for it (yet). -though you could get away with not having the iron stand, bread board (either the wooden type or the prototyping type). You may not need the power supply (use batteries? though these can be just as expensive). If you're building really really simple circuits you may not need the multimeter. In fact you can start making stuff with electronics without any of this stuff (I did when I was a child).

What you buy depends on what you need to do, if you only ever want to build test circuits, then the need for a soldering iron is small.
If you want to permanently keep everything that you make, you'll definitely need to solder it (else it'll fall apart).

In addition to this you're going to want some components. stuff like wire
http://www.rapidonline.com/Cables-Connectors/Equipment-Wire/Equipment-Wire/1-0.6mm-Single-core-equipment-wire-on-100m-reels/62317

LEDs, resistors, capacitors, transistors, op-amps... lots of components.

I'm not going to specify what you need, your projects will specify that for you.

Just know that you can start out with almost nothing, (a bit of wood, drawing pins, a paper clip, batteries and a light bulb) and still make something.

If you're just wondering about getting your feet wet or you've so far managed to make a torch, but really want to make just a little bit more, then I'd really recommend one of the 200-in-1 kits. these are a little pricey, (~£60). but as a thing for getting people into electronics they are really good, the projects in the book include making radio receivers, radio transmitters, lie detectors, amplifiers, light switches, light level meters, sound level meters.

Strangely, I don't think that I would recommend the 500-in-a kit. it's much more expensive (£150). the only additional benefit that it offers is a microprocessor (but a very odd one that I can't say I've seen used in many places, that's programmed in a peculiar way). For the same money you could get the 200 in one kit, and breadboards and such and get a more current microprocessor such as the Arduino, or a PIC set-up, with a programmer.

Sunday, July 03, 2011

On going formatting, and the future of this blog.

Having properly written up a project for the first time since leaving university I've decided that I like that formatted way of doing things.

Therefore I'm going to spend some time going back through the blog re-arranging all the posts that I've been writing since 2006, and try and put them in a better format.
I'll see about adding up some pictures, (something I've not done before instead trying to just describe things).
this will mean some posts just disappearing, having been combined into a single post, but this should make searching back for a specific project a lot easier, and since I tend to run projects concurrently (media machine being a great example of an ongoing work) anyway, hopefully projects will now come as a nice easy to digest block, start to finish instructions, properly, written theory (if applicable) included.
I'll also be interspersing tips and opinions in between the how-to's I've had this blog for 5 full years and so far only managed 30 odd posts. adding a bit more variety might help me come back and add more. I'm going to aim to make at least 1 post per month.

Wednesday, June 01, 2011

LED Torch with a difference

This LED Torch has a difference, when most people convert torches to use LED lights they are usually interested in super bright LED's and illuminating entire football pitches with a brilliant white light using something that can be stored in their pockets.

This torch I actually need to be intentionally dim. I also don't want white light, I want red light.

This torch is a star chart reading torch to be used when outside and looking at maps.

it could also be used whilst in a car (assuming that you're not driving) to read maps whilst you're going along the road.

Theory
The theory is actually quite simple.
When you switch off the lights at night, you can't see anything, then after a while, you find that you're able to see quite a lot. after ten minutes you're able to see a reasonable amount of things, after half an hour you can see so much more.

How it Works
This is why, the retina of your eye is made up of photo receptors (things that sense light), these are broadly divided into two groups called rods and cones, seemly like an odd name for bits of your retina, but under a microscope the rods are rod shapes, and the cones are, well cone shaped.
Your rod cells contain a chemical called Rhodopsin, it's this chemical that is senses the photos in light and lets you see. though strangely this chemicals actually breaks down into two different molecules (retinal and opsin), these two molecules, do re-combine, but at a very slow rate (hence why it takes time for your eyes to adjust to the dark!)

Why it's Important
If you're looking up at stars this is especially important, some stars are extraordinarily dim this is why light pollution is a problem for anyone looking up at the stars, the night sky is effectively partly illuminated, for the brighter stars that's not a problem they cut through the light shroud that covers us, dimmer stars don't have enough light coming our way to do this, so we don't see them.

A Simple (no tools or skill required) Experiment
If you are interested in stars, and even if you're not I highly recommend that you drive out to a field somewhere (actually the middle of nowhere is best!), then leave your car and walk into the field, you might need a torch to light your way to get to the middle of the field. When you are in the middle of the field turn off the torch and look up-you'll see loads of stars (more than you'd normally see when looking up when in a town or city. stay there for a while, after ten minutes, look up again, there are seemingly more stars.
Wait half an hour and look up again, try not to fall over backwards as now there will be so many stars in the sky that you'll be amazed at how they all got there!

-you can go back to your car now. and by this point your eyes should be so well adjusted to the dark that you don't even need a torch.

Red Light
The rod cells in your retinas do not perceive red light, if when you were out in the middle of a field you switch on a normal white or yellow torch the Rhodopsin will break down into its component molecules, but since the rod cells don't perceive red light, looking at something with a red light will leave the Rhodopsin (and your night vision) perfectly intact.


Making a Red Light Torch
Even though red light does not make you loose your night vision, you ideally still want to keep the light output down to the pretty much absolute minimum that you can.

Parts required
You will need:
>a torch body (if the bulb is blown then don't worry about replacing this) the torch body must be intact, and the glass front (for keeping out water) and the switch to turn it on or off
>Batteries for the torch. (I have a torch that requires 2 AA batteries, this give a total voltage of 3Volts when using non-rechargable batteries, or 2.4Volts when using rechargeable batteries.
>Red LEDs I used 4 normal 5mm (5v) LEDs, you may choose to use just a single one. bear in mind the low voltages listed above, you may want to use some low voltage LEDs
>A "midrange" value resistor. think above 1k below 10k you can figure out the values for optimum use using the data sheet for your LED.

Ohms Law and Resistor Values
Figuring out the resistor values is easy. you use Ohms law (or at least a part of it).
Ohms law states V = IR (or V/R=I or V/I = R depending on how you write it)
V is voltage
R is resistance
I is current

lets say that LEDs have a maximum current carrying capacity of 3milliamps.

basically you just put those numbers into the equation.
V = 3v
I = 3mA (0.003 amps)
R=?
V/I = R

3/0.003 = 3000 Ohms (3Kohm).

I places 3 LEDs in parallel (therefore splitting the current load between 3 devices). so my total maximum current draw is now 9mA and my resistor needs to be at least 1k.

That would be the resistor value needed to illuminate the LEDs to their fullest brightness, which I didn't want to do anyway, so I chose a trusty 4k7 resistor.

Beam Angle
Now you may be wondering why I say don't illuminate your LEDs to their fullest brightness, but use multiple LEDs which will increase the light output. that's to do with the beam angle.

A single LED has a relatively narrow beam angle, try illuminating an LED and looking at it from the top compared to looking at it from the side. you'll see that the beam is focused into a reasonably narrow channel, this is good for some applications, but for throwing some light onto a large sized star chart, not so good, so I used 3 LEDs arranged in a flared out triangle to increase the beam width pattern.

Unless you're building this into the body of a mini MAG light using miniature LEDs I would recommend this, if you are using a mini MAG light then, it's not the torch that I'd have picked (and I did have a broken one of these I could have picked), but I understand it's going to look a bit nicer than my slightly more bulky plastic wolleys torch.

Putting it all Together
There is no real skill involved in putting it together, -you don't need a doctorate in electronic engineering, but it can be a bit fiddly, so have some patience!

Start with the LEDs take the short lead (or flat side leg) of each LED and put these together being careful not to pull the legs off any of the LEDs. now solder them together.
take the positive side and group then solder these together also. to one side of your LED bulb attach the resistor that you're chosen.

Take the front part of the torch containing the bulb and reflector off of the torch.
remove the bulb.
Carefully push the LED assembly into the bulb housing, (you may need to pull at the assembly and poke in one LED at a time if the hole that the bulb went through isn't big enough).

Inside the reflector you should now have all your LEDs, poking then through one by one means that they've likely splayed out by themsleves anyway, but if not try to make the tops of the LED point towards the reflector in the torch.

Now you can either choose to try to solder wires to the bulb and connect these straight to the switch, or you can position the legs of the LED and resistor into the existing bulb holder in place of the torch -i.e in the future if you need a torch you can just take the LED red bulb out and use a normal bulb again. I went for positioning the wires so that the resistor was in the middle and would make contact with the centre spot (+ve) connection and the short legs of the LED touched the outside of the bulb holder (-ve).

Try turning it on. you should get a light that looks pretty useless indoors, and doesn't really light up a lot, because it's so dim.
But outside, in the dark, it should provide just enough light for you to be able to see to set-up your telescope, or see star maps -without ruining your acquired night vision!

Costs
This cost me nothing but my time, because I already had batteries, a torch LEDs and resistors
however, a rough costed parts list is here.
torch £5 -Wolleys is closed now, but your cheapest supermarket/hardware store/pound land will probably have a torch. don't go overboard and you should get a reasonable torch for not a lot of money.
LEDs -these are in the order of pence when buying in bulk however if you go to Maplin they will be £0.60 each. you'll want three (£1.80)
Resistor -again pence, really look up Rapid Electronics or CPC, don't be afraid to create an account and get parts delivered to your door, from Maplin £0.24 for a single resistor. (twice the price for a single resistor at Rapid, or 3 times the price of bulk buying at Rapid!

Total cost (maplin price) = £7.04. (includes torch)

Which is not a lot to pay when you consider it'll save you half an hour of standing waiting for your eyes to adjust!

Alternatives -and why I didn't use them

Red filter - I tried a red acetate filter, too much white light was escaping around the sides and would have lessened the acquired night vision.

Red filter with torch body covered in Gaffa tape -would have worked but just looked messy.

Red Nail Varnish -I didn't have any, and buying some would have meant spending as more on a bottle of nail varnish as I would have on buying 3 LEDs and 1 resistor anyway! for a substandard result and permenant destruction of a torch -I can take my LED bulb out and have the original torch back. -but if your don't care about the torch and you have access to red nail varnish then you may as well try it that way.