Showing posts with label Resistor. Show all posts

Monday, July 09, 2012

Electronics lessons: The Resistor Simple circuits Wheatstone bridge

So, A long time ago we covered potential dividers, in that lab we used a potential divider to vary the brightness of a light bulb.

Since then we've used potential dividers to bias amplifiers and provide feedback networks for other amplifiers.

Now I'm going to introduce a very simple circuit, that really going to test that you understand, what voltage, resistance voltage difference and potential dividers are all about!

Potential difference
Now, we mostly think of potential difference as being the difference between a point and ground. when we say what's the voltage there, it's just common sense that we mean, what's the voltage there with reference to 0v, not what's the voltage there with reference to the positive power rail, or negative power rail...

When you think about it, if you have a +9, -9 and 0v power rails, If I say what's the voltage there.
you measure potential difference between 0v and that point and get +3v, if you measured between the 9v rail and that point you'd see -6v, if you measured between the -9v rail and that point you'd measure 12v.

Measuring resistance
The real crux of what we've getting into here is measuring resistance. This can be though of as a how to make your own multimeter.

We should now be comfortable with the potential divider. and what potential difference is.


So I'm going to draw a series of potential dividers, and talk about the voltages that are in use in those circuits.

First, the circuit that I'm going to talk about looks like this:
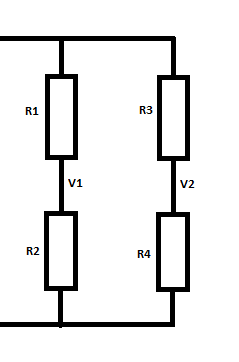
Pretty simple eh? pretty useful as well

We know that the voltage at any point is relatively easy to find

Voltage = 10v
R1 = 5
R2 = 5
R3 = 5
R4 = 5

We know that the voltage at V1 is (V / R1 + R1) x R2
in this case that's (10 / 5 + 5) x 5
10/10 = 1 multiplied by 5 is 5volts.

We know that the voltage at V2 is 5v also.

So the potential difference between V1 and V2 is zero.


Now lets change the value of R3 to 15

now V1 = 5
but V2 = 10/20 x 5 = 2.5

So the potential difference V1 - V3 is 2.5.


Now is we change the resistor R3 to be 1
V1 still = 5 (that's out reference voltage)
but V2 = 10 / 6 * 5 (10/6 = 1.66666, 1.6666 x 5 = 8.3333

The potential difference is 5 - 8.33333 = -3.3v

This sounds simple and it is.

Lets build a circuit from this.
We'll need a battery.
an analogue volt meter,
3 resistors,
2 bits of wire
1 sharpie.
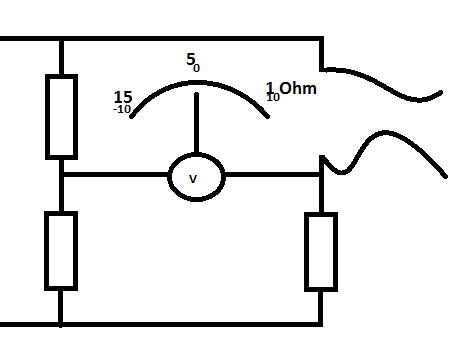
Use the wire to connect resistors of a known value to the circuit, then use the sharpie to draw onto the analogue meters screen to give you calibrated marks.

Alternatively, use a light dependant resistor, and draw on the screen specific points (as measured against another calibrated device) to make a light meter.

Or use a thermistor, in a range of temperatures measured by a mercury thermometer to can have a fully calibrated electronics thermometer.


If you use load cells, (that alter resistance in accordance to the load placed on them) you have electronic scales.
Light, heat water, position of wiper on a potentiometer, if you can get a sensor to return a resistance for whatever environmental input you want, then you can use a whetstone bridge setup like the one above to measure.

Monday, June 11, 2012

Electronics lessons: Music effects: The distortion pedal

This is the first guitar pedal that I eve made...

What is distortion.
Distortion is the changing of a wave form from one form to another so as to distort it.

Technically speaking, a tone control distorts the signal, a envelop filter distorts the signal, anything that "colours" the signal also distorts it.

but if I stop being a smart ass for a second.

distortion to most people means fuzz.

History of overdrive.
It seems to make sense to me to start at the very beginning, and lets take a look at the physics of what's happening.

Many people try to make a distinction of what type of distortion they are listening to, if it's a hard clipping, or soft clipping, some people thing that an over drive and a distortion are different, they kind of are, but fundamentally it's all the same.

OK, distortion was around long before this, but lets set the scene...
To understand this analogy you;re going to need to know what a green back is.
A green back is a speaker made by the British speaker manufacturing company Celestion in the 60's or 70's.
It was a basic run of the mill speaker, which has gained cult status (and price) with it's inability to handle the power of the signals that people were trying to drive thought it.

Now you might think that from the description above of a basic speaker that's gained notoriety for sounding bad might make you think that I dislike it.
nothing could be further from the truth. the point I'm getting at here is that the magic sound of 60/70 British rock, (think Rolling stones/Yard birds/Led Zepplin) lays a lot in the mechanical and electrical limitations of the time.

Consider how a speaker works,
a coil of wire is suspended in a permanent magnet,
the coil of wire is subject to an electrical current, this makes the coil magnetic, where it will be either attracted to, or repelled from the permanent basket on the back of the cone.
the coil has a paper cone attached to it.
as the coil moves the paper cone moves, this moves air particles, which vibrate through the air and then the air vibrates against our ear drums and happy days we hear sound.

So we get that the coil is moving, and we get that we can turn the volume up and make it move more, but, the coil is attached (with what's called suspension) to the metal frame (spider) in the speaker construction. The size and stiffness of the suspension limits how far that speaker cone can move.
that means that for very large wave forms the speaker will not replicate exactly what is being asked of it.
it tries to reach the point where the signal applied it telling it to go, but excersion limits are met and the speaker cannot move any more.
additionally the suspension on the speaker slows down the cone as it reaches the excursion limit

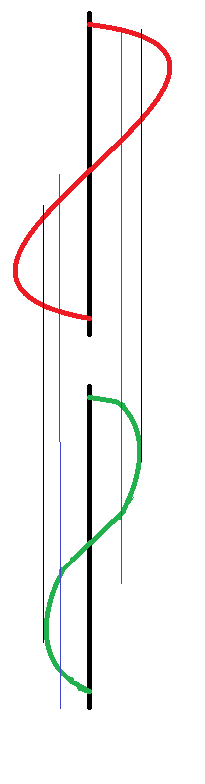
So the following picture hopes to show you what I mean, I've drawn it on it's side so you can visualise a speaker cone going in and out.

The thick black line is zero, this is where the speaker normally rests.
the red line is the input to the speaker.
you see it rising, the green line (speaker position) moves with it, then we reach the blue line, this is nearing the excursion limits for the speaker, so whilst the red line continues to move, the green line is being slowed by the suspension of the speaker.

The red line continues to rise where it meets the black line, this is the excursion limit the speaker can no longer move at all past this point whilst the red line continues to be at this point the speaker sits as it's maximum excursion position waiting for the red line to fall.

This is, in the most traditional sense an over drive distortion.
the wave is quite smooth, (as the suspension prevents square edges to the sound wave) and as such will sound like a warm fuzz.

It is also possible to get over drive distortion from an amplifier.
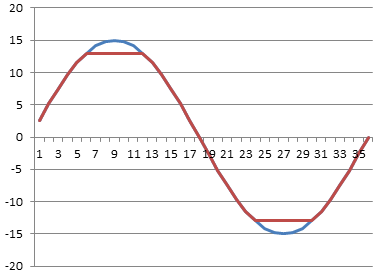
Consider the following chart.
the blue wave is what we want. the red wave is what we get

lets say we have an amplifier with supply rails of +15 and -15 volts, you we give the amplifier a 1v / -1v signal and say, amplify that, and set the gain to 15.

What should come out of the amplifier is a smooth wave (the same as went in) with peak values of + and - 15 volts.
but we can't actually drive the amplifier to the supply rail voltages, the most that we could get out is +13 and -13 volts, so the top and the bottom of the votlage is cut off.

This is a much harder clipping sound.

Now that we've listened to loads of music and realised that the classic hot sound of the 60/70s is so desirable what can we do to emulate that?
(clearly we don't want to run our amplifier at that level forever, and the amount of power that you need to put into a speaker cone to reach cone excursion limits makes your show loud, (and perhaps not suited to the venue size you have!)

So you want to fake it.


Well, now that we know what we're trying to fake, it's a very simple matter of finding a way to cut a little from the top and a little from the bottom of an audio wave.

So what we want to do is take a small wave form say 1 or 2 volts then shave a small amount of voltage off of it.

So what we want is a component that can give a low resistivity for small signals, and gradually that resistivity will increase until it hits a limit then it will only allow that amount of signal to pass.
kind of like some kind of flow control.


well, we don't exactly want flow control, but if we look at the diode we have the component that we need.

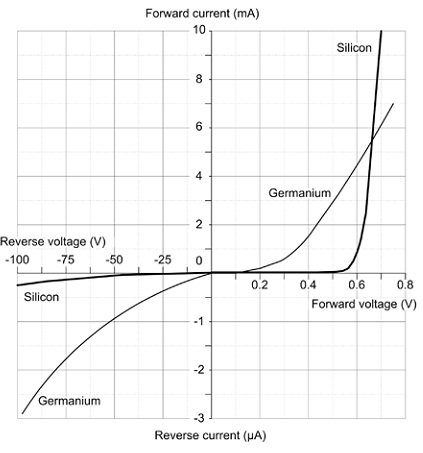
the following graph shows the voltage and current flow of a regular silicone an germanium diodes as they approach their forward conduction zones:

You see that (especially with the silicone diode) there is a gently slope on the voltage vs current graph, this is that component gradually decreasing it's resistance to a signal, until it reaches ~0.65 volts where it begins to conduct, at 0.7 volts the junction inside the diode is saturated and it's in full conduction mode.


So what does this mean for our distortion effect.

Well, quite simply, we wanted a component that we could use to clamp our voltage inside an artificial set of parameters that would mimic the gentle slowing due to suspension and then flat constraint of an over driven speaker. and with a diode we actually have that.


There are two ways of using diodes in a distortion circuit, these are often called hard and soft distortions.
what makes a distortion hard is very angular edges on the wave form when it flattens off, (see the picture of the amplifier distortion above, and soft distortion is more controlled, the distortion still exists, but it's smoother.

not only does the wave look smoother, but it sounds smoother too!.

There are two ways to use diodes to produce this distortion.

First we need to understand the building block that we're using.

two diodes are placed back to back, (and front to front)
this looks like a crazy way to put a diode,-surely they'll just conduct to ground regardless of the signal applied and there will be no output?

Well, no they won't just conduct to ground because as explained above, as the diode is switching on it has a resistance, and even when it's on there is a voltage drop.

So what actually happens is we clamp the signal line to only permit signals within a certain threshold, and limit any larger signals to that threshold.

So now we have a simple model.

for signals under 0.5 volts a diode acts much like an open circuit,
for (silicone) 0.5 - 0.7 volts a diode acts like a resistor with progressively less resistance being applied as the signal rises
for germanium diodes 0.2-0.3 volts acts like a resistor with progressively less resistance being applied as the signal rises
for signal over 0.7 volts the diode acts like a short circuit grounding the circuits and therefore clamping the signal to the activation energy threshold.


now that we have this component block figured out we can look at how to apply to to a circuit.

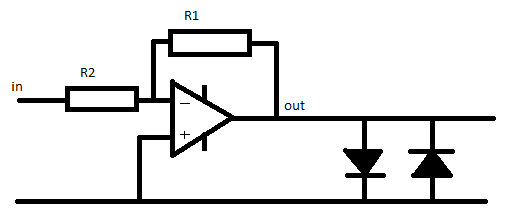
The first method of connection is to follow the amplifier that is used in the circuit with the component block.

This literally clamps the output to 0.7v, this type of circuit arrangement is suited to either Light emitting diodes or germanium diodes.
the use of silicone diodes produces a quiet hard clipping in this position, mixing a silicone diode and a germanium diode in series for the block can have a positive effect in making this clipping less harsh.


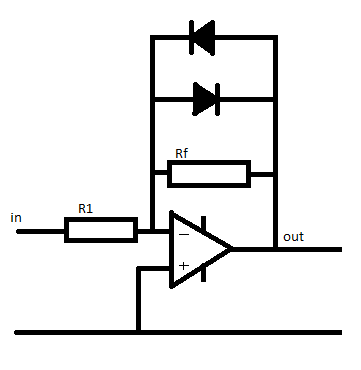
The second way to use this component block is in the feed back network of the inverting amplifier.

we put the network in parallel with the feedback resistor.

At low signals the diodes act like an infinitely large resistor.

so the value of 1/Rfn = 1/Rf + 1/diodeR(infinity) therefore the total value for the resistor network (Rfn) equals Rf

so if R1 = 100 Ohm, and Rf = 200 Ohms,
Gain = -Rf / R1 so the gain = 2

now as the signal gets larger the amplifier will put out a larger signal, when the output of the amplifier reached 0.55v the diodes are behaving like a resistor.
we'll (for the sake of simplicity) say that the value of this acting resistor is 200 Ohms.

now the feedback network has a resistivity if found by the equation
1/Rfn =  (1/200) + (1/200)
so Rfn = 100 Ohms

now the gain of the amplifier is
Gain =-rf/R1
gain = -100 / 100 = -1

so the gain has gone down.

Now the voltage continues to rise to above 0.7 volts, the diodes now act like short circuits.

the resistance of the feed back network a 1/Rfn = 1/200 + 1/0  so Rfn 0

and the gain is
-0/100 which also equals zero.

Remember a gain of 1 is unity.
the output = input x gain.

so a gain of zero actually turns the output off completely.
(but if that were to actually happen the there would be no voltage so the diodes would have infinite resistance again.

thus the voltage is again clamped in the region of the diode conduction threshold.


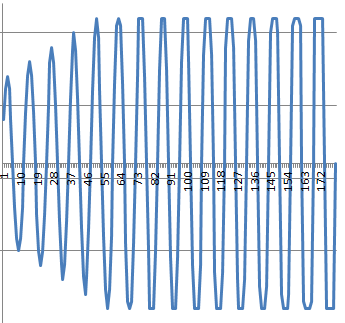
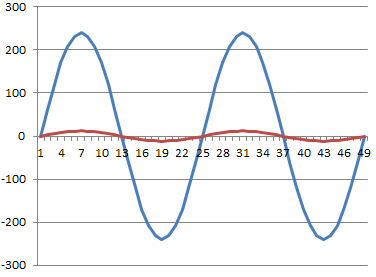
You can see in the graph below what a gradually increasing waveform looks like as it approaches the clipping region.
at the start there is no distortion, as teh wave gets gradually larger the clamping effect of the distortion begins to take effect, you see by the end of the graph the distortion is no longer smooth, the input signal is massive and the clipping is more and more choppy (and will sound worse)


Monday, April 23, 2012

Electronics lessons: Opamps as level meters

In the Last electronics lesson I rather clumsily covered operation amplifiers as input comparators.

Saying that is the non-inverting input was high than the inverting input then the amplifier would have basically the supply voltage as an output. and if it was lower then if would be low.

a better way of saying this is
If Vnon-inverting > Vinverting, then output = +source-2 (if it's a 15volt source that means 13 volts at the output)
If Vnon-inverting < Vinverting, then output = -source+2 (if it's a -15volt source that means -13 volts at the output)
if Vnon-inverting = Vinverting, then output = 0

So you might be asking why is this useful?

Well, to explain why this is useful you have to think about what I was saying in the last lesson.
I talked about the source voltage at the non-inverting input, and the reference voltage at the inverting input.

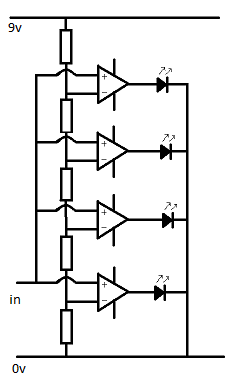
Say for example we have a series of op-amps.
the inverting leg of each amplifier is set to a different reference voltage, each a small distance apart.
now we connect the non-inverting legs together to form a single common input.
and we connect the outputs to a series of LEDs.


We now have a situation where:
starting at zero the state of each op amp is Vnon-inverting <= Vinverting, so all amplifiers are either  negative voltage, or zero volts at the output.
As the non-inverting input rises it will increase above the reference voltage applied to the non-inverting input of op-amp 1, this output will then go positive and the LED attached to it's output will turn on.
as the source rises further op-amp 2 will turn on.

We have created a level meter.

Notice that on this schematic the resistors that protect the LEDs are missing (because it's simpler that way)

So, in this circuit we're imagining that our input voltage swing between 0 and 8 volts

All the resistors are 1k,
so starting at the top and working down we know that the reference voltage applied to each function is

7.2v
5.4v
3.6v
1.8v

So when the source signal goes above 1.8v, the bottom LED will turn on,
when it goes above 3.6 the second from the bottom LED turns on.

But what id the signal is smaller?
Well, the reference voltage can be anything, if doesn't even have to have the same gap between the reference points.

You could have reference voltages of 0.1, 0.2, 0.5, 1 or anything you want.

You set your reference voltage with the resistor network.

Monday, April 02, 2012

Electronics lessons: Power supply

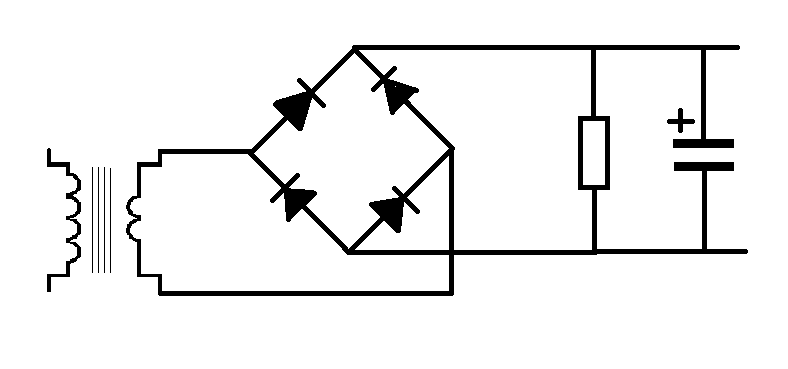
This is a very simple power supply circuit.
With the lessons on the transformer, diodes and capacitor this should be fairly self explanatory as to how this works, but I'll go through step by step.

What we need is to take a 240 volt supply an turn this into a 12 v supply for a circuit.

So we start with a transformer.

our mains voltage is 240, out ideal output voltage is 12

240/12 = 20, our transformer needs to be 20:1

After this we need to stop the voltage being an AC wave and rectify it.

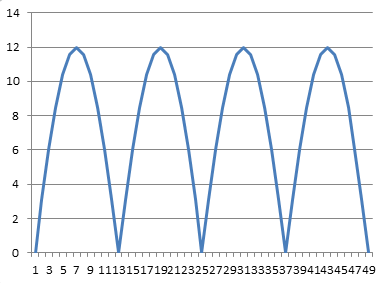
We'll use the full wave rectifier discussed earlier. this gives us that two humps per cycle (as the negative waveform becomes positive).

But this wave form isn't all that useful, you see each time it dips to zero it's effectively turning off.
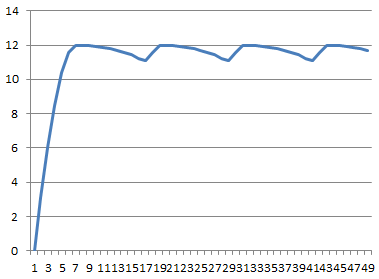
in order to smooth out the humps in the power supply we add a capacitor across the power rails, this acts like a battery storing power from the peaks of the humps and discharging, (and thus keeping the rail voltage high) as the hump drops to zero and whilst it's on it's way back up again.

Ripple Voltage
the series of humps has now been transformed into a straight DC line with a ripple in it.

That ripple can be very unwanted, consider what you can hear (20hz - 14Khz).
mains voltage is 50Hz, if you connected a speaker to the mains you would hear a low hum, (just before the fire started).

well, if the supply voltage in the circuit has a 50Hz ripple on it, that's also going to appear as hum at the output.

the ripple voltage is calculated as

Vpp = i/2fc where a full wave rectifier is used (as above)

Where a half wave rectifier is use it is Vpp = i/fc

So, where do we get the values from.

well,
vpp is the peak to peak value for the ripple voltage
I is the current in the circuits,
C is the value of the capacitor
and F is the frequency of the AC power

for the example above lets say that the load of the circuit is 1200Ohms.
we know that the votlage applied to that circuit is 12 volts

so the current is
12/1200 = 0.01A

The capacitor value is 0.001F (1 milifarfad)
and mains voltage is 50Hz

so the ripple voltage here is

vpp = 0.01/(50 * 0.001) = 0.2

so in this case the voltage goes between 11.8 and 12 volts, the ripple is 0.2 volts

Tuesday, August 23, 2011

Electronics Lessons: The Resistor Standard Values -The E12 Values

In the transistor amplifier lesson I introduced a new concept without talking about it too much. I kind of just shoved it in there and assumed that you'd get to know what I was talking about.

If you found it confusing or didn't have the foggiest what I was talking about, then read on.

Standard Values
Standardising the values allows manufacturers to make a handful of components, in bulk quantities, therefore keeping costs down.

Can you imagine the size of the hobby section in electronics shops if every component value imaginable was actually made? 1oh, 2 ohm, 3 ohm, etc or 1 and 1.1 and 1.2 and 1.3 and 1.4ohms all the way up to millions of ohms?

Instead of making every size imaginable, the manufacturers use standard values instead.

This values are spaced in the same kind of range of values as notes on a piano, (white and black).
in an Octave, there are 7 white keys and 5 black keys.
C, C#, D, D#, E, F, F#, G, G#, A, A#, B then we get back to C
Those notes are all equally spaced apart and the gap between then is called a semitone.

Standard resistor values have the same sort of spacing, the spacing between them is 10^(1/12)
(or ~1.212). (there are, just like on a piano, 12 values in a range, and the ratio of the spacing of these is equal.)

This is why it's called the E12 series (there are 12 values in the series)

The values
This makes values that start a 1,
then (multiply by 1.2 = 1.2), x1.2 = ~1.5

Therefore the actual values are

1, 1.2, 1.5, 1.8, 2.2, 2.7, 3.3, 3.9, 4.7, 5.6, 6.8, 8.2 and 10 (the ten is the start of the next range, kinda like how that C was the start of the next scale on the piano.)

Designing
Of course this is a bit of a trouble, when we're designing circuits we often come up with values where there just isn't a standard value.

In the amplifier lab none of the values were standard! all had to have a closest fit.

However, when you look at the range of values, it's not all that bad...

Margins of error/Tolerance
If you look at the values, they are all equally spaced, with not more than 20% between the values.

The gap between 5.6 and 6.8 is 1.2Ohms, so lets hit exactly in the middle, and say that you need a 6.2Ohm resistor.

If you go for a 6.8Ohm, resistor you're 0.6Ohms over,
If you go for a 5.6Ohm resistor you're 0.6Ohms under.

In short, whichever way (up or down) you go, you're only ever going to be 10% or less out of what you want the value to actually be.

I suppose you could say that 10% is a large percentage and does makes a difference.
You would of course be right to say that.

But consider two things, firstly, your designs, are mathematical models, not measured values,
And that even the values on the data sheet, though they are measured values, they are measured from a sample, not the component that you have in front of you, -hence data sheets provide minimum, typical and maximum values, measured from a range of samples.

Whether you chose a higher or lower value depends what you're working with, if you're getting close to the absolute maximum values of current, then choosing a lower value, and possibly exceeding that absolute maximum would not be a good idea. However, if you're well within the absolute maximum, then choosing a slightly lower value of resistor isn't going to cause too much current to flow, nothing is going to fail or melt!

Also, you should remember that if you desperately need an exact non standard value, you can add resistances together.
if you need exactly 45Ohms, no more no less then instead of settling for 47 ohms, use a 12 ohm and 33 ohm resistor in series!

Also remember that on resistors there is a tolerance band.
If you're using a silver tolerance band then your components may be as much as 10% out of their marked values anyway!

Thursday, August 11, 2011

Electronics Lessons: The Transistor Simple Circuits (Lab 2)

So in the last lesson I talked about the transistor, I talked about how you could turn the transistor on to a fully conducting state.

I also mentioned that transistors could be used as current amplifiers.

You'll use a current amplifier when you need a little more power to switch on an output than that output can supply.

We discussed before how the transistor was off, and how it could be turned on.

So, lets make a device that puts a light on with the presence of a voltage, even if that voltage source doesn't have the power (current sourcing capability) to light up the light itself.

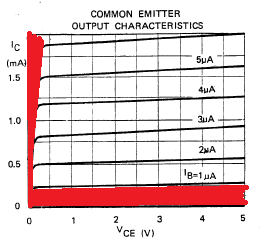
In this tutorial we're interested in two areas of the transistors output, because we're going to use the transistor as a switch we'll either have the transistor in the cut-off region (off), or the saturation region (on) of it's output characteristics. (There are the areas marked in red in the chart below).


The Circuit
What we do is connect the input to the base of the transistor, we use a resistor to ensure that not too much current is pulled from the voltage source that we're detecting.

We'll also put a resistor between the circuit voltage source, and the transistor to limit the current being drawn from the source.

Our light will be an LED, we're expecting that the voltage going to the LED will be 5V at most, but as little as 3v so we look at some data sheets for LEDs and we find that the there are a couple that we can't use, (some have Vmax as 4v), and others will tolerate a higher voltage, but won't light with only 3v.

Eventually we come across the L-53GD-5V made by Kingbright

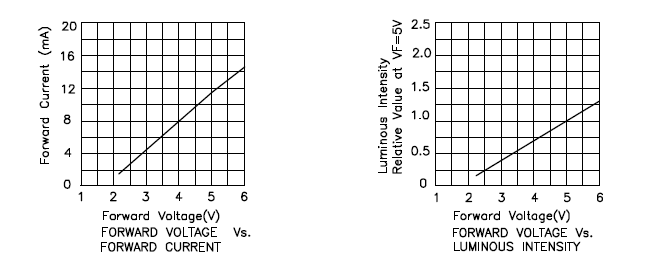
It has the following characteristics.


So we can see that it'll be on, and bright at 5v, and it will turn on, (though only be half as bright) at 3volts, (we're interested in sensing 5v Logic levels and 3.3v Logic levels right?)

Elsewhere in the data sheet it tells us that the maximum current is 17mA
We know that our greatest voltage going through the LED will be 5v
So we use ohms law to determine the resistor needed.

5/0.017 = 294

So we really want to make the total resistance between the supply voltage and the indicator LED around 300Ohms
In case you're interested

3.3/300 = 0.011 or 11mA available for the 3.3v logic level to light the LED.

I say the 3.3v, remember this is a current amplifier, not a voltage amplifier. The voltage is going to remain the same as what's going into the transistor base.
Anyway, at 3.3v the LED only draws some 6mA, so there is plenty of current available. (and that 11mA is below the devices max draw of 17mA

Schematic
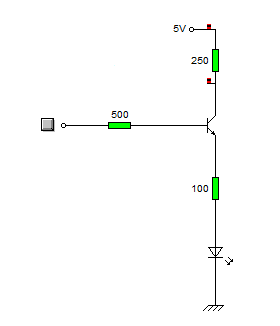
Here is the schematic of the circuit.


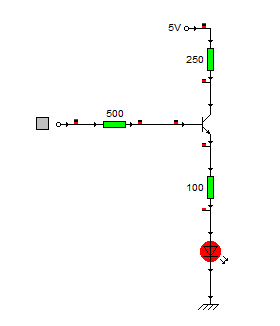
And here's what happens when a logic level of 1 (+5v) is applied to the base resistor


When the circuit is on it pulls around 6ma from the logic source, and the current going through the LED is about 14mA.

Stay tuned to see this idea scaled up!

Friday, July 22, 2011

Electronics Lessons: The Resistor Simple Circuits

Ok, so it's time to crack out the components and do some simple experiments.

Lessons are boring, I don't need to tell you that though. If you've read through the resistors lesson you may have switched off half way through, you may have just clicked away.

Endless theory is boring. So... lets crack out a few components and start making something nice and simple to illustrate some of this theory.

Equipment
For this lesson, you'll need
>a 9v battery
>a battery clip to attach wires to the battery.
>a small light bulb (and possibly bulb holder).
>and about 3 100ohm resistors, (brown black black).

If you have one then a multimeter that measures voltage would be good.

You should be able to nip into your local radio shack/Maplin/electronics hobby store and get all of these things for less than £5.

Method
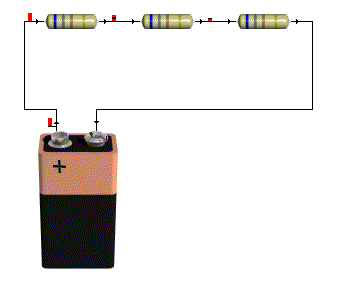
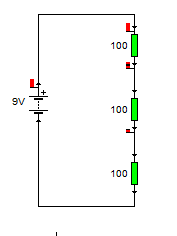
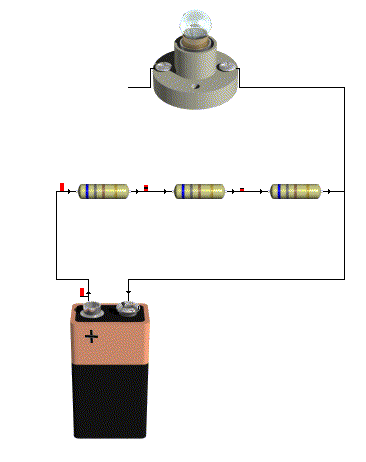
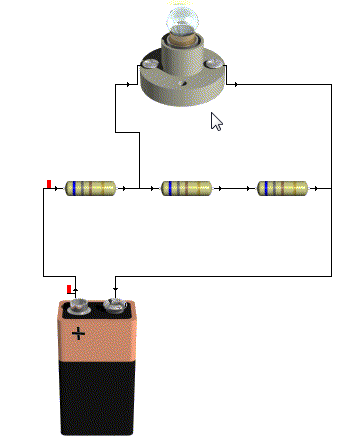
The first thing that you want to do is join the three resistors in series, and attach them to the battery, whether you practice your soldering skills, use a breadboard (as in the little plastic thing), just twist the legs together to form a connection or even use a breadboard with screws and screw cups to hold the components, if doesn't matter, all you need to do is connect the resistors in series and attached then to the battery.

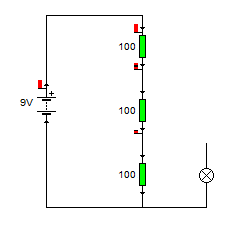
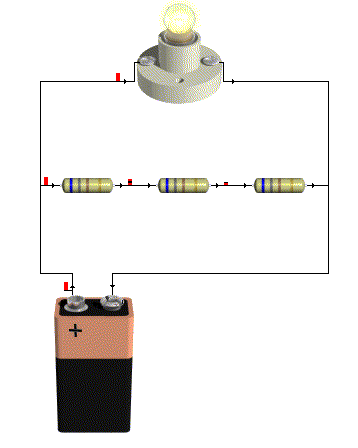
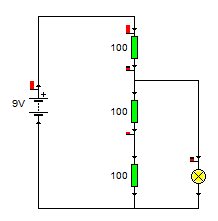
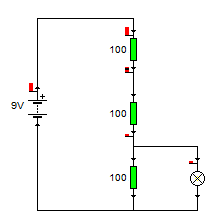
I'm going to illustrate this with a series of pictures, that should show you what you're looking at, and the schematic diagrams that represent what the circuit is.


Next attach one side of your light bulb also to the negative side of the battery.


Now you want to attach the other side of your light bulb to the positive side of the battery.
you should see if lights up very bright.


Now remove the connection from the light bulb to the positive side of the battery, and connect the battery to the second leg of the first resistor, you should see that the bulb still lights, just not as bright.


Now remove that connection and connect it to the second leg of the second resistor. the bulb should light a little bit, but it won't be very bright at all.

Extra Activities
If you don't have a multimeter then you should just skip over this bit to the results section.
Now take the light bulb out completely, switch your multimeter onto measure volts in the 20volts range, (or as close to 9volts without being under 9volts depending on your meter).

Touch the (usually black) Comm probe to the negative terminal on the battery and the other (usually Red) lead onto the positive terminal of the battery.

The display should read 9Volts,

Now touch the red lead onto the second leg of the first resistor, it should now read 6Volts.

And if you touch the second leg of the second resistor it should now read 3Volts.


Results
What you have created is a potential divider.
In an earlier lesson we talked about electricity as being a potential energy, (though not in the strict physics sense) this little collection of resistors is dividing up that potential so it reduced as you go down the ladder.

We talked about how power and voltage were linked earlier, the reason that the bulb shines less brightly when a lower voltage is applied to it is because there is less power going to the bulb to make it shine.

There is an equation to work out what the voltage at the given points of a potential divider will be.

That equation is

Vout = (Z2/(Z1+Z2)) x Vin

This formula is using Z in place of R, it may be a little confusing at first, but go with it!

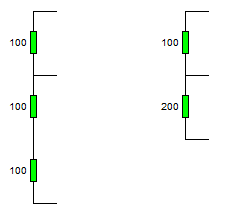
I've made it a little more complicated using three resistors in the example, but that's ok, we learned earlier about how to deal with resistors in series, you just add them together.

Lets look the voltage on the second leg of resistor 1

We know that the input voltage Vin is 9v
The resistor R1 is 100Ohm, so Z1 = 100Ohm
but what's Z2, (yes if you look at the schematic R2 is 100Ohm, and R3 is also 100Ohm).

For this equation, since we're measuring at the second leg of R1, Z2 is the total resistance of R2 and R3 which are in series, (so we just add them together.)


So lets fill in that equation now.

Vout = (Z2/(Z1 + Z2)) x Vin

Vout = (200/(100 + 200)) x 9
Vout = (200/300) x 9
Vout = 0.666666666 x 9
Vout = 6

That's what we measured!

Now let's look at the voltage at the second leg of resistor 2,

This time Z1 is the top two resistors (R1 + R2) and it's 200Ohm
The voltage is still 9v
and Z2 is R3, which is 100Ohm

Vout = (Z2/(Z1 + Z2)) x Vin
Vout = (100/(200 + 100)) x9
Vout = (100/300)x9
Vout = 0.333333333 x9
Vout = 3v

Which again is what we measured! so everything is looking good.

Wednesday, July 06, 2011

Electronics Lessons: The resistor and Ohms law

I started to write a post on what is electricity, but soon realised that subject was far too broad, far to detailed, far to simple and far to complicated all at once...

Suffice to say, what electricity is doesn't matter so much as what you can do with it.

I'm going to create a series of blog posts as a kind of electronics 101, the idea being that anyone can start at the beginning, learn about components, and learn how to build up circuits.

Throughout these lessons I'll be making a series of good analogies, and bad analogies.

Resistors


Theory
In Physics things have potential energy when they are sat still, a weight sitting on top of a book shelf has potential energy, if you nudge the weight to the edge it'll fall off, that potential energy has been converted into kinetic energy.

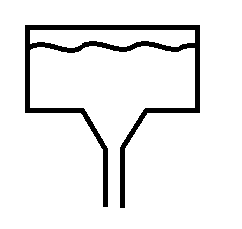
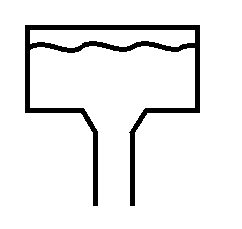
For the purpose of a resistor, think of electricity as like a tank of water, sat on top of a hill, the electricity, like anything is itching to get to the ground, and will take the path of least resistance.

A resistor adds resistance to the flow of electricity.


Look at the two pictures, the first shows a tank of water with a small opening, when you think about it you'll see that in this case the water will run down slowly, the narrow channel adds resistance and stops the water just gushing out.

The second picture has a bigger opening, in this case the water just gushes out, you can't stop it because the channel is too wide, the water gushes out with such force that you couldn't just put your hand over it.

There are calculations that you could do, knowing the size of the header tank and the size of the outlet to know with what force the water is pouring through the hole.

In electricity, the size of the header tank is measured in Volts, the size of the pipe or opening is measured in Ohms, and the force that the water pushes is not measured in PSI but is measured in Amps.

Resistance, Voltage and Current
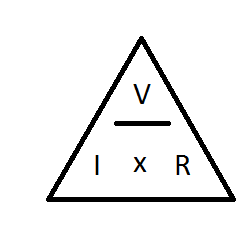
The equation is simple.

The voltage, divided by the resistance is equal to the current.
V/R = I
so say you have a 9v battery, and a 100Ohm Resistor.
9/10 - 0.09A (or 90mA)

Next you might be thinking about about how much power that actually is. (if your resistor can't handle the power it's get hot and fail, sometimes quite spectacularly.)

Voltage, Current and Power
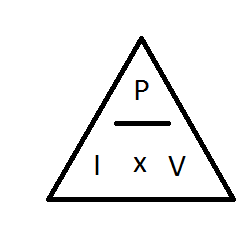
Another electronics law tells us that Power = Voltage multiplied by Current
In the example above the voltage was 9V, and the current dissipated was 0.09A

9 x 0.09 = 0.81W

Now less than 1 Watt doesn't sound like a lot, but consider that resistors generally come in 1/8th Watt, 1/4 Watt, 1/2 Watt, you're going to need at least a 1Watt resistor, so it's going to be reasonably large.

Resistor values

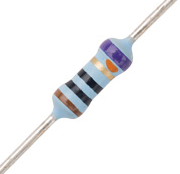
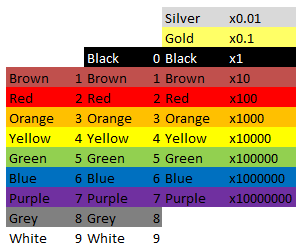
Resistor values are quite easy to remember, once you've been told what the values equate to.
black is zero and brown is one, after that the colours follow the colour spectrum, Red, Orange, Yellow, Green, Blue, Purple, then Grey and white are tagged onto the end. quite why it was done like this with black and brown first, and not just the spectrum colours first then extra ones I don't know...

Anyway,

Black = 0
Brown = 1
Red = 2
Orange = 3
Yellow = 4
Green = 5
Blue = 6
Purple = 7
Grey = 8
White = 9

The last band on the resistor is always Silver, Gold, Brown, Red, Green, Blue, Purple or Grey, these colours relate to the tolerances. (how far off of the stated values the component might be).
Silver = 10%
Gold = 5%
Brown = 1%
Red = 2%
Green = 0.5%
Blue = 0.25%
Purple = 0.1%
Grey = 0.05%

So, if you have a resistor that has colour codes

Red, Red, Brown, Silver
the values are
2 2 * 10 = 220Ohm, +/- 10% -i.e the value is somewhere in the region of 220 Ohm, 198 Ohm - 242 Ohm range (quite a range.)

You might notice that black is missing from the first column, and be thinking how do you write 1Ohm, this should be Black, Brown, Black right? (01 x 1)

Wrong, the correct way to write 1 ohm, is Brown, Black, Gold (10 x 0.1)

Symbols
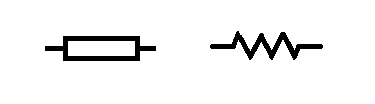
Resistors, like all components have a symbol user to indicate them on electronics schematics.
the symbol for a resistor looks like a box (the box does not have a line through it) however you may sometimes find the symbol written as a zig zagged line.

So that about wraps up the humble resistor. There is of course more to learn, there is indeed always more to learn. I'll cover some more advanced stuff with resistors, and the different type of resistors later.

Calculations
As with everything electronics related, sooner or later you run into something maths related.

Even with the simplest of components, maths somehow finds it's way in.
Not to worry though, the calculations concerning resistors are really simple.

Resistors in series
This is as easy as one add one.

When resistors are in series (one linked to the other like a train) you just add all the values together.

R1 + R2 + R3 + ... + Rn = Rtotal

In the circuit above there are 4 x 8Ohm resistors.

8 + 8 + 8 + 8 = 32Ohms.

Resistors in parallel
When you connect resistors in parallel, things get a little more complicated, a mathematician would tell you that it's the sum of the reciprocal of the values of the resistors that makes the reciprocal of the total resistance.

And they would be right, but they'd also likely confuse the hell out of you.

In laymans terms, it's the sum of one over the value of all the components, that makes one over the final value, 1 over this value gives you the total resistance.
(1/R1) + (1/R2) + (1/R3) + ...+ (1/Rn) = 1/Rtotal

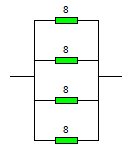
In this circuit the resistors are all arranged parallel to each other and connected differently from the original circuit.

The sum for creating this circuit is

(1/8) + (1/8) + (1/8) + (1/8) = (1/total)
1/8 = 0.125

So writing this out a bit more long hand we have...
0.125 + 0.125 + 0.125 + 0.125 =(1/total)

If you add all of those together you get 0.5
And 1/0.5 = 2

The total resistance of 4 x 8ohm resistors in parallel is 2 Ohms.


Series and parallel connections
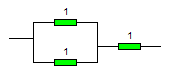
Sometimes you're going to want to connect things in a mixture of series and parallel.

You might do this because you want a 1.5ohm resistor, they don't make these but you could connect 2 x 1ohm resistors in parallel

1/1 + 1/1 = 2
1/2 = 0.5

Then add a third 1 ohm resistor in afterwards in series and you get 1.5Ohm.

You might want to do this for a completely different reason than getting values that you can't get...

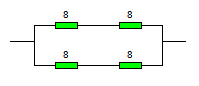
look at this example:

To start with break it down into two halves.
there's clearly a top half (2x 8ohm resistors) and a bottom half that's the same.

So work out the values of those first.

Top half = 8 + 8 = 16 Ohms.
The bottom half also is 16Ohms.

Now they are in parallel to each other
( 1/16) + ( 1/16) = 0.125
1/0.125 = 8

Now you may be wondering why anyone would be such a sadist as to use four components, have to go through that maths when they end up with the same value as just one of those components.

And the answer is power, as in power handling.
If you have a wire that can conduct a certain amount of power (voltage and current), and if you exceed that it'll heat up and melt, then you want to get a bigger gauge wire, you're adding more strands of wire, more paths to go down.

In the example above imagine that they were 10W resistors, but you needed to be able to handle 20W of load, buy arranging two side by side you've doubled that power handling capability to the 20W that you want.

but you've also halved the resistance, so then you add a couple more resistors in series to increase the resistance again.