A while ago I wrote an electronics lesson post on how to use pulse width modulation to move a servo device.
However, servo control is not the only use for PWM.
There are a series of other ways in which PWM can be useful.
the first of which is persistence of vision.
persistence of vision is basically referring to an effect that can most closely be stated as the refresh rate of our eyes.
We all know that TV is a series of pictures that just blink incredibly fast, but due to persistence of vision we never see the "off" part where the picture changes.
This effect leads to a pretty cool thing that you can do with very fast on off light devices such as LEDs.
if you turn an LED on, it is a bright source of light.
if you turn an LED off, it shows no light.
if you turn an LED on, then off, then on then off repeatedly (with equally measures of on and off) then the LED will appear around half as bright as when it's constantly on.
(I mean on and off really fast, measured in milliseconds!!)
if you turn the light on for 1 millisecond, then off for 3 milliseconds and repeat the light will seem 1/4 as bright as the fully on LED, on for 3 milliseconds and off for 1 millisecond and the light seems 3/4 as bright.
This means, (with some clever work from the device turning the power on and off) than you can produce some really nice effects, such as variable LED lighting, or pulsing LED's that smoothly transition from dim to bright.
Another use is playing audio, yes making sound.
and on/off square wave will sound just like a buzzer. but if you add a capacitor, (which can store energy) your mostly on pulses now start to charge the capacitor and bring the wave cycle up, and then when you transition to mostly off cycles the capacitor discharges and your wave form falls.
Creating a smooth audio wave from a digitally stored PWM signal.
an example of this can be seen in this project:
http://hackaday.com/2011/06/16/beginner-concepts-using-a-low-pass-filter-to-smooth-pwm-output/
Monday, November 28, 2011
Monday, November 21, 2011
Electronics lessons: revisiting the relay
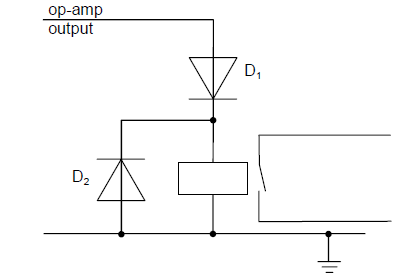
So a few weeks ago I introduced the relay, in my planning of what I'd like to appear next in this blog I realised that I forgot to include a mention of precautions that should be taken when dealing with electromagnetic relays.
As you know electromagnets can be used to generate electricity.
you have a coil of wire, you put a magnet inside of it, then you take the magnet away.
the collapsing magnetic field causes electricity to be generated.
When you have energised a relay you have created a magnet. when you turn a relay off you cut electricity going to the coil, the magnetic field collapses, and much like in a generator electricity is generated in the coil.
This spike of electricity occurs in the relay coil, and will travel throughout the circuit, if there are electrically sensitive parts, (transistors, or micro controllers) in the circuit these can be damaged by this electrical charge, which travels backwards through the circuit.
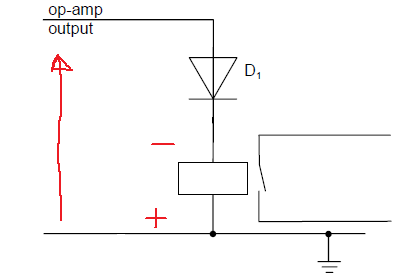
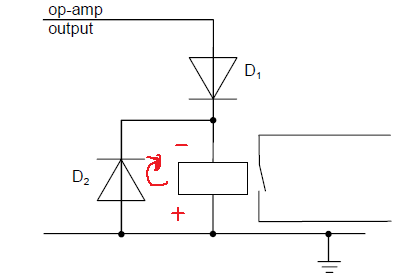
this "back EMF" backward electromotive force, can be limited by putting a diode in parallel with the relay like so:
During normal operation electricity flows from positive to negative.
the relay is energised
When the coil collapses the relay becomes a generator, but a generator that's connectted the wrong way around.
now a large voltage spike is introduced to the circuit, backwards, this voltage spike may be greater than a components maximum rating for reverse polarity connecttion:
the result is that the components may die.
putting a protection diode in means that rather than travelling backwards through the sensitive components, (where not inconsiderable work needs to be done to breakdown a component) the path the voltage spike takes is through the diode right back to the other side of the relay coil.
As you know electromagnets can be used to generate electricity.
you have a coil of wire, you put a magnet inside of it, then you take the magnet away.
the collapsing magnetic field causes electricity to be generated.
When you have energised a relay you have created a magnet. when you turn a relay off you cut electricity going to the coil, the magnetic field collapses, and much like in a generator electricity is generated in the coil.
This spike of electricity occurs in the relay coil, and will travel throughout the circuit, if there are electrically sensitive parts, (transistors, or micro controllers) in the circuit these can be damaged by this electrical charge, which travels backwards through the circuit.
this "back EMF" backward electromotive force, can be limited by putting a diode in parallel with the relay like so:
During normal operation electricity flows from positive to negative.
the relay is energised

now a large voltage spike is introduced to the circuit, backwards, this voltage spike may be greater than a components maximum rating for reverse polarity connecttion:
the result is that the components may die.
putting a protection diode in means that rather than travelling backwards through the sensitive components, (where not inconsiderable work needs to be done to breakdown a component) the path the voltage spike takes is through the diode right back to the other side of the relay coil.
Monday, November 14, 2011
Coding Lessons: C and Arrays (lesson 9)
Arrays are a pretty important part of the way in which information is stored. This is true of both programming on computers, and (as a hint of things to come) also when programming embedded micro controllers for projects that you may create.
You create arrays when you want to store many items of the same type of data, and you want them to be stored in adjoining memory locations to make locating or sorting them easy.
This could be (for example) a series of temperature measurements.
So we have the idea that an array is a series or collection of data, you can imagine it as a table row.
something like this
[1][2][3][4][5][6][7][8]
and we've covered that the data is of the same type, (all int, or all char, etc) so now lets have a look at how we define and element and how we use an element.
Remember we define a single value like this
int x;
that is I want this type of data (int) stored as this variable name (x)
defining an array is not much different.
int x[8];
I want to store integers (int) as this variable name (x) and I want this many pockets to put data in (8)
When you access an array it is treated like a normal piece of data.
for example.
If I had a program.
int x;
int y;
int z;
I have 3 bits of data.
I can say
x = 1;
y = 2;
z = 3;
and call them like this
printf("x = %d\r\n", x);
printf("y = %d\r\n", y);
printf("z = %d\r\n", z);
but if I use an array I can store all the data in adjoining memory.
now I say
int coordinates[3];
coordinates[0]=1;
coordinates[1]=2;
coordinates[2]=3;
and I can recall the data from it's storage location, in much the same way as using standard data;
printf("x = %d", coordinates[0]);
and so on.
Now this interesting thing for anyone paying attention there is that we're not starting counting from 1, Just as data pins on microchips start counting with pin0, pin1 etc in arrays we count our first data "pocket" as 0
Multi Dimensional Arrays
You may have noticed that a single table row is a little, well limiting, I gave an example of a coordinate above.
Imagine you're drawing a graph (x,y), what are you going to do? declare multiple arrays
int datapoint1[2];
int datapoint2[2];
...
int datapoint8[2];
or are you going to try to make an array that is:
int datapoints[16];
(where 0 = x1, 1 = y1, 2=x2, 3 = y2, 4 = x3... -far too confusing)
or instead would it make more sense to define your array in multiple dimensions. more like a table?
int datapoints[8][8];
Now you can store your x an y values in a way that makes sense to you.
The thing that you should note is that this is not an array that looks like a table 8 columns wide and 2 rows deep, this table is 8 wide, 8 deep, there are 256 data pockets.
storing 2d co-ordinates like this would be a bit of a waste of memory.
2 dimensional arrays are not the limit, you can create incredibly complex multi dimensional arrays.
int array[10][10][10]; = 1000 array pockets
int array[10][10][10][10]; = 10,000 array pockets
you see how it adds up fast.
On a modern computer with near limitless amounts of memory this is unlikely to be a problem, you can waste memory, like making an 8x8 256 pocket array for storing 16 values, to make 8 graph points on a line graph.
but on a lower spec'd device (like an embedded processor) you might want to be more careful with your memory use.
in this case your 2d array for a graph might be
int points[8][2];
and you'd have data
[x1][x2][x3][x4][x5][x6][x7][x8]
[y1][y2][y3][y4][y5][y6][y7][y8]
Monday, November 07, 2011
The Workbench/shop stock list
I've had enough of posting lessons for a little while so I'm going to post a little commentary.
back to a subject visited earlier in the year, the what tools should you buy list.
So far I looked at some very basic Electronics tools:
http://ah-screwit.blogspot.co.uk/2011/07/workbenchshop-stock-lists-electronics.html
As that post says, this was prompted by an article on Hack a day that was asking for comments on what are essential workshop stocks.
There was a £60 spend on the very basic electronics workbench and roughly £130 spent on woodworking tools (well you really should make nice cases for your projects!)
So of the original £600 budget I still have around £400 to spend.
During the course of introducing components I've suggested making a logic level indicator
http://ah-screwit.blogspot.com/2011/07/logic-level-indicator.html
This will save you a whole load of time making the circuit over and over and money, it's much cheaper to make this than to buy it.
So far on the list of stuff that you really should have in your workshop/workbench we have:
multimeter
soldering iron
Iron stand
breadboard/choipping board/work surface protector
solder sucker/braid
breadboard
Clamps
Saw
Tape measure
Square
Marking Tools
Hammer
Punch
Chisel
Drill
Drill bits
Screw drivers
Safety Gloves
So lets start adding to that list.
By now you must have figured out that there are a few tools that are rather specialised, (solder suckers can only be used for sucking up molten solder) whilst other tools seems to be able to complete a variety of tasks with no ill effect. -as well as being able to solder a soldering iron is also a really good tool for burning wood, (that's if you're into creating wood burning drawings.
I've realised that there is a pretty essential item missing from the list.
Pliers
A decent set of pliers will include both needle nose and bull nose pliers.
If you're doing Electronics then you'll want a small variety, you'll also want a set of side cutters.
If you do bead craft then you'll mainly be interested in needle nose pliers, and side cutters.
Large work (and metal work) will likely require larger pliers.
A lot of needle nose pliers and have wire cutters built into them, and can also be used for holding nails as you begin to hammer them (saving your fingers!) three uses in a single tool. you should definitely get that!
A set of small pliers
http://www.maplin.co.uk/5-piece-miniature-plier-set-31557
this 5 piece set has bul nose, needle nose, end cutters, side cutter and curved needle nose.
£12.99 can't go wrong.
I think that takes care of all the change from the first £200 and gives you a pretty full tool box capable of working with both wood and electronics.
But lets look at expanding that...
As much as when you're starting out you clearly won't just spend £200 right off the bat on new stuff for a hobby. that list is very far from an exhaustive list of the kind of stuff you;re going to want to have around when you start to get seriously involved in the (very rewarding) world of DIY stuff, or hobby making and fixing.
now we'll start looking at some more specialist tools, these are the kind of non-essential stuffs, but also the high price items, this is where the money starts to disappear fast! so this is also where you may start to specialise. (As you may have gathered from the wide variety of lessons and projects in this blog I'm rubbish at specialising, for the tools I have, to buy new would be thousands, even buying some second hand at car boot sales etc I've probably spent thousands!
Wood Working
If you are into wood working, this is the time you need to start considering some real power tools.
if you cut a lot of boards then you will probably want to invest in a Circular saw (£50), a set of long straight edges to use as a fence when using the circular saw (this could just be a long length of wood) you'll probably want to finish the edges and corners of wooden box projects with rounded or moulded edges, or inlay router detail, so you'll want a router and a set of bits (£50) if you ever want to cut out objects that are not straight you'll want to consider getting a scroll saw/jigsaw (£50) finishing project sanding large table tops by hand isn't great, you want a power sander, maybe even more than one, a belt sander for really ripping into a course surface (£50) and a sheet sander for more detailed work (£50) if you ever plan on doing DIY that involves say hanging a door or making rough timber smooth then you'll likely want a power plane (£50)
now you have £100 of that £600 budget left. if you;re doing big wood working projects, you'll likely need to bolt something together one day, so you'll want a ratchet set (£30) and you're going to need somewhere to work, a couple of folding "workmate" benches, which are about £30 each.
that's £600 gone. (£200 in previous blogs and £400 on those last tools)
now you can comfortably make small electronics projects and do some very nice woodworking projects. even with £600 spent there is still no table saws pillar drills, the planner is hand held, not a table. the more "into" making things you get, and the more your skill develops, the more tools you will inevitably buy.
Electronics
Lets assume thatyou want to specialise in electronics. and want to cover a mix of analogue and digital projects.
First tool you're going to want is an oscilloscope, these can be had from eBay for as little as £20, for an old analogue scope. but can also go right up into hundreds or thousands for digital storage scopes. you can get scopes that attach to your PC. this isn't the place for talking about how to chose a scope. but right now we;ll budget about £100 for a scope. that will be a reasonable new scope, or a great second hand scope.
You'll also want a function generator for giving your circuits signals that you control. that again will cost you about £100.
You're also going to spend around £50 on good leads and probes to connect them all together.
You should consider getting a microcontroller development board. I mainly use PIC chips from Microchip a programmer for these costs around £20 for a generic one.
You may also chose AVR or similar programmers cost around the same, you could also just buy a single chip development board, the arduino costs about £20, but why buy just that board when you could get a programmer for the who AVR range from Atmel for a similar price?? my pickit2 programmer also programmes a variety of EEPROM chips.
you now have £130 change.
but you're now making some big circuits, one breadboard isn't cutting is, you need more.
you also want components, LEDs resistors, crystals resonators for the chips, capacitors, the chops that you are using. a set of draws to keep components sorted (£30). that £130 will disappear fast!
Metal Working
I haven't posted many metal working projects just yet, that's because they tend to be big, and bulky, taking lots of time and space. metal working is also a pretty specialised and expensive arena to be in.
that £400 change you have from the initial lessons.
welder £100 - £1000 (don't buy a sub £100 welder) and the only welder you'll get that is good for that money is a stick welder. (useless for sheet metal work) (I'll call this £200)
a big vice (£50)
a big blow torch (for brazing) (£50)
a set of hammers and dollies (£50)
a decent leather bag (£25)
brazing supplies (£25)
Fabric / Textiles
Textiles is an amazingly rewarding crafting experience. don't be suckered into thinking it's girl stuff and easy because it's just not!
You're going to want at a minimum some pinking shears, (they cut those non fraying jaggered edges)
needles, threads.
if you're doing big stuff a dewing machine is a must, (basic machine will set you back £100, avoid any one called mini or travel sold for around £30, they are rubbish.
however, most of the expense of your textiles crafting supplies is going to be materials cost. fabric is just not cheap!
Auto Mechanics
Gone are the days of having just a single set of cresent spanners and a flat head screw driver.
today if you want to work on a car you need some serious equipment.
the old stock tools are still needed.
Feeler guages for checking plug gaps and valve clearance (£10)
Spring Compressors (£50)
Circlip Pliers (£10)
Pressure gauge (£30)
Rachet and spanner set (£100) - yes seriously a hundred beer tokens. go to Halfords, get their 200 piece professional set, it's expensive, but it's got pretty much every socket you;ll ever need and is guaranteed for life, if you ever break a socket you go to a store with the broken socket, (that are all embossed Halfords professional) show them the socket and they replace it. you don't even need a receipt, all their professional stuff is guaranteed for life. tell them you lost the recipt but still want then to honour the promise, (clearly that's a UK only thing) if you're not in the UK then consider your nearest large tool supplier who are happy to put crazy guarentees on quality
A set of torque wrenches, (small medium and large) (£100)
a drain pan, (for catching oil) (£10)
a good trolley jack (£50 - £100)
Ramps (£50)
axle stands (£30) - seriously get Axle stands, I was working on my car the other day I heard a creak, I rolled out from under it to check out the noise, five seconds later the car fell of the scissor jack, the brake disc/rotor that was ten seconds before right above my chest was now on the floor.
well that's actually £500 spent, (though you may find what's called a lifting kit including ramps and jacks together for a good price, but I've still not included any diagnostic gear fault code readers. (the code reader I have for my car is a specialist Peugeot one that I need to have a dedicated laptop for as well!)
It's when you get seriously into the hobby that the serious money starts to be spent!
Subscribe to:
Posts (Atom)